Taylor Swift Bad Blood Makeup (Inspired)

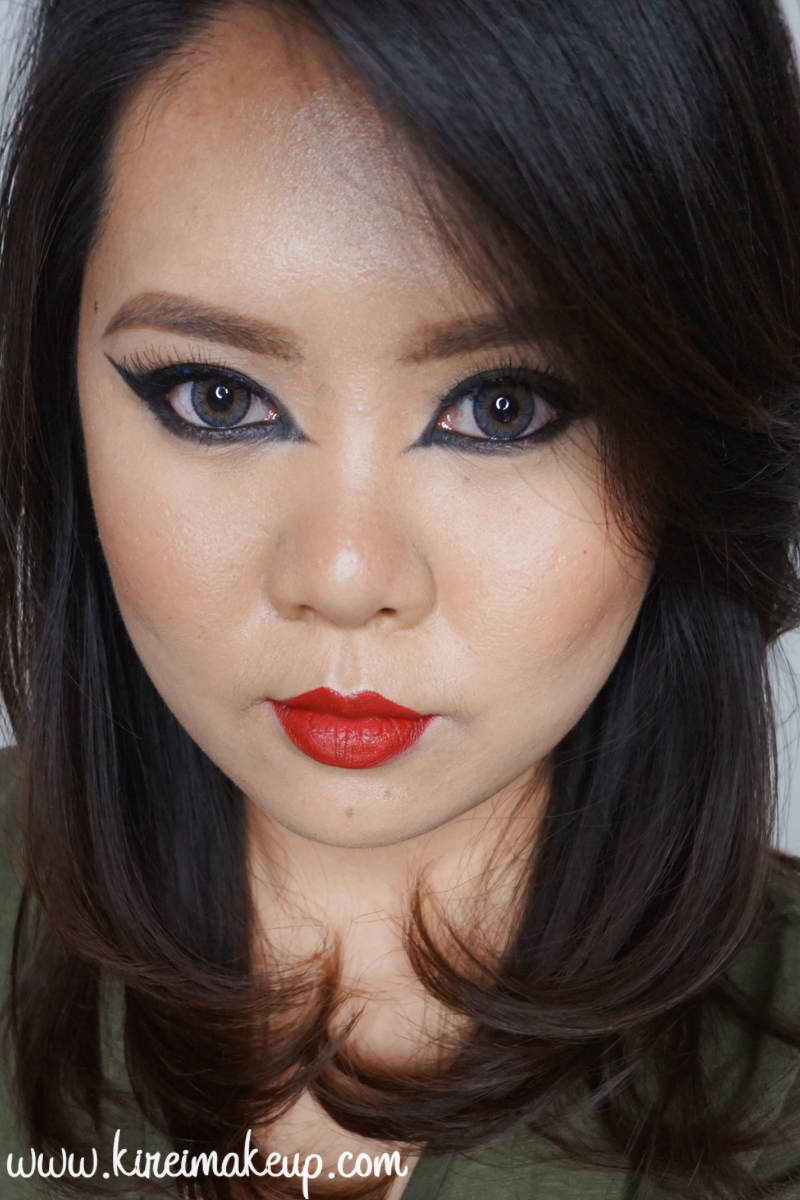
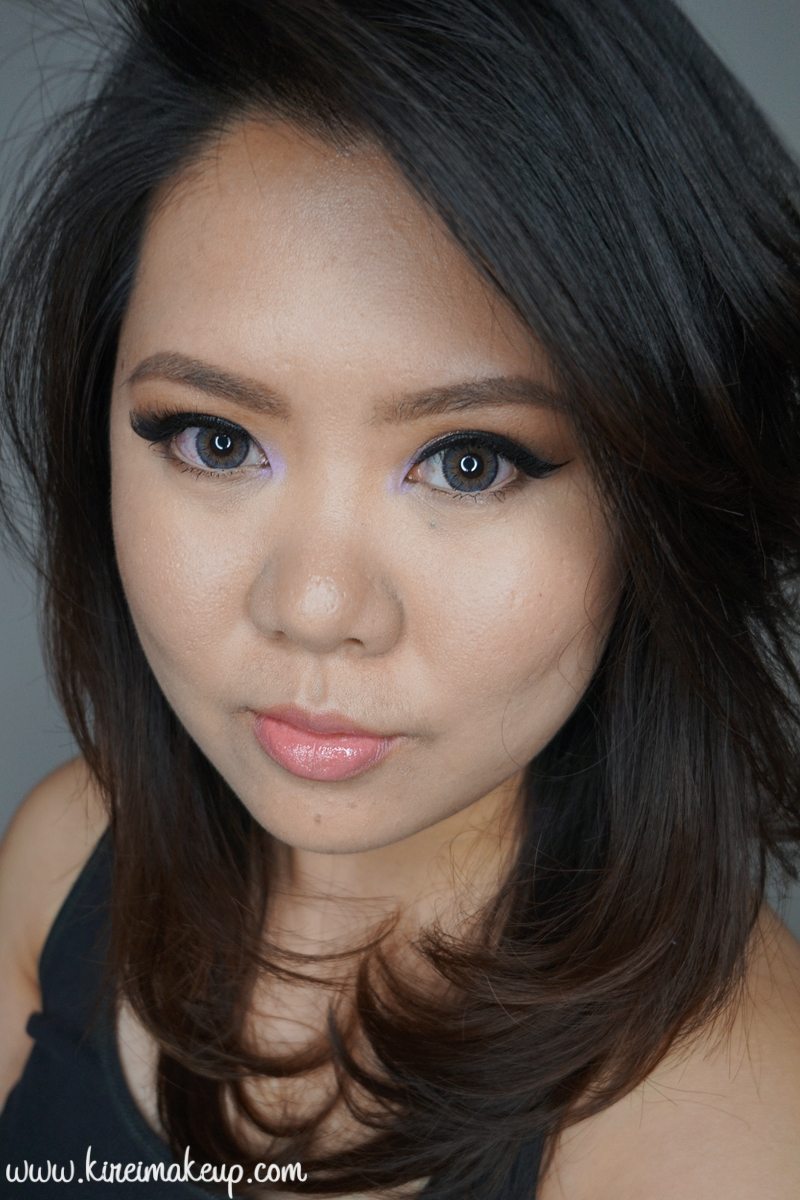
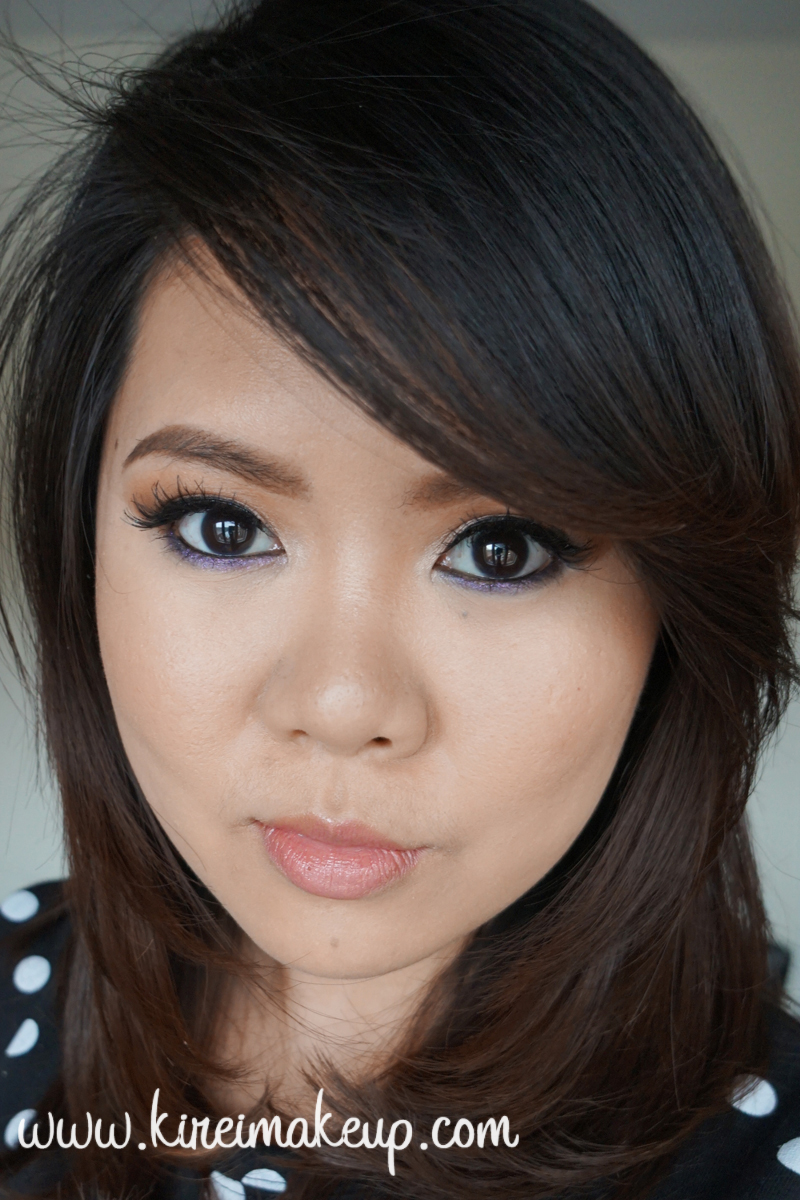
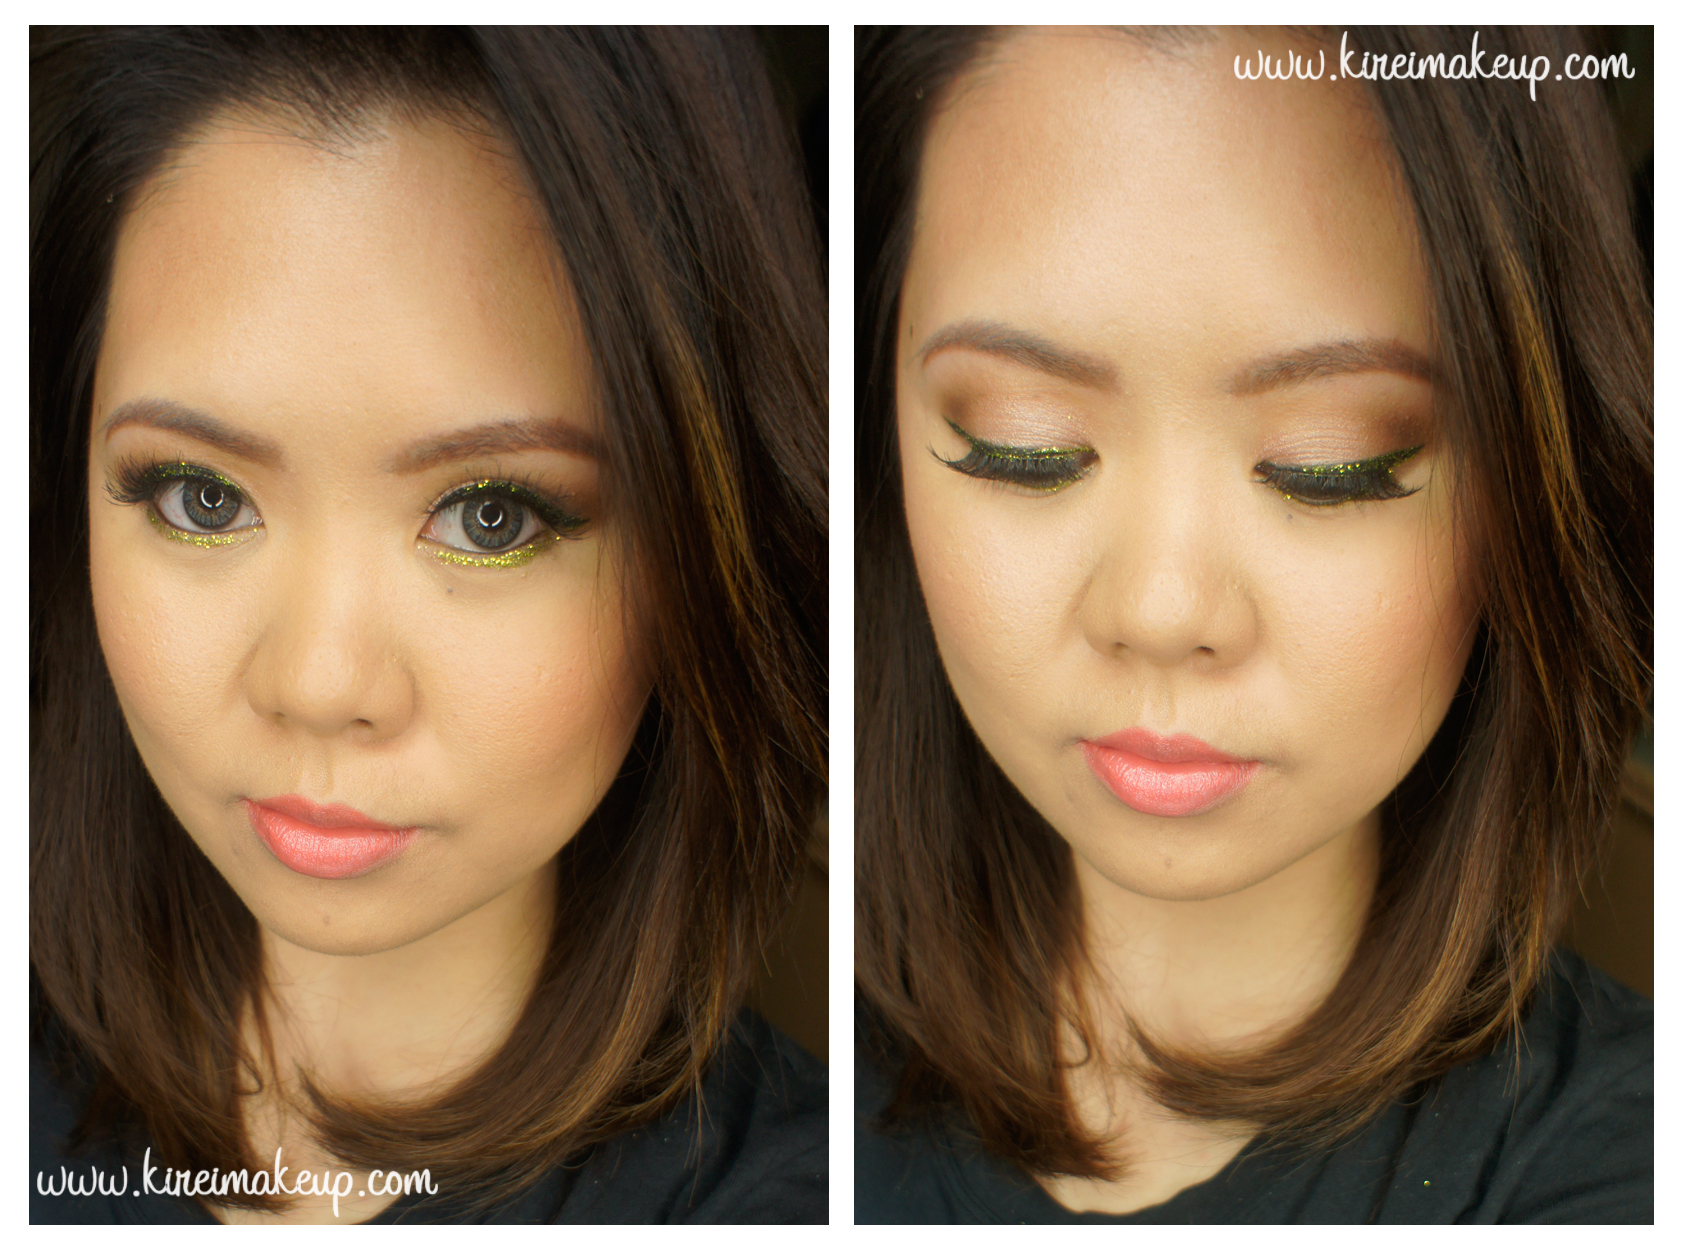
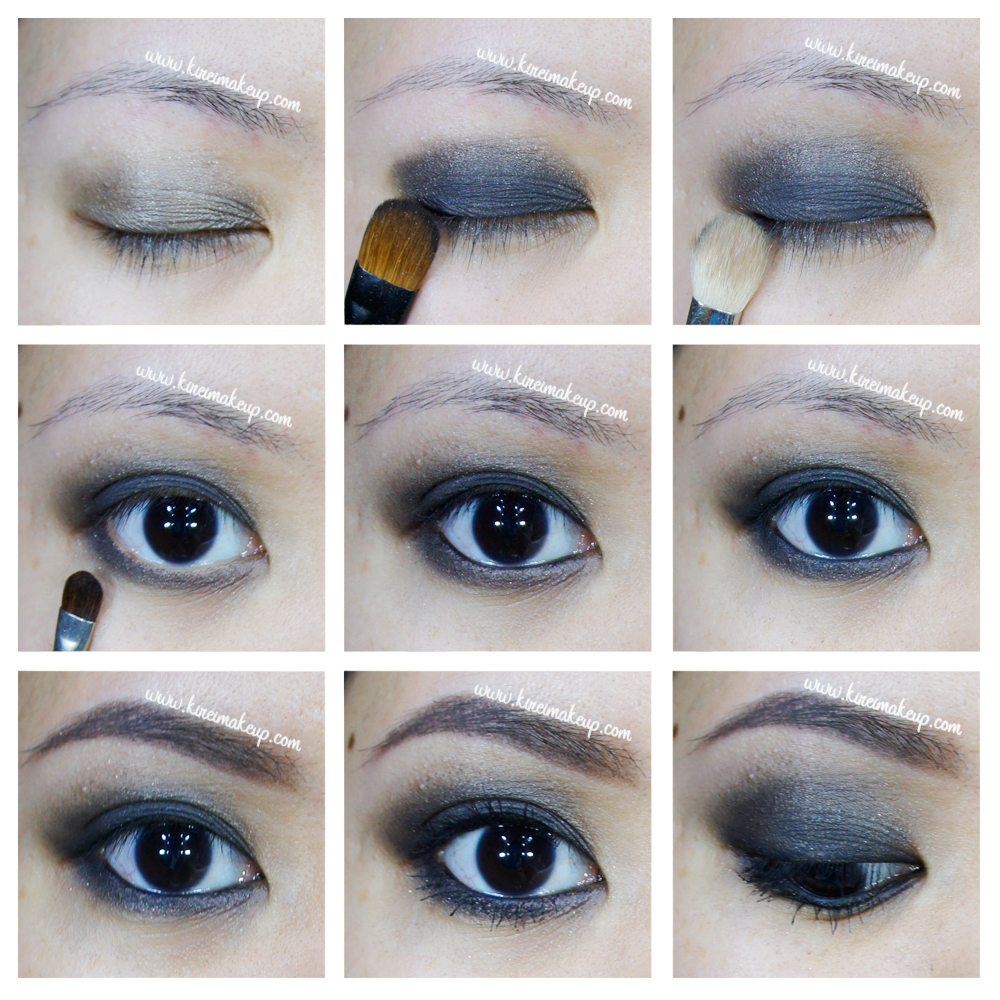
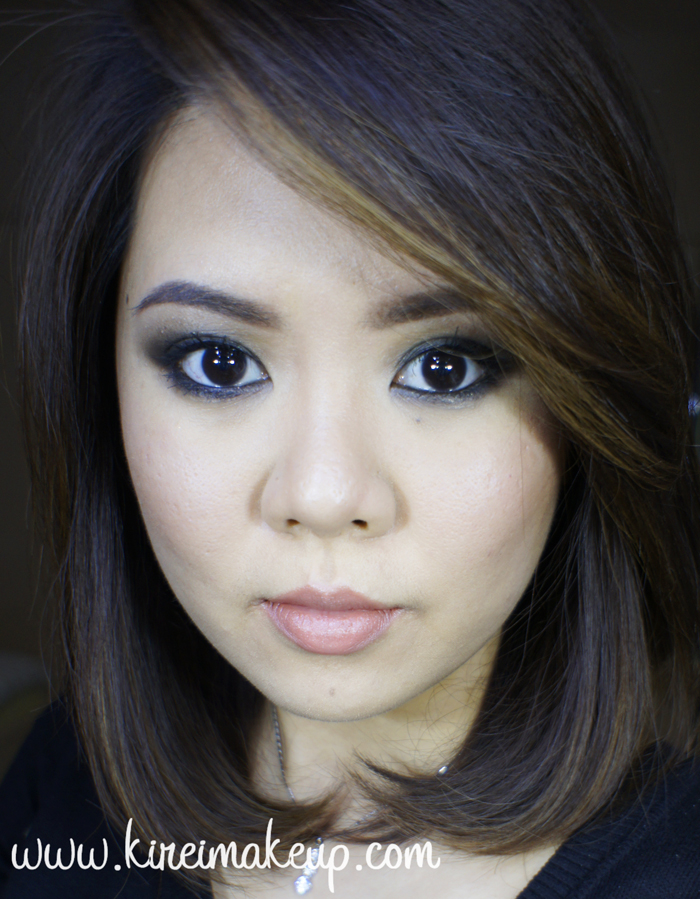
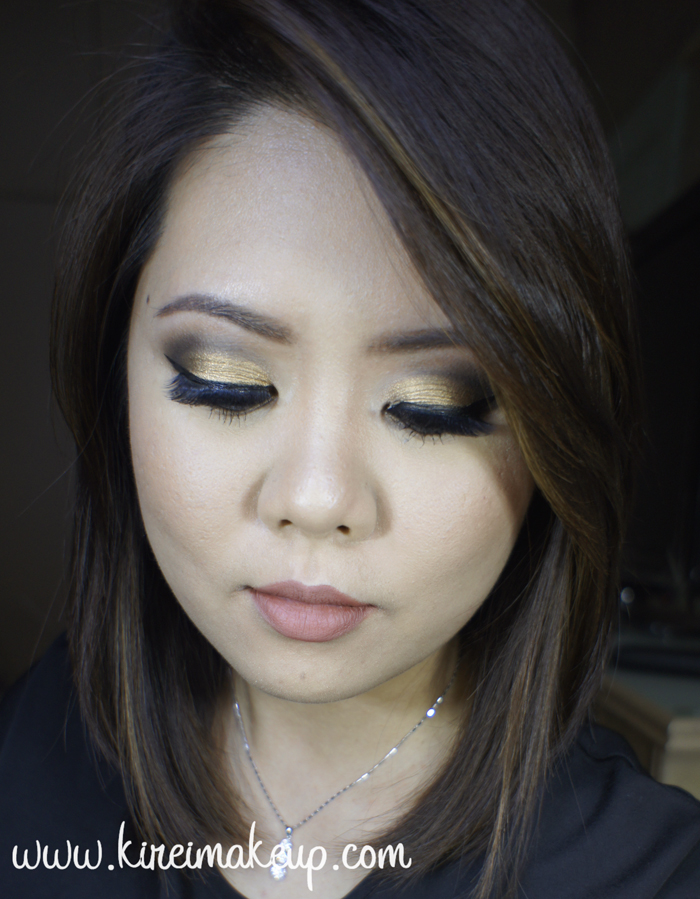
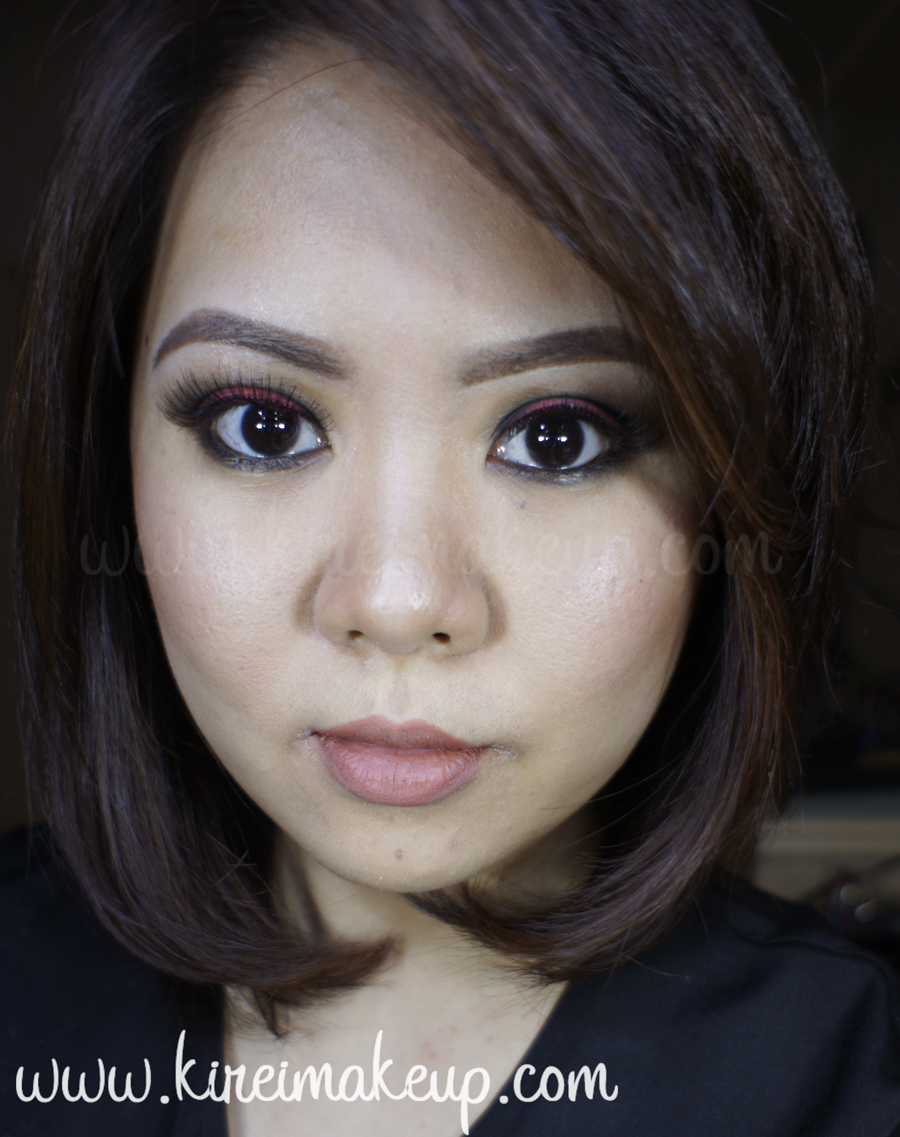
Today’s tutorial is Taylor Swift Bad Blood makeup from her music video. Her costars and herself have such great makeup on the videos, it was hard to pick. However, I decided to choose this look where she has a smoky cat eye with red lipstick. I think she looks drop dead gorgeous!

At first, I wasn’t planning to do this look, but oh well why not, right?! For the lips, I chose MAC Viva Glam I lipstick, since I thought it looked dark enough. However, when editing the pictures, I just realized the lips looked pretty bright. I can assure you it’s not that bright in real life. Nevertheless, if you prefer a darker lips, MAC Diva lipstick would do just great. I should have used MAC Diva, but it’s in one of the unpacked boxes. Ah, the joy of moving right? Anyways, hopefully I’ll be able to unpack everything by next week!

taylor swift bad blood makeup

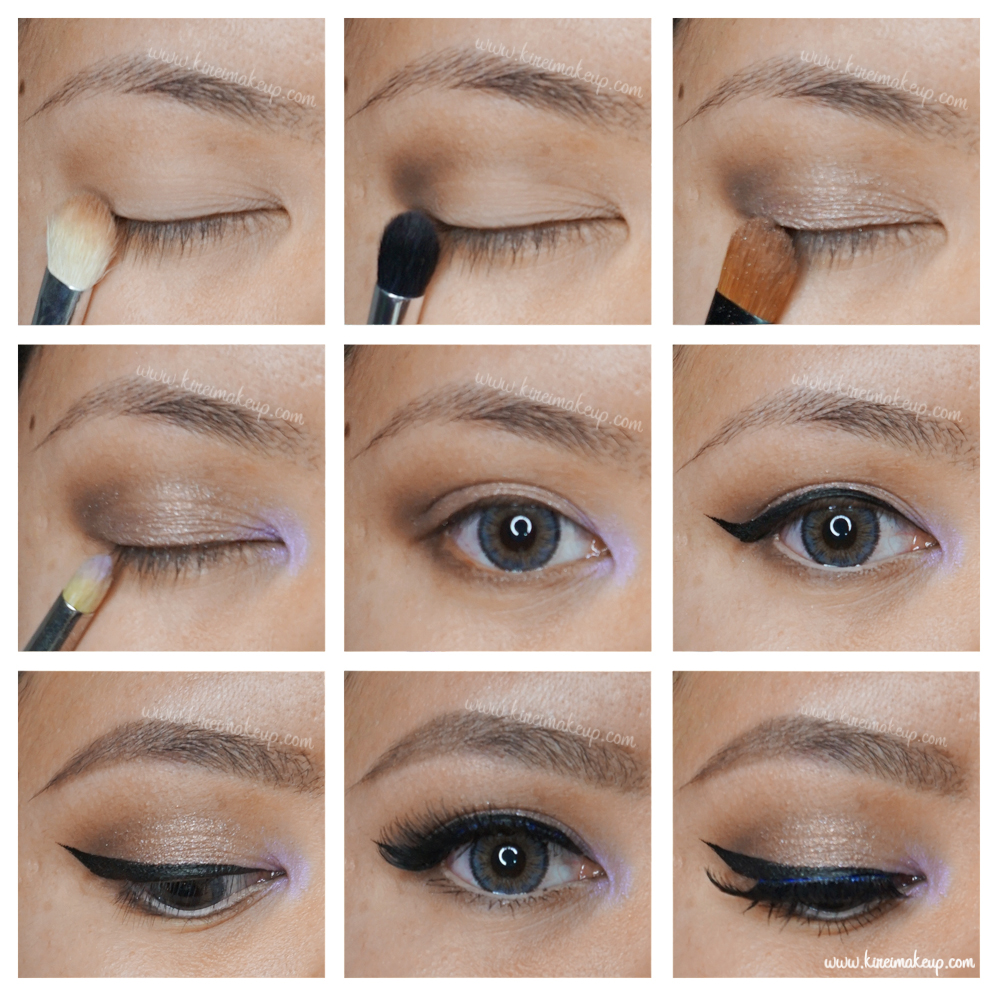
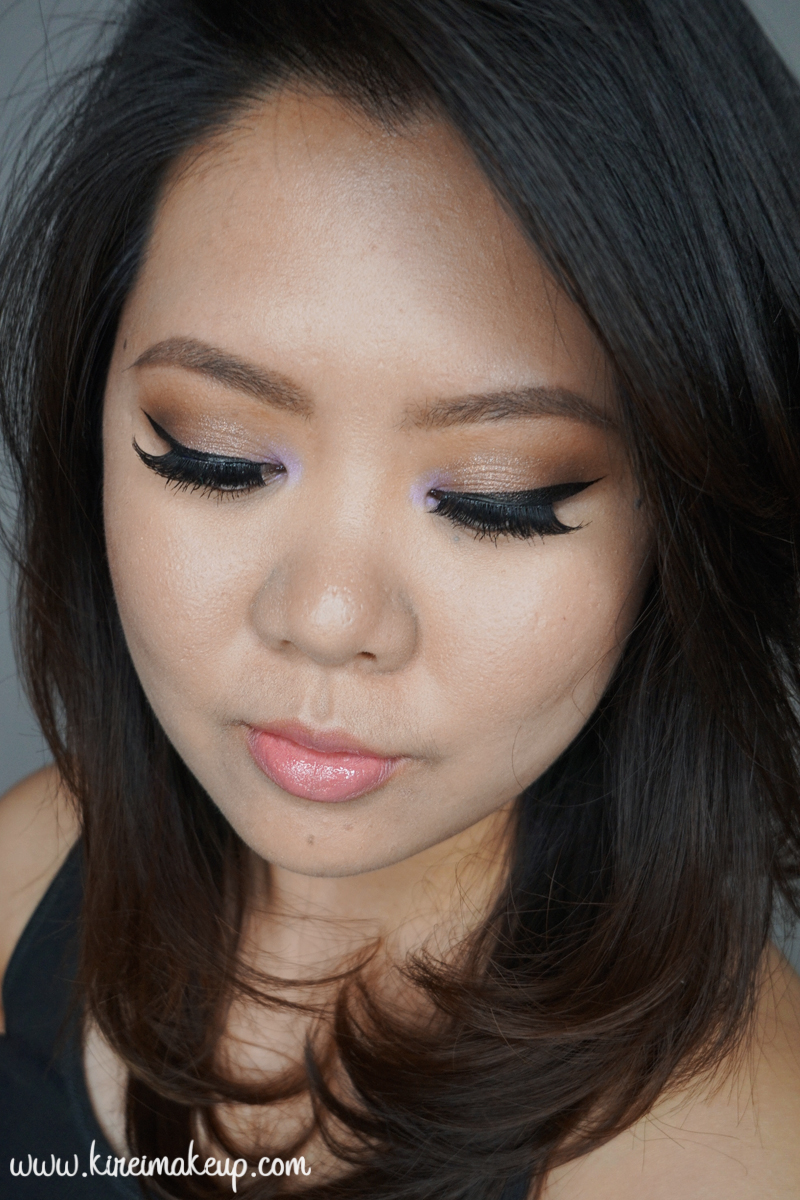
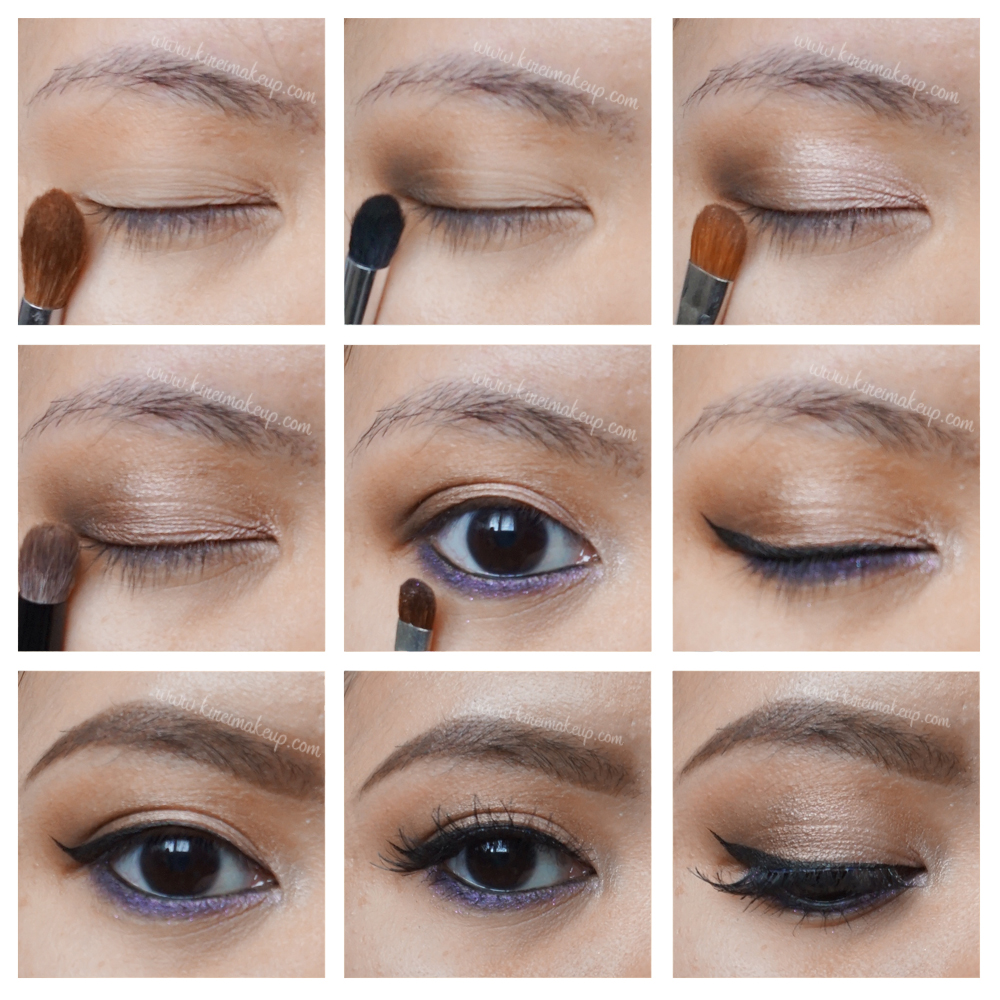
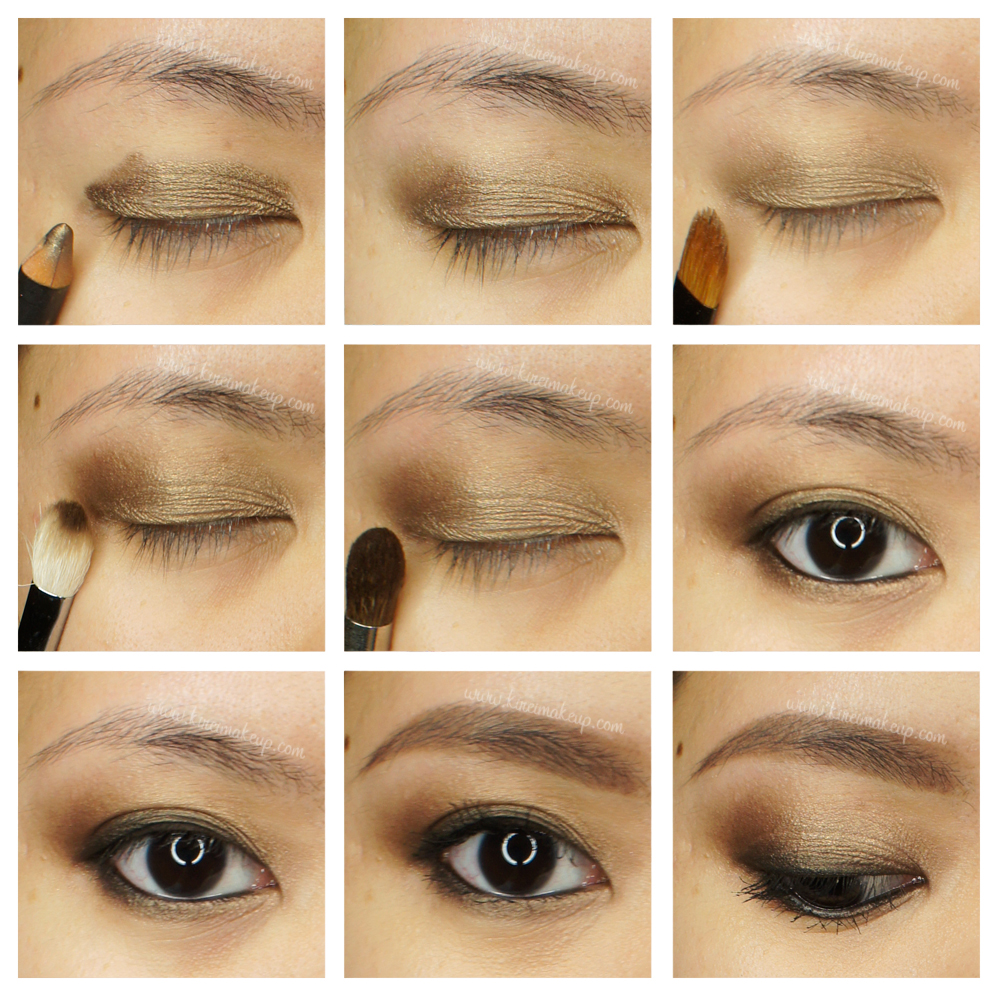
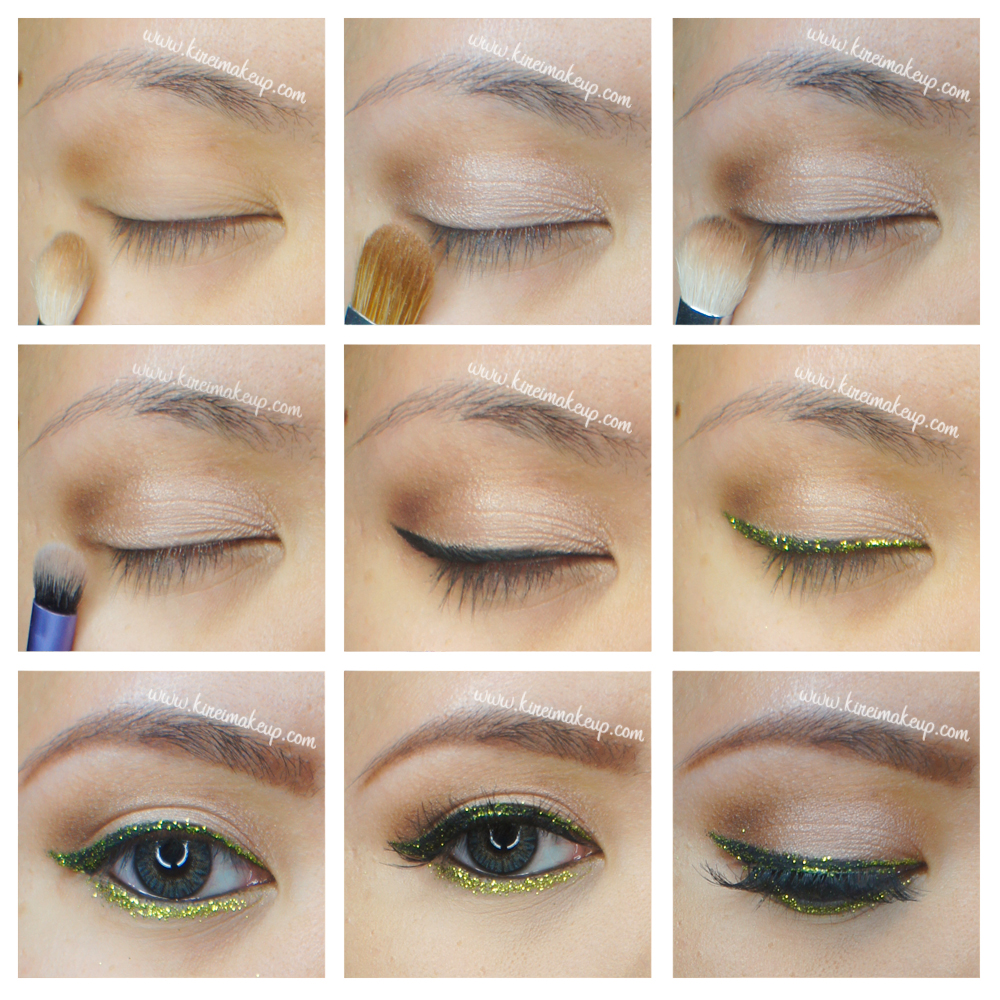
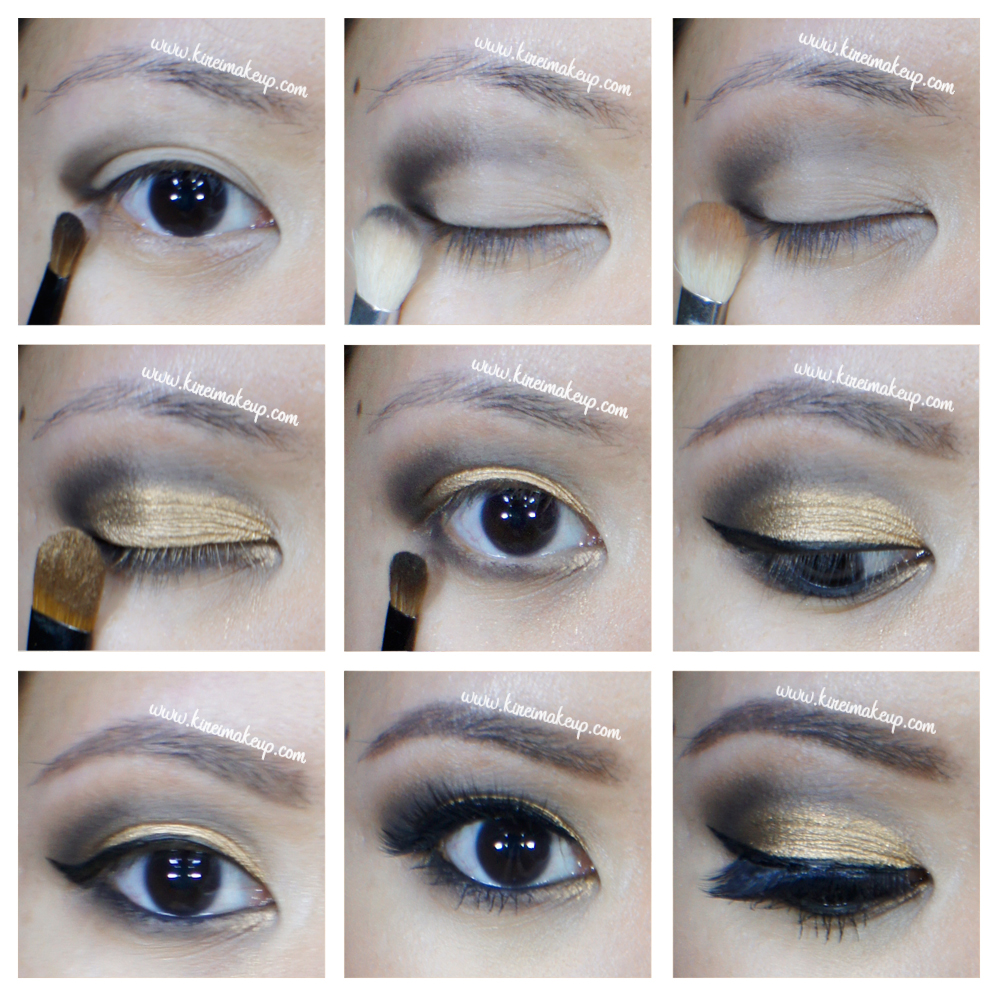
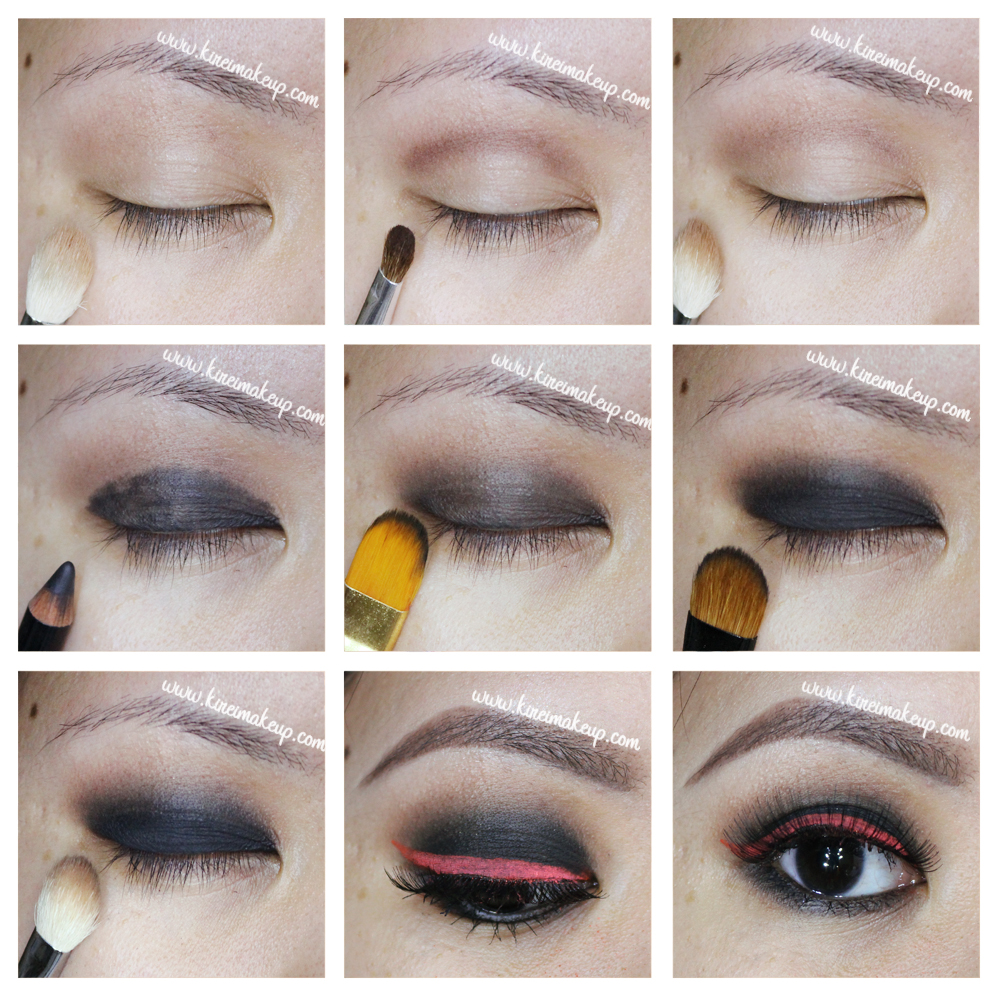
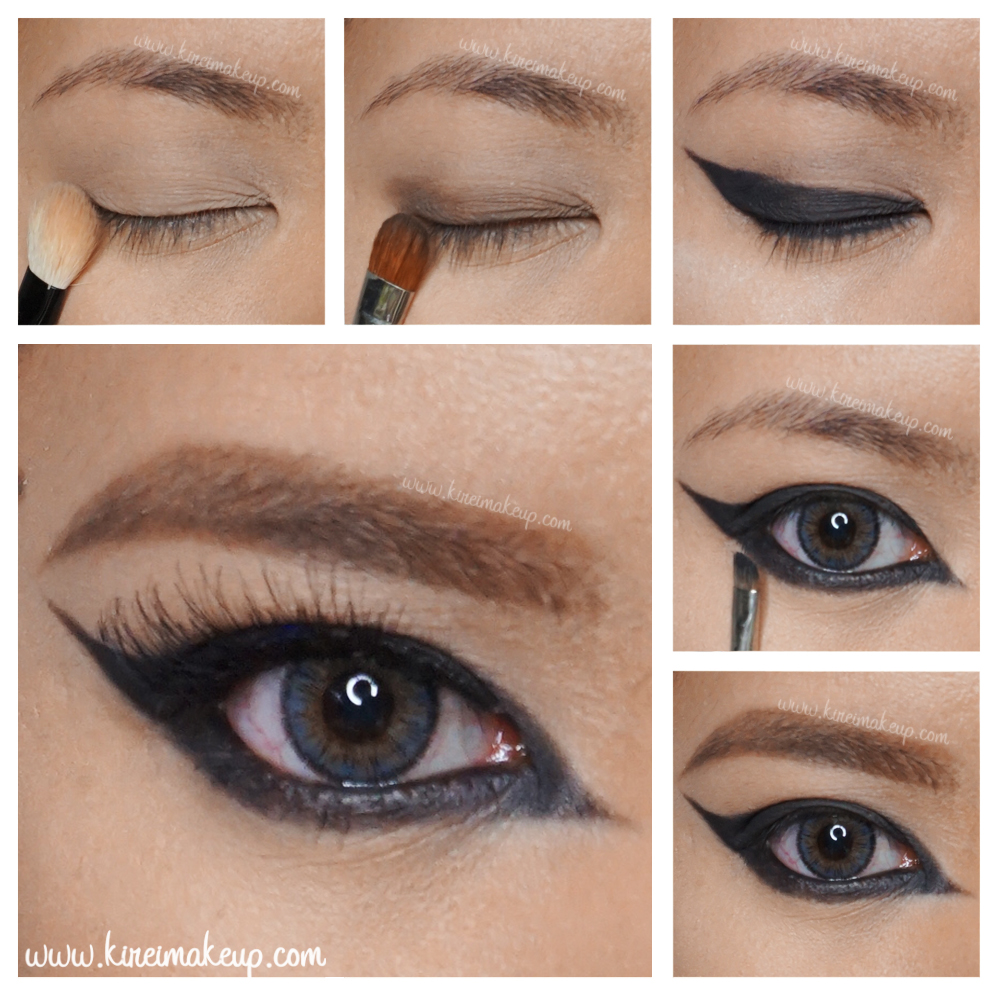
For this look, most of the products on the eyes are from Kat Von D Shade + Light Eye palette, but you can use any matte eyeshadow. You can skip the second step – putting a dark grey eyeshadow on the lash line. I did that part because I thought I was going to do a classic smoky eye, but then decided to do the cat eye after.

For the cat eye part, since I have hooded eyelid on my right eye (left in picture), I’ve to extend the inner corner area a bit more. The cat eye is shaped using a black matte eyeshadow and an angled eyeliner brush.

taylor swift bad blood makeup

Products used

Eyes

  • Primer – Urban Decay Primer Potion “Original”
  • Base – Kat Von D Shade + Light Eye Contour “Laetus”
  • Eyelid – Kat Von D Shade + Light Eye Contour “Lazarus”
  • Upper lash line – Kat Von D Shade + Light Eye Contour “Saleos”
  • Cat eyeliner/Lower Lashline – Kat Von D Shade + Light Eye Contour “Shax”
  • Waterline – L’oreal Voluminous Smoldering eyeliner
  • Mascara – Cover Girl Lash Blast “Very Black
  • Brows – Anastasia Beverly Hills Brow Wiz “Medium Brown”; L’oreal Stylist Brow Plumper
  • Falsies – Gwiyomi Boutique no. 3

Face

  • Primer – Kat Von D Lock-it Featherweight Primer
  • Foundation – Kat Von D Lock-it Tattoo Foundation
  • Concealer – NARS Radiant Creamy concealer “Custard”
  • Setting Powder – CoverFX setting powder

Cheeks

  • Contour – Kat Von D Shade + Light contour palette “Shadowplay” + “Subconscious”
  • Blush – Smashbox Halo powder blush “In Bloom”

Lips

taylor swift bad blood makeup

Neutral Eye with Pop of Color

One of my favorite way to change my makeup wardrobe is to create a neutral eye with pop of color. This is the easiest way to add colorful eyeshadow, if you are not comfortable wearing lots of colors on your eyes. There are several ways to add this pop of color – on the waterline, along the lower lash line, or as winged liner. This time, I decided to add a pop just on the inner corner of my eyes. It’s very subtle, and has a brightening effect. This is a great way for those with monolids or hooded eyes to add color to their eyes.

The eyeshadows that I used for this tutorial is from the MAC Amber times 9 palette (except for the purple). You can purchased the eyeshadow individually if you prefer. The eyeshadows on this palette is smaller than the individual ones, but I think it’s not that bad especially if you’re a beginner makeup artist who is trying to build their kit, or if you are someone who don’t wear much makeup daily but would like a versatile palette. I like this palette, it might be my go-to bridal palette, such pretty earthy tones with a good mix of matte, shimmer, frost, satin, velvet and lustre

spring makeup tutorial

Products list

Eyes

  • Primer – Urban Decay Primer Potion original
  • Base – MAC eyeshadow “Georgia Peach”
  • Transition – MAC eyeshadow “Cork”
  • Outer V/lower lash line – MAC eyeshadow “Aromatic”
  • Eyelid – MAC eyeshadow “Don’t Tell”
  • Inner corner – MAC eyeshadow “Beautiful Iris”
  • Winged liner – Kanebo Kate Super Sharp eyeliner
  • Waterline – MAC Chromagraphic eyeliner “NC15”
  • Eyebrows – Anastasia Beverly Hills Brow Wiz “Taupe”
  • Eyebrow gel – L’oreal Brow Stylist
  • Mascara – L’oreal Manga Rock mascara
  • Falsies – Gwiyomi lashes no. 3 + Gillian


mac amber times 9 makeup look

Face/Cheeks

  • Primer – La Roche Posay “Cicaplast Baume B5”
  • Foundation – Mac Pro Longwear foundation “NC25”
  • Concealer – MAC Pro Longwear concealer “NC25”
  • Setting Powder – CoverFX translucent powder
  • Contour – MAC contour powder “Sculpt”
  • Blush – MAC blush powder “Fleur Power”

Lips

  • Lipstain – Shu Uemura Lip Tint Gelatin “CR1”
  • Lip gloss – Make Up For Ever Artist Plexi-Gloss “202 (sweet pink)”

summer bronze smoky eyes


Too Faced Chocolate Bar Tutorial #3

Spring is almost here, and I wanted to do something lighter and with a bit more color. So, for today’s Too Faced Chocolate Bar tutorial, I created a neutral eye makeup with a bit of purple on the bottom lash. This is how I usually wear my makeup if I want a splash of color on my eyes.

I’ve done similar looks on my other tutorials – Kat Von D Monarch tutorial #2 and Cobalt Blue. For other ways to incorporate just a bit of colors into your eye makeup, please check out this other tutorials – Adding Color to eye makeup and a Hint of Mint.

For this look, I specifically wanted to only utilize Too Faced Chocolate Bar palette. I will try to create more looks with this palette, so you can see how versatile this palette is. You can check out my other tutorials using this palette as well – Holiday Makeup #2, Holiday Makeup #3, and 4 bridal makeup looks.

1

I do apologize for the unruly eyebrows. I’m trying to grow them out, but I’ll clean them up before my next tutorial, promise! Anyways, I’d like to mention that the pictures do no justice on how the eyeshadows are in real life. My room was bright when I took the first couple photos, but it get cloudy real fast yesterday. I had to deal with the Sun going in and out, so the last few pictures don’t really show how shiny and awesome the eyeshadows are.

Products used

Eyes

  • Primer – Urban Decay Primer Potion
  • Base – Too Faced Chocolate Bar “White Chocolate
  • Transition – Too Faced Chocolate Bar “Salted Caramel
  • Outer V – Too Faced Chocolate Bar “Triple Fudge
  • Eyelid – Too Faced Chocolate Bar “Marzipan
  • Middle lid – Too Faced Chocolate Bar “Hazelnut
  • Lower lash line – Too Faced Chocolate Bar “Candied Violet
  • Waterline – MAC kohl pencil liner “Smolder”
  • Eyeliner – Kat Von D Tattoo liner “Trooper”
  • EyebrowsAnastasia Beverly Hills Brow Pomade “Medium Brown”
  • False lashes – Gwiyomi false lashes #3

NARS weightless luminous foundation


Face

  • Primer – La Roche Posay Cicaplast Baume B5
  • Foundation – NARS Weightless Luminous Foundation “Punjab”
  • Concealer – MAC Pro Longwear Concealer “NC25”
  • Powder – MUFE HD Pro Finish “118”

Cheeks

  • Contour – MAC Sculpting powder “Sculpt”
  • Cheeks – MAC blush powder “Cubic”
  • Highlight – The Balm Mary-Lou Manizer

* For tutorials on how to do contouring please check out – subtle contouring; cream contouring.

Lips

  • Clinique Chubby Lip Stick “Boutiful Blush”

3


Tarnished Gold Smokey Eyes

I wanted to share with you guys my favorite way of wearing a warm smokey eyes, without having to use too many products. My Tarnished Gold Smokey eyes tutorial is warm, it’s earthy, and it doesn’t look too dark. You can add more intensity by adding black eyeshadow on the outer V, but this is how I wear my smoky eyes.

So, I’ve written a lengthy explanation regarding this tutorial, but something went wrong and everything I’ve done went down the drain. It’s missing and I can’t find it. To waste no time, I’m just going to list all the products used and I’m sure the pictorials are pretty self-explanatory. I apologize for any inconvenience and should you have any questions regarding this tutorial please feel free to leave comments below or on my social network account (preferably Instagram).

tarnished gold smoky eyes

Eyes

Face

  • Make Up For Ever HD Foundation 120 (base)
  • Bobbi Brown Peach corrector (under eyes corrector)
  • MAC Pro Longwear Concealer (under eyes concealer)
  • MAC Pro Conceal/Correct palette in Medium (blemish concealer)
  • NARS Setting powder (setting powder)

Cheeks

Lips

  • NARS Multiple Riviera

tarnished gold smokey eyes

Holiday Party Makeup #4 – Glitter Liner Tutorial

Almost NEW YEAR! I wish everyone a great year ahead! 2014 was fun, it was a bit rocky for me, but nevertheless a good year. 2014 has passed, and here to a great 2015! Hopefully in 2015 everything will go even better! I cannot wait to start 2015, and I have a feeling it’ll be an awesome year! Anyways, since the New Year is almost here, this is my last post of 2014 – a glitter liner tutorial. Last year, for NYE, I did a silver smoky makeup, this time I opted for more glitter!

I wanted to do a slightly more silver glitter, but couldn’t find any, so I decided to do this neon green glitter. Keep in mind that some glitters are not meant for the eye area! The one that I used for this tutorial actually is NOT for the eye area. I decided to use it because I know it won’t irritate my eyes. If you are not sure whether to use glitter or not, please consult the makeup artist/sales person who’s selling you the glitter. Also please be careful if you’re wearing contacts and using glitter on your eyes!

As I said in my previous post, I will not be posting the step-by-step instruction, instead you’ll get the usual photos and product list only. This is a scheduled post, so for any questions, go to my Instagram if you need a quick response.

For the glitter, I applied it onto my eyes using a wet angled eyeliner brush. However, if you can find a mixing medium (e.g. MAC), that’d probably be better since I found that when the water evaporated from the glitter, it became apparent that the glitter started to fall all over my lashes and then to my face.

Another tip when using glitter and it falls on your face, use a tape to pick it up – just press it lightly to your face and it’ll pick up all the fallen glitters. If you have no tape around, use a CLEAN SPOOLY (aka mascara wand) to get rid of the glitter – just brush it in places where the glitter has fallen, use the tip of the wand if it is a stubborn one.

glitter new year makeup tutorialPlease check out my how-to winged eyeliner tutorial if you need help. I also have another glitter eyeliner tutorial that’s slightly easier and simpler.

If you prefer a full on glitter makeup, please check out my Christmas inspired makeup, and last year’s gold glitter makeup tutorial.

Products used

Eyes – Urban Decay Primer Potion; Make-Up Store Smog eyeshadow (crease), Make-Up Store Desert eyeshadow (transition color); Too Faced Chocolate Bar Palette (outer v – Triple Fudge); MUFE Aqua Black; L’oreal Voluminous Smoldering eyeliner; Make-Up Store Northern Lights glitter; Gwiyomi False Eyelashes; Chanel brow pencil

Face – MAC Pro Long-Wear foundation and concealer; MUFE Pro Finish powder.

Cheeks – Chanel Universal Bronzer; Smashbox Halo Blush in In Bloom.

Lips – MUFE Aqua lip pencil #18C

glitter eyeliner makeup tutorial


Holiday Makeup 2014 #1

Hello everyone! I’m back with a new Holiday Makeup tutorial! Christmas is just around the corner, and I want to be able to squeeze in couple holiday makeup looks before it’s here. For this year’s first holiday makeup series, I wanted to create a very warm eye makeup with a bit of color. So, I decided to use my beloved Kat Von D Monarch palette and some loose gold pigment.

Since the eyes are so strong, the rest of the face is kept simple and on the down low. We want the attention to be on the bold eyes. No liners, you can if you want, but I wanted to keep the focus on the colors since it’s so gorgeous. The lashes are optional to, but I think the lashes help to make the eyes look bigger.

gold and orange makeup tutorial

*Check out my other tutorials using Kat Von D Monarch palette*

How-to:

1. I prepped my eyelids using Urban Decay Primer Potion. I dusted Tiny Death from Kat Von D Monarch palette all over my eyes, all the way up to the brow bone.

2. Using a flat eyeshadow brush, I applied Wrath from the Kat Von D monarch on the outer V, blending it inwards towards the inner corner.

3. Using another flat eyeshadow brush, I applied a L’oreal HIP High Intensity Pigment in Visionary on the inner half of the eyelid.

4. Using the same shader brush as step 2, I applied Wrath on the lower lash line.

5. I filled my brows using Anastasia Brow Wiz in Taupe and Brunette.

6. I applied Mata Nona falsies no. 015  on my upper lashes.

7. I lined my waterline, just the outer half, using MAC Smolder kohl eyeliner pencil.

kat von d monarch tutorial

8. On my face, I applied Etude House BB cream.

9. I applied MAC Pro Long-Wear concealer under my eyes and my on blemishes.

10. I set my face using Cover FX Translucent powder.

11. I applied NARS Orgasm blush on my cheeks.

12. Lightly, I dusted The Balm Mary Lou Manizer on my cheekbones, nose and cupid’s bow.

14. I also dusted a little bit of MAC Mineralized Skinfinish in Deep on the outside perimeter of my face to warm my face up slightly.

13. I applied Revlon Socialite lipstick on my lips.

holiday makeup

The Balm Mary-Lou Manizer Review

My brand new obsession! Today’s The Balm Mary-Lou Manizer review would make you want to go grab this highlighter at your nearest store! This highlighter/luminizer is staying permanently on my kit. I’m not a big fan of powder highlighter since I have huge pores, and I find powder highlighters sit on my pores and make them appear even larger. However, this gorgeous product just give the nicest sheen on the skin, it doesn’t look powdery, and the way it reflects light in real life is ah-maeeee-ZING!

the balm indonesia

What is Mary-Lou Manizer?

Meet Mary-Lou Manizer, a seemingly innocent honey hued luminiser that catches everybody’s eye. This highlighter, shadow and shimmer diffuses light so your skin looks softer and younger while adding a subtle glow.

I’ve worn this highlighter in my Smokey eyeliner tutorial, Grunge Smokey tutorial, as well as Fall Makeup tutorial.

mary-lou manizer review

Packaging

Lovely compact, with a mirror inside. The compact doesn’t feel like plastic, feels more like it’s made from some sort of metal. Packaging feels very sturdy, doesn’t feel cheap.

Finish

The swatch picture on my hand is applied a bit heavy handed, so it can be captured on camera. However, apply it lightly on your cheekbones with a small fluffy brush and it applies very nicely to a soft glowy finish.

Shade

This highlighter is more on a champagne color, I think it suits light to medium skintone, medium dark might be pushing it a little but still possible. Might look frosty on darker skin tone. If you are a MAC NC10 or paler, this highlighter might work better as an eyeshadow, might be too dark for your skin tone.

Price

USD$ 24, CAD$ 26, IDR 375k for 8.5 gr.

Where to buy

I bought mine in Bandung couple months a go at Metro Department store at Trans Mall Bandung. In Jakarta, you can grab them at The Balm counter in Seibu Department Store Grand Indonesia (from what I know).

In Canada, you can find them at Rexall pharmacy (some locations I think), and online you can grab them at Nail Polish Canada.

mary-lou manizer review

Pros

  • Works for light to medium skintone
  • Gives a subtle sheen
  • Multi-purpose – highlighter, eyeshadow, shimmer
  • Beautiful sturdy packaging
  • Fine light-reflecting particles, does not make pores look bigger
  • Gives a nice overall glow to the face when apply lightly
  • Does not look too shiny on oily skin if applied properly (read: light handed)
  • Smooth and easily blendable

Cons

  • Dark skintone might find this highlighter to be too light/frosty
  • Super fair skin tone might find this to be slightly darker than their skin tone.


NARS Mekong Smoky Eyes (NARSissist palette)

Who doesn’t love a good smoky eyes? I sure do! I’m sure my friend, Finency, loves it too! She showed me this picture on Instagram, and it showed a smoky eyes using NARS Mekong eyeshadow. I love how simple, easy, and definitely I’ll wear this for a night out.

I skipped the whole false lashes so this look is more grungy, and more me. I don’t usually wear falsies, so this really stay true to how I’d wear my smoky eyes. I also filled my brows without shaping it using any concealer. Again, just want to stay true to how I usually do my makeup. As I said, it’s very simple and quick. No fuss, sexy, and sultry. I like my makeup to be as simple as possible. This is just how I prefer to do my makeup, but if you like more of a glam look you can take a look at my other tutorials under smoky eyes.

For this tutorial, I used NARS eyeshadows from the NARSississt palette. I’ve done tutorials, and review of this palette. Please feel free to check them out.

NARS Mekong tutorial

How-to:

1. I prepped my eyelids by applying a cream-base eyeshadow. I used Smashbox limitless 15-hour cream shadow in Stone.

2. Using a flat eyeshadow brush, I applied NARS Mekong eyeshadow all over my eyelid. The camera didn’t pick it up, but there’s lots of gorgeous golden flecks on my lids.

3. Using a fluffy blending brush, I applied NARS Madrague I on the crease to diffuse the color out.

4. I applied NARS Mekong on the lower lash line using a small shader brush.

5. I lined my waterline, tightline, and upper lash line using L’oreal Voluminous Smoldering eyeliner.

6. Using an angled eyebrow brush, I applied NARS Pandora II along the upper lash line. I kind of winged mine a little, but you don’t have to.

7. I filled my brows using Anastasia Brow Wiz in Medium Ash.

8. I curled my lashes and applied MUFE Aqua Smoky Lash mascara on both upper and bottom lashes.

NARS Mekong smoky eyes

9. On my face, I applied Smashbox Liquid Halo Foundation using CoverFX cream foundation brush.

10. I highlighted (under my eyes, bridge of my nose, cupid’s bow, chin, & forehead) my face using YSL Touche Eclat.

11. I set my face using Cover FX translucent powder.

12. I lightly contoured my face using Smashbox contour palette.

13. On my cheeks, I applied Chanel Blush de Horizon.

14. I filled my lips using MAC Spice lip liner, and Clinique Heaping Hazelnut Chubby Stick lip balm.


Products used

Eyes – Smashbox limitless 15-hour cream shadow in Stone; NARSissist eyeshadow palette (Lid: Mekong, crease: Madrague I, liner: Pandora II); Anastasia Brow Wiz in Medium Ash; MUFE Aqua Smoky Lash mascara

Face – Smashbox Liquid Halo foundation; YSL Touche Eclat; Cover FX Translucent Powder; Smashbox contour powder; Chanel Blush de Horizon

Lips – MAC Spice lip pencil; Clinique Heaping Hazelnut chubby stick

Smoky Eyes using MAC Rose Gold Pigment

At one point some time last year, I was crazy about anything Rose Gold. In fact, I am still obsessed with anything Rose Gold. Anyhow, I was browsing  around and saw this MAC Rose Gold pigment on their website. I bought it, and played with it. To be honest, when it first came, I was quite disappointed how it does not look anything rose-colored. I should’ve paid more attention to the description. On the MAC website it was described as “smooth, tarnished gold with a touch of rose”. Not sure where the “touch of rose” comes from, I think this pigment is a lot more “tarnished gold”.

Anyways, I actually love this pigment. It has amazing pigment pay-off, and it’s super smooth! I have used this pigment before on my New Year makeup post. I think the hardest part of using this pigment is actually finding a combination of color that will match it. I’m not that crazy on the result for this tutorial, I feel like the pigment should’ve been paired with a warmer shade. May be I’ll re-do this look in the future.

bronze smoky eyes

How-to:

1. I prepped my eyelids using Urban Decay Primer Potion.

2. Using a small fluffy blending brush, I applied Ultra Mattes V2 from Sleek Makeup iDivine Showstopper on my outer V. If you have a monolid, or droppy/hooded eyelids, apply this eyeshadow with your eyes open.

3. I blended out the crease using a clean fluffy blending brush. I added a little bit of the same black eyeshadow to create more depth.

4. I wanted to add a bit more warmth, so I ran a little bit of bronzer, from the Smashbox contour palette, just above the crease.

5. I applied MAC Rose Gold pigment on my eyelid using a flat eyeshadow brush.

6. Using the same brush as no. 2, I applied Ultra Mattes v2 on my lower lid. I applied a little bit of the pigment just on the inner corner of the lower lid.

7. I created a winged liner using Kanebo Super Sharp eyeliner. I also applied a little bit on my waterline.

8. I filled my brows using Anastasia Brow Wiz in Medium Ash. Then, I feathered in Brunette a bit more.

9. I curled my lashes, and applied Gwiyomi Boutique false eyelashes in Annabelle.

mac rose gold pigment

10. On my face, I applied MAC Pro Longwear foundation using MAC Masterclass Oval 6 brush.

11. I applied the concealer from MAC Pro conceal/correct palette under my eyes.

12. I set my face using Cover FX translucent powder.

13. I lightly contoured and highlight my face using Smashbox contour palette.

14. I applied MAC Cubic blush on my cheeks.

15. For my lips, I lined and filled it in using MAC Spice lip liner.

smoky eyes for asian

Smoky Eyes with a Neon Eyeliner

Hey ya’ll! I hope everyone is doing great this weekend! I posted this look on Instagram last night, and I almost forgot to upload it today. Anyways, as mentioned on my Instagram account, this smoky eyes with a neon eyeliner look is a recreation from @jenmiamakeup. She’s one of the many great makeup artists who I follow on Instagram. I love how she does hers with a neon yellow. I tried this one with the only neon pigment I owned – MAC Neo-orange loose pigment.

If you are going to recreate this look, I’d suggest using a mixing medium instead of water, like I did. I used water and for some reason the pigment didn’t want to mix smoothly. I ran out of my mixing medium so I have to go get one in the near future. The other issue that I kept having is the fact that my smoky eyes kept creasing. Ugh, I should have used a different eyeshadow base (and probably should have prime my eyelid first). So, I’d suggest for you to use an eyelid primer to avoid creasing.

Anyhow, let’s get the tutorial started!

smoky eyes for asian

How-to:

1. Using a light brown eyeshadow (mine was a sample, and it has no brand nor name), I applied this shade just above my crease using a clean blending brush. I used this shade as a transition color, the shade is just slightly darker than my own skin color.

2. Using a deep chocolate brown (again, this was a sample with no brand and no name), I applied this shade right on the crease using a small crease brush.

3. Using the same blending brush as step no. 1, I blended the chocolate shade.

4. I applied Revlon Photoready Kajal eyeliner in Carbon Cleopatra, I applied the black eyeliner all over my eyelid, and waterline.

5. I lightly blended the eyeliner using a synthetic art brush.

6. I applied Kat Von D Monarch palette Deadhead eyeshadow on top of the black base using a flat eyeshadow brush. I also applied this eyeshadow along the lower lash line using a small shader brush.

7. Using the same brush as step no. 1, I blended out the edge of Deadhead so there’s no harsh line.

8. I mixed water and MAC Neo-Orange loose pigment to create the neon winged eyeliner.

9. On my brows, I used Anastasia Brow Wiz in Medium Ash to fill them.

10. On my lashes, I applied Ardell 105 false lashes.

mac twig lipstick

11. On my face, I applied MARC JACOBS gel foundation using CoverFX foundation brush. I concealed using MUFE HD concealer, and set my face using CoverFX translucent powder.

12. I applied Benefit Moon Beam highlighter on the bridge of my nose, cupid’s bow, chin and cheekbones.

13. I lightly contoured my face (sides of the nose, under my cheeks, jawline, and temples) using NARS ITA kabuki brush and MAC Blunt powder.

14. I applied MAC Dainty on my cheeks.

15. For the lips, I applied MAC Spice lip pencil all over.