Golden Bronze

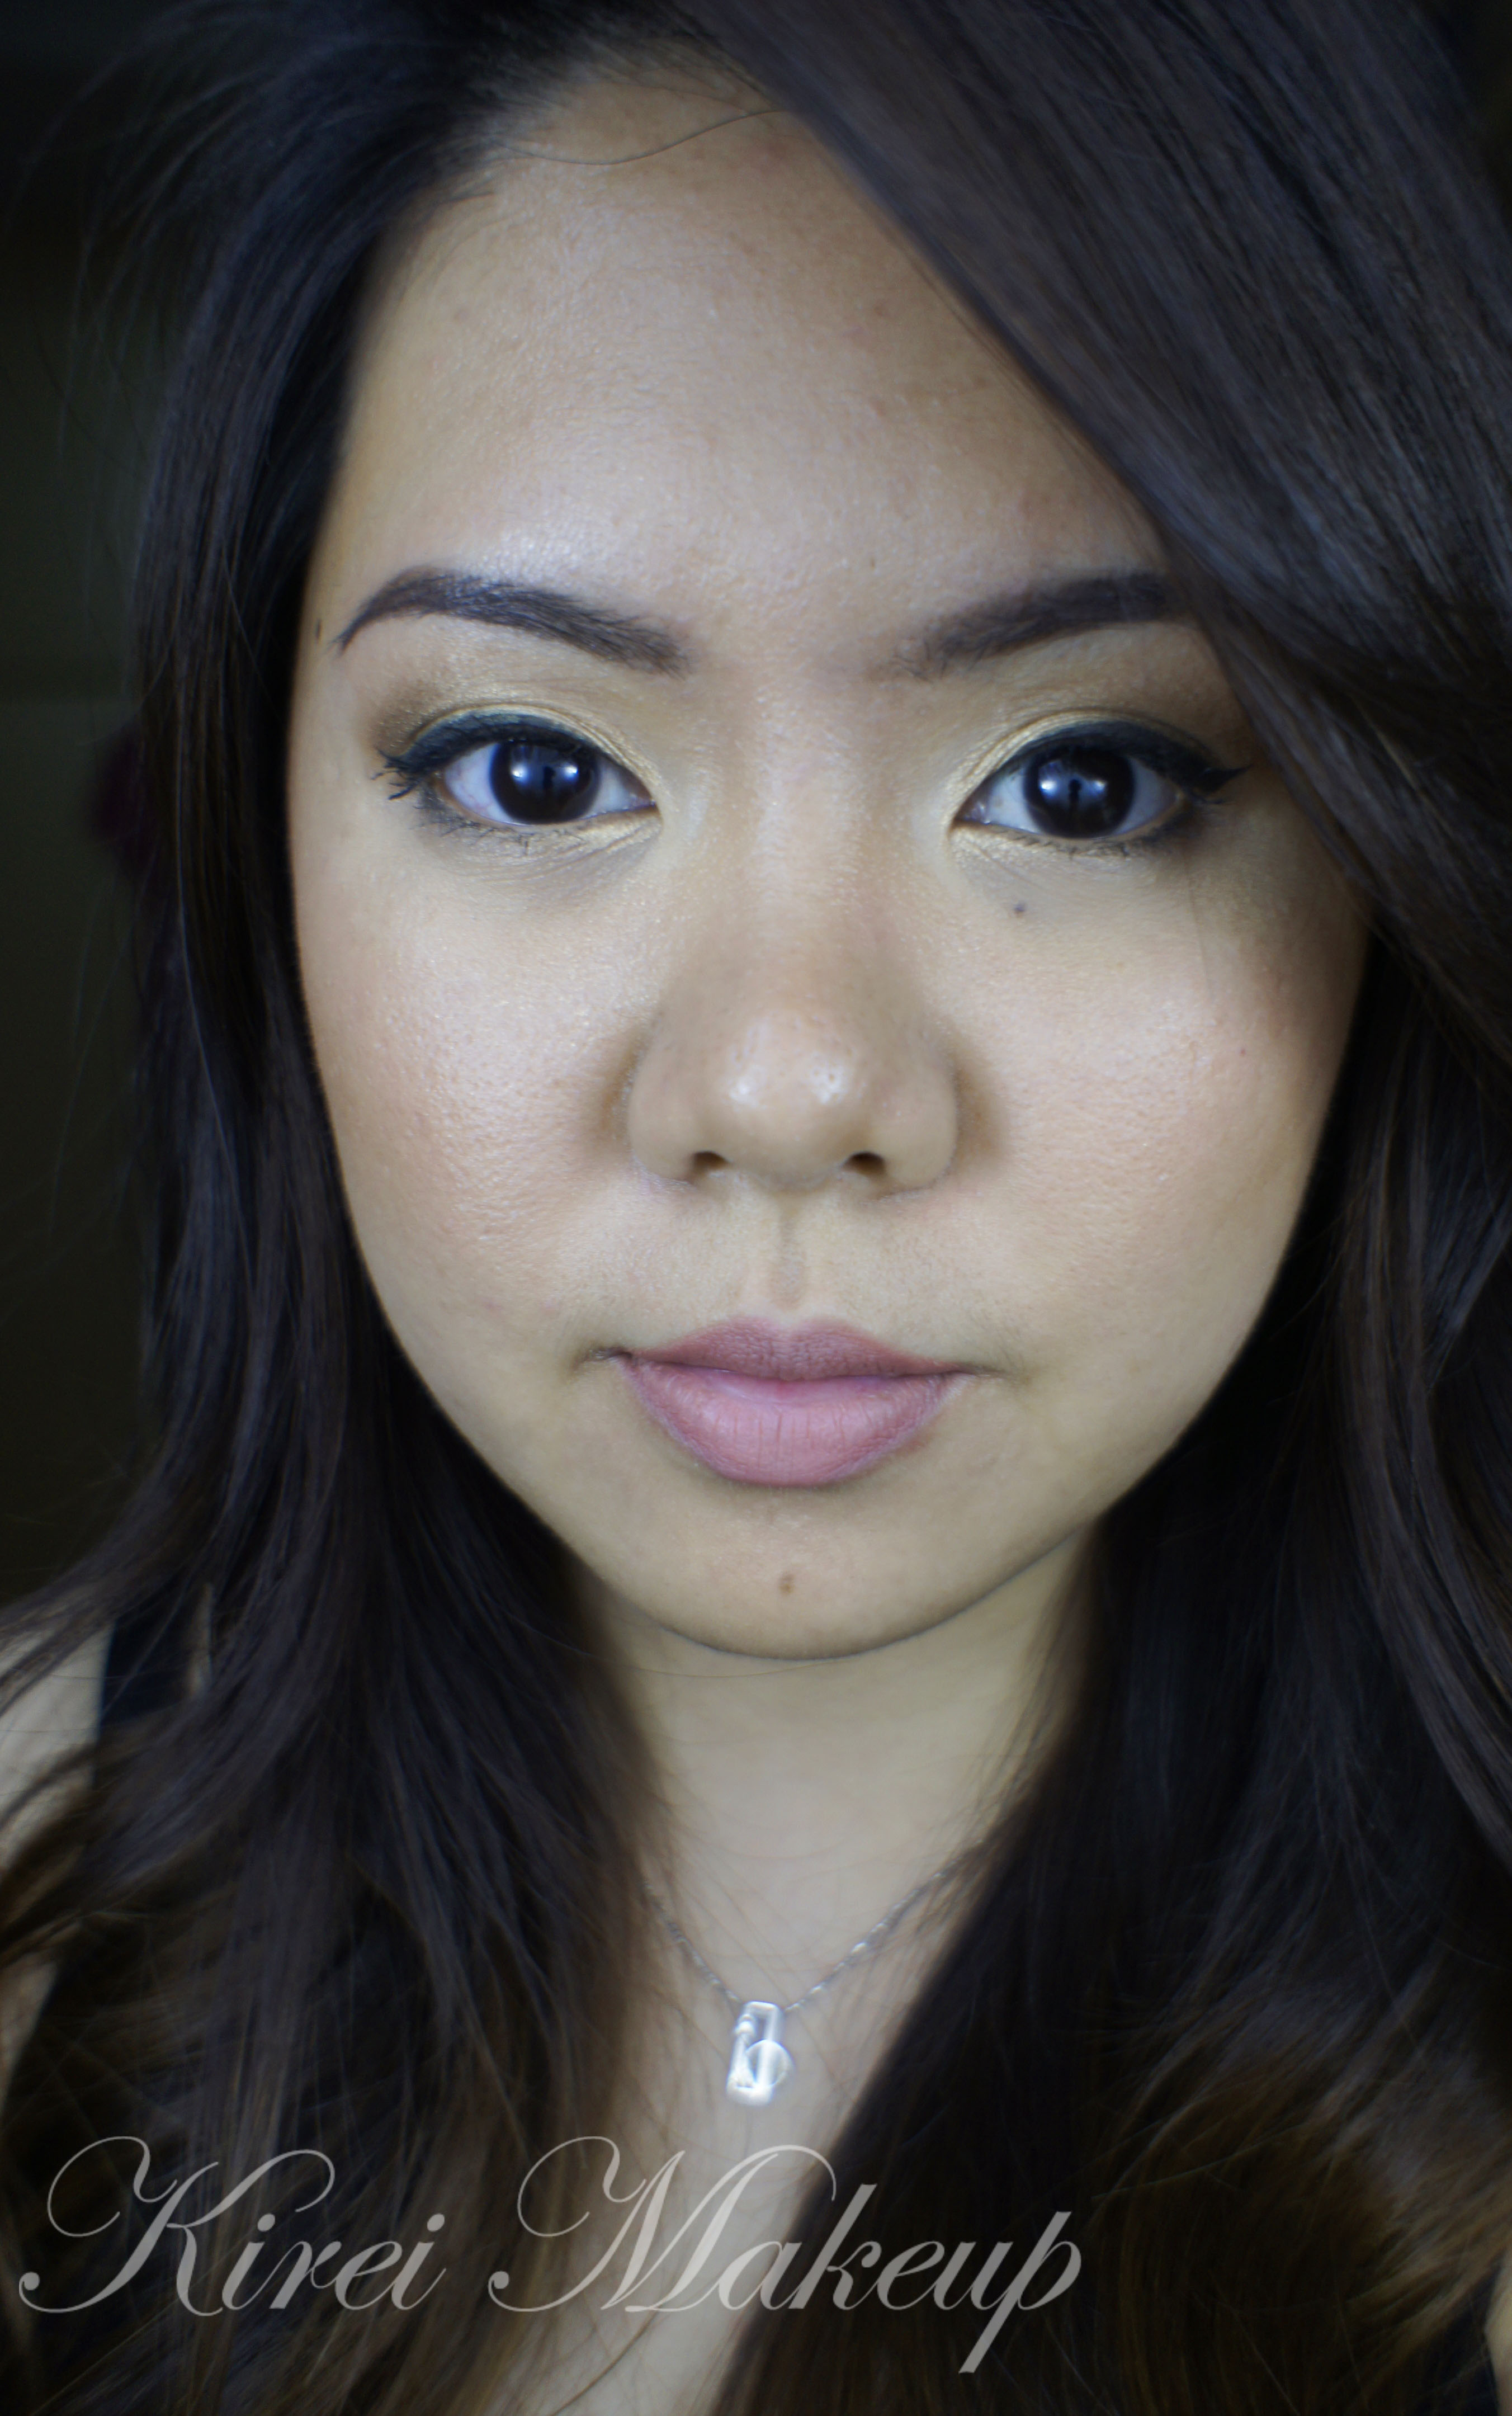
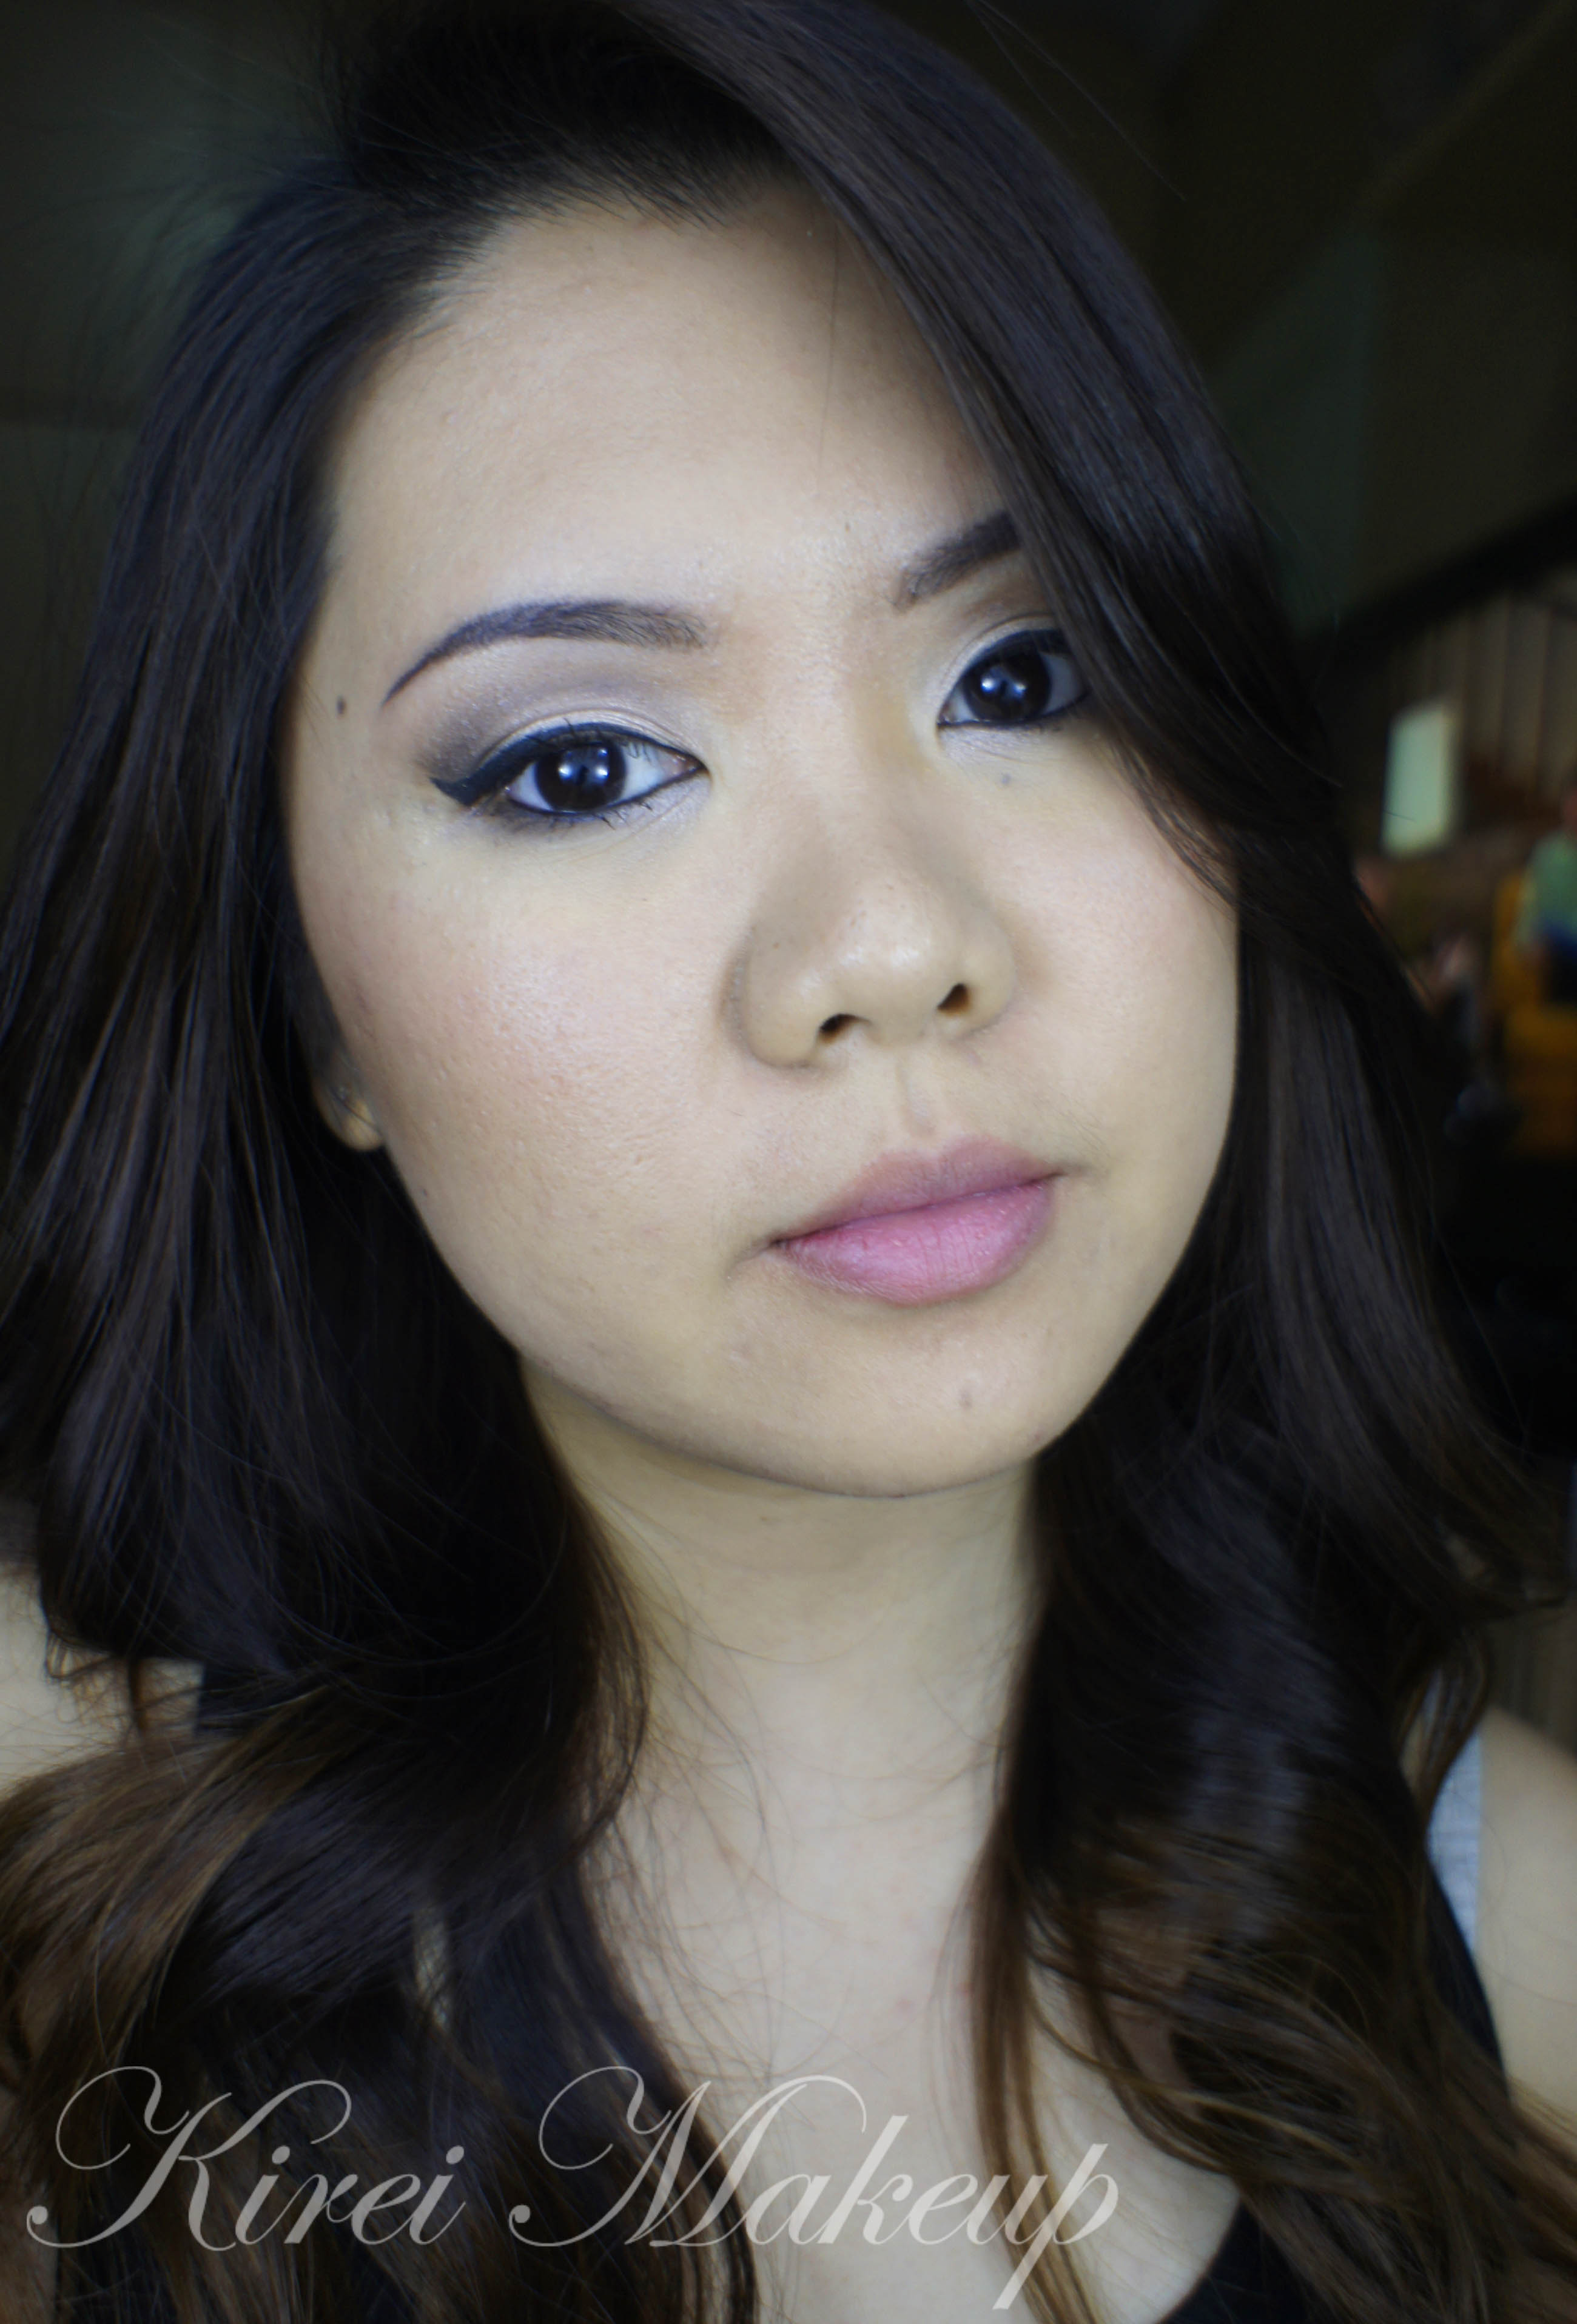
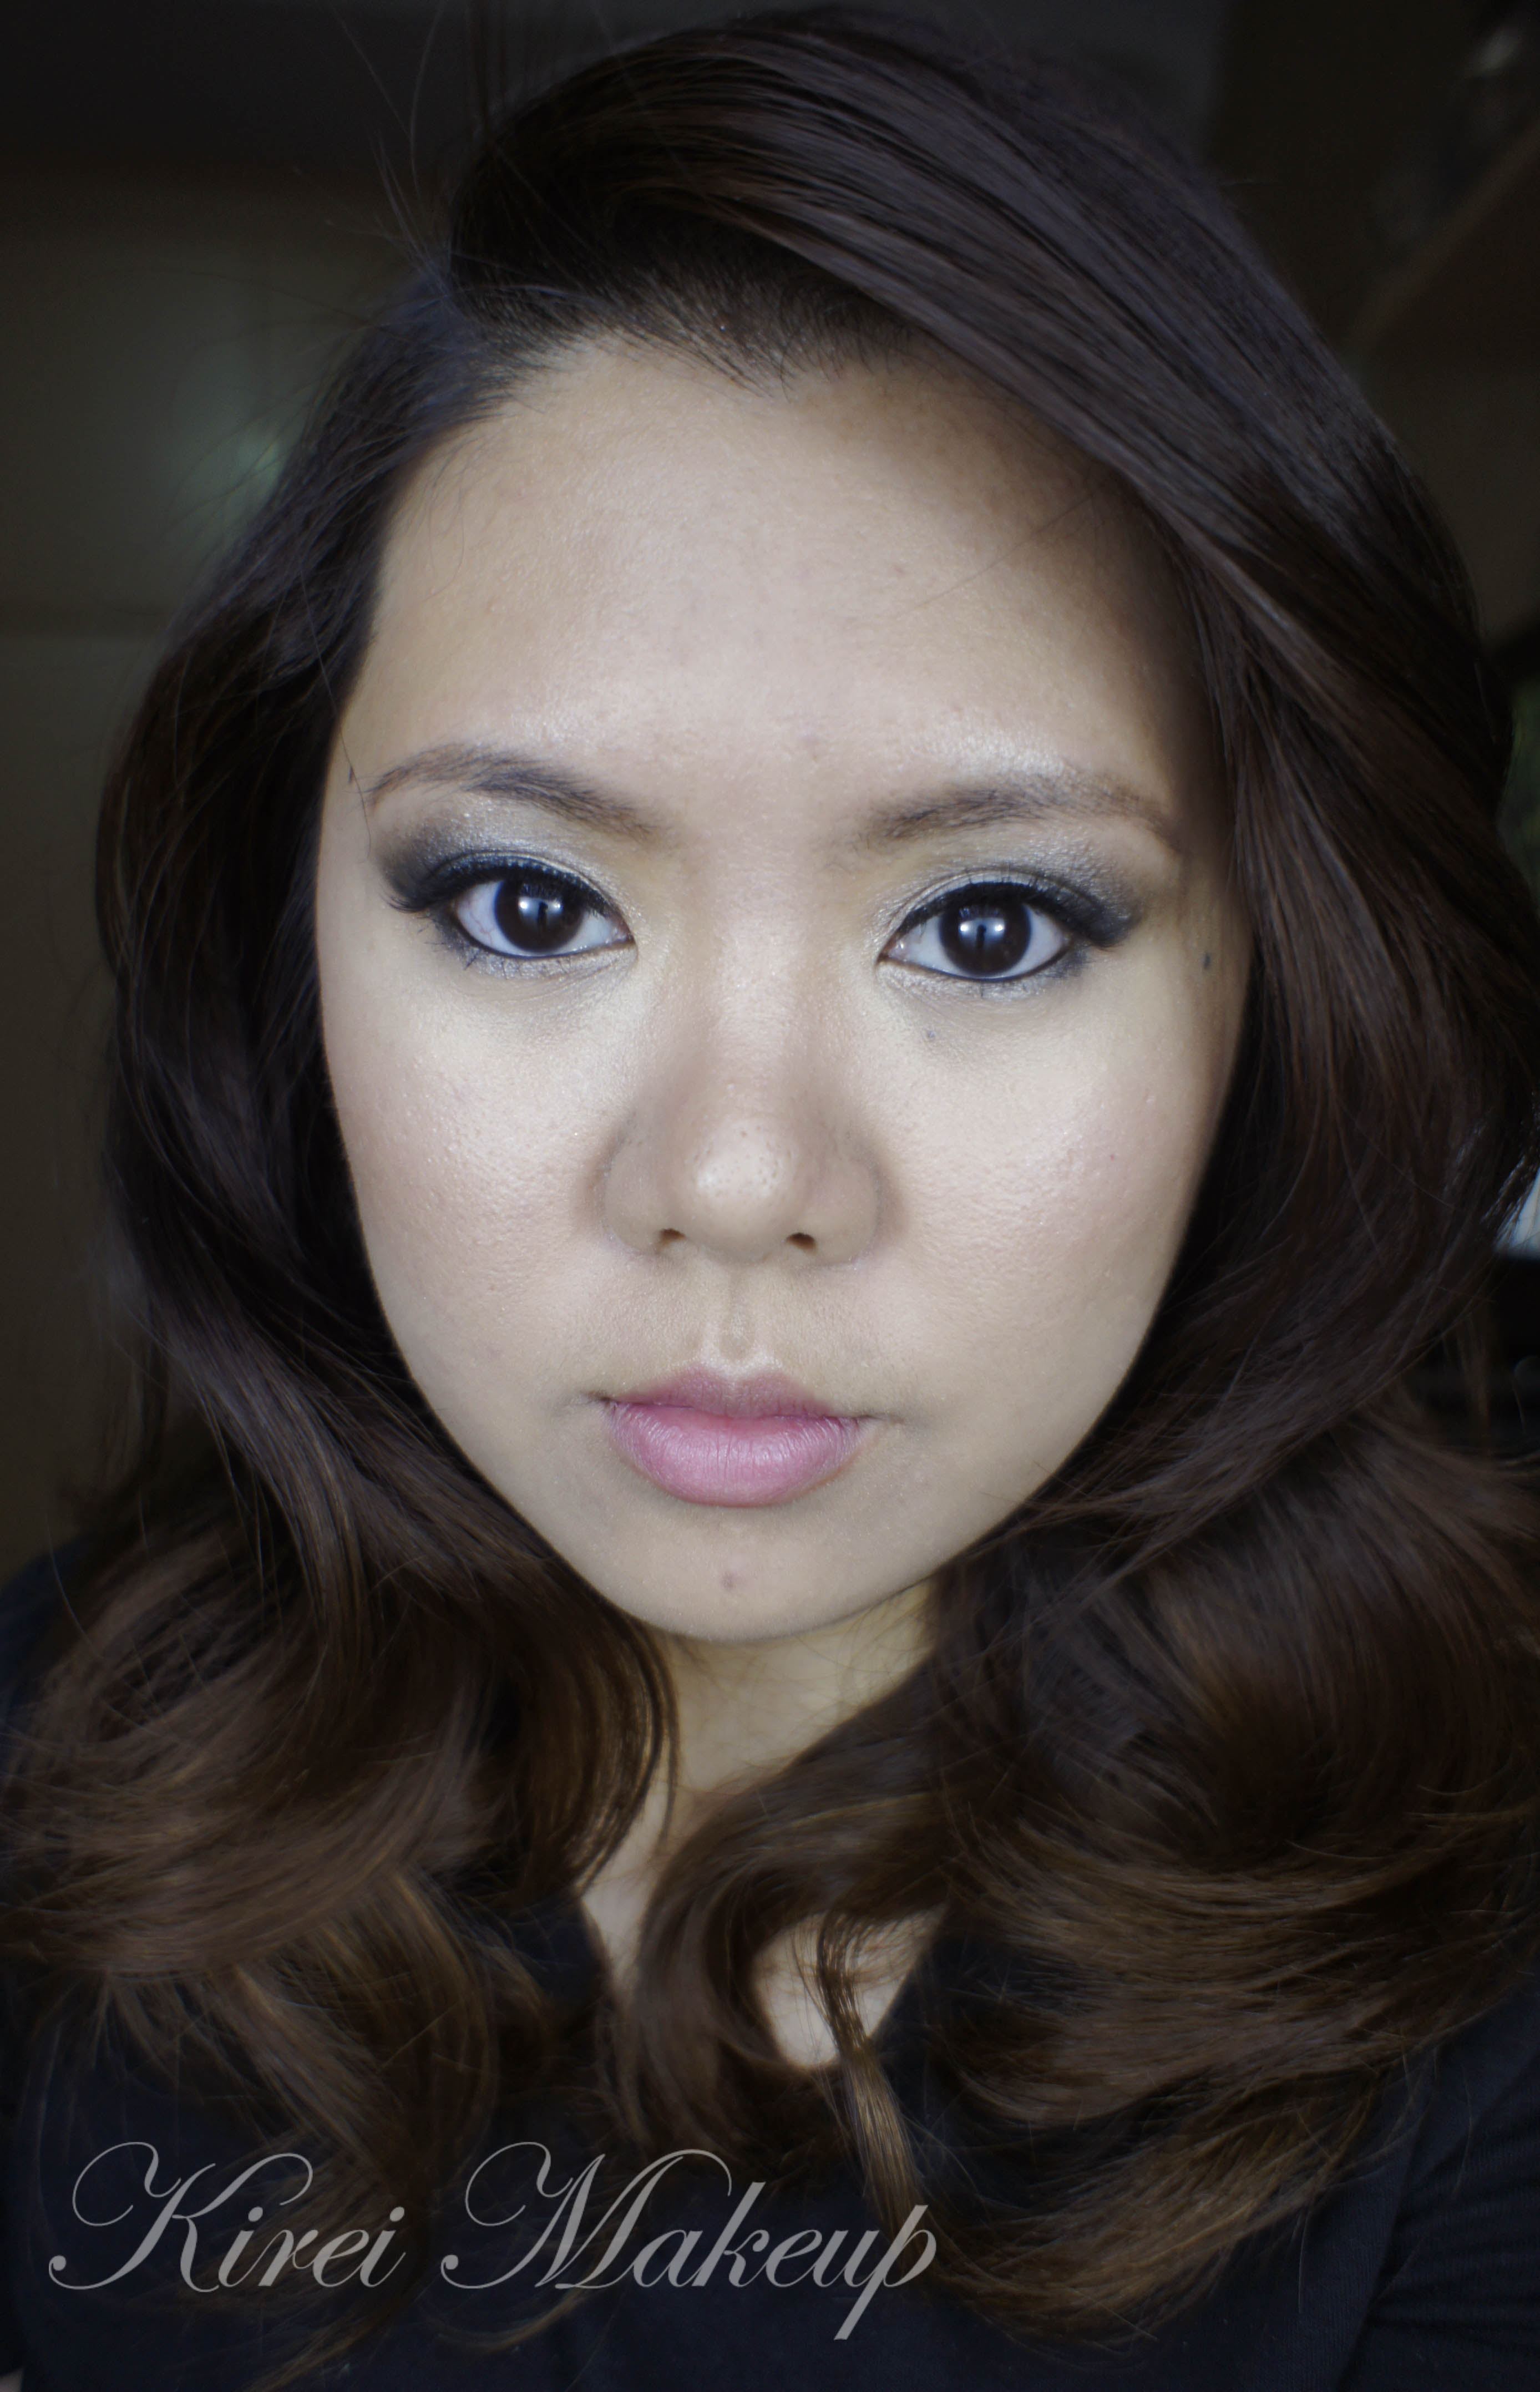
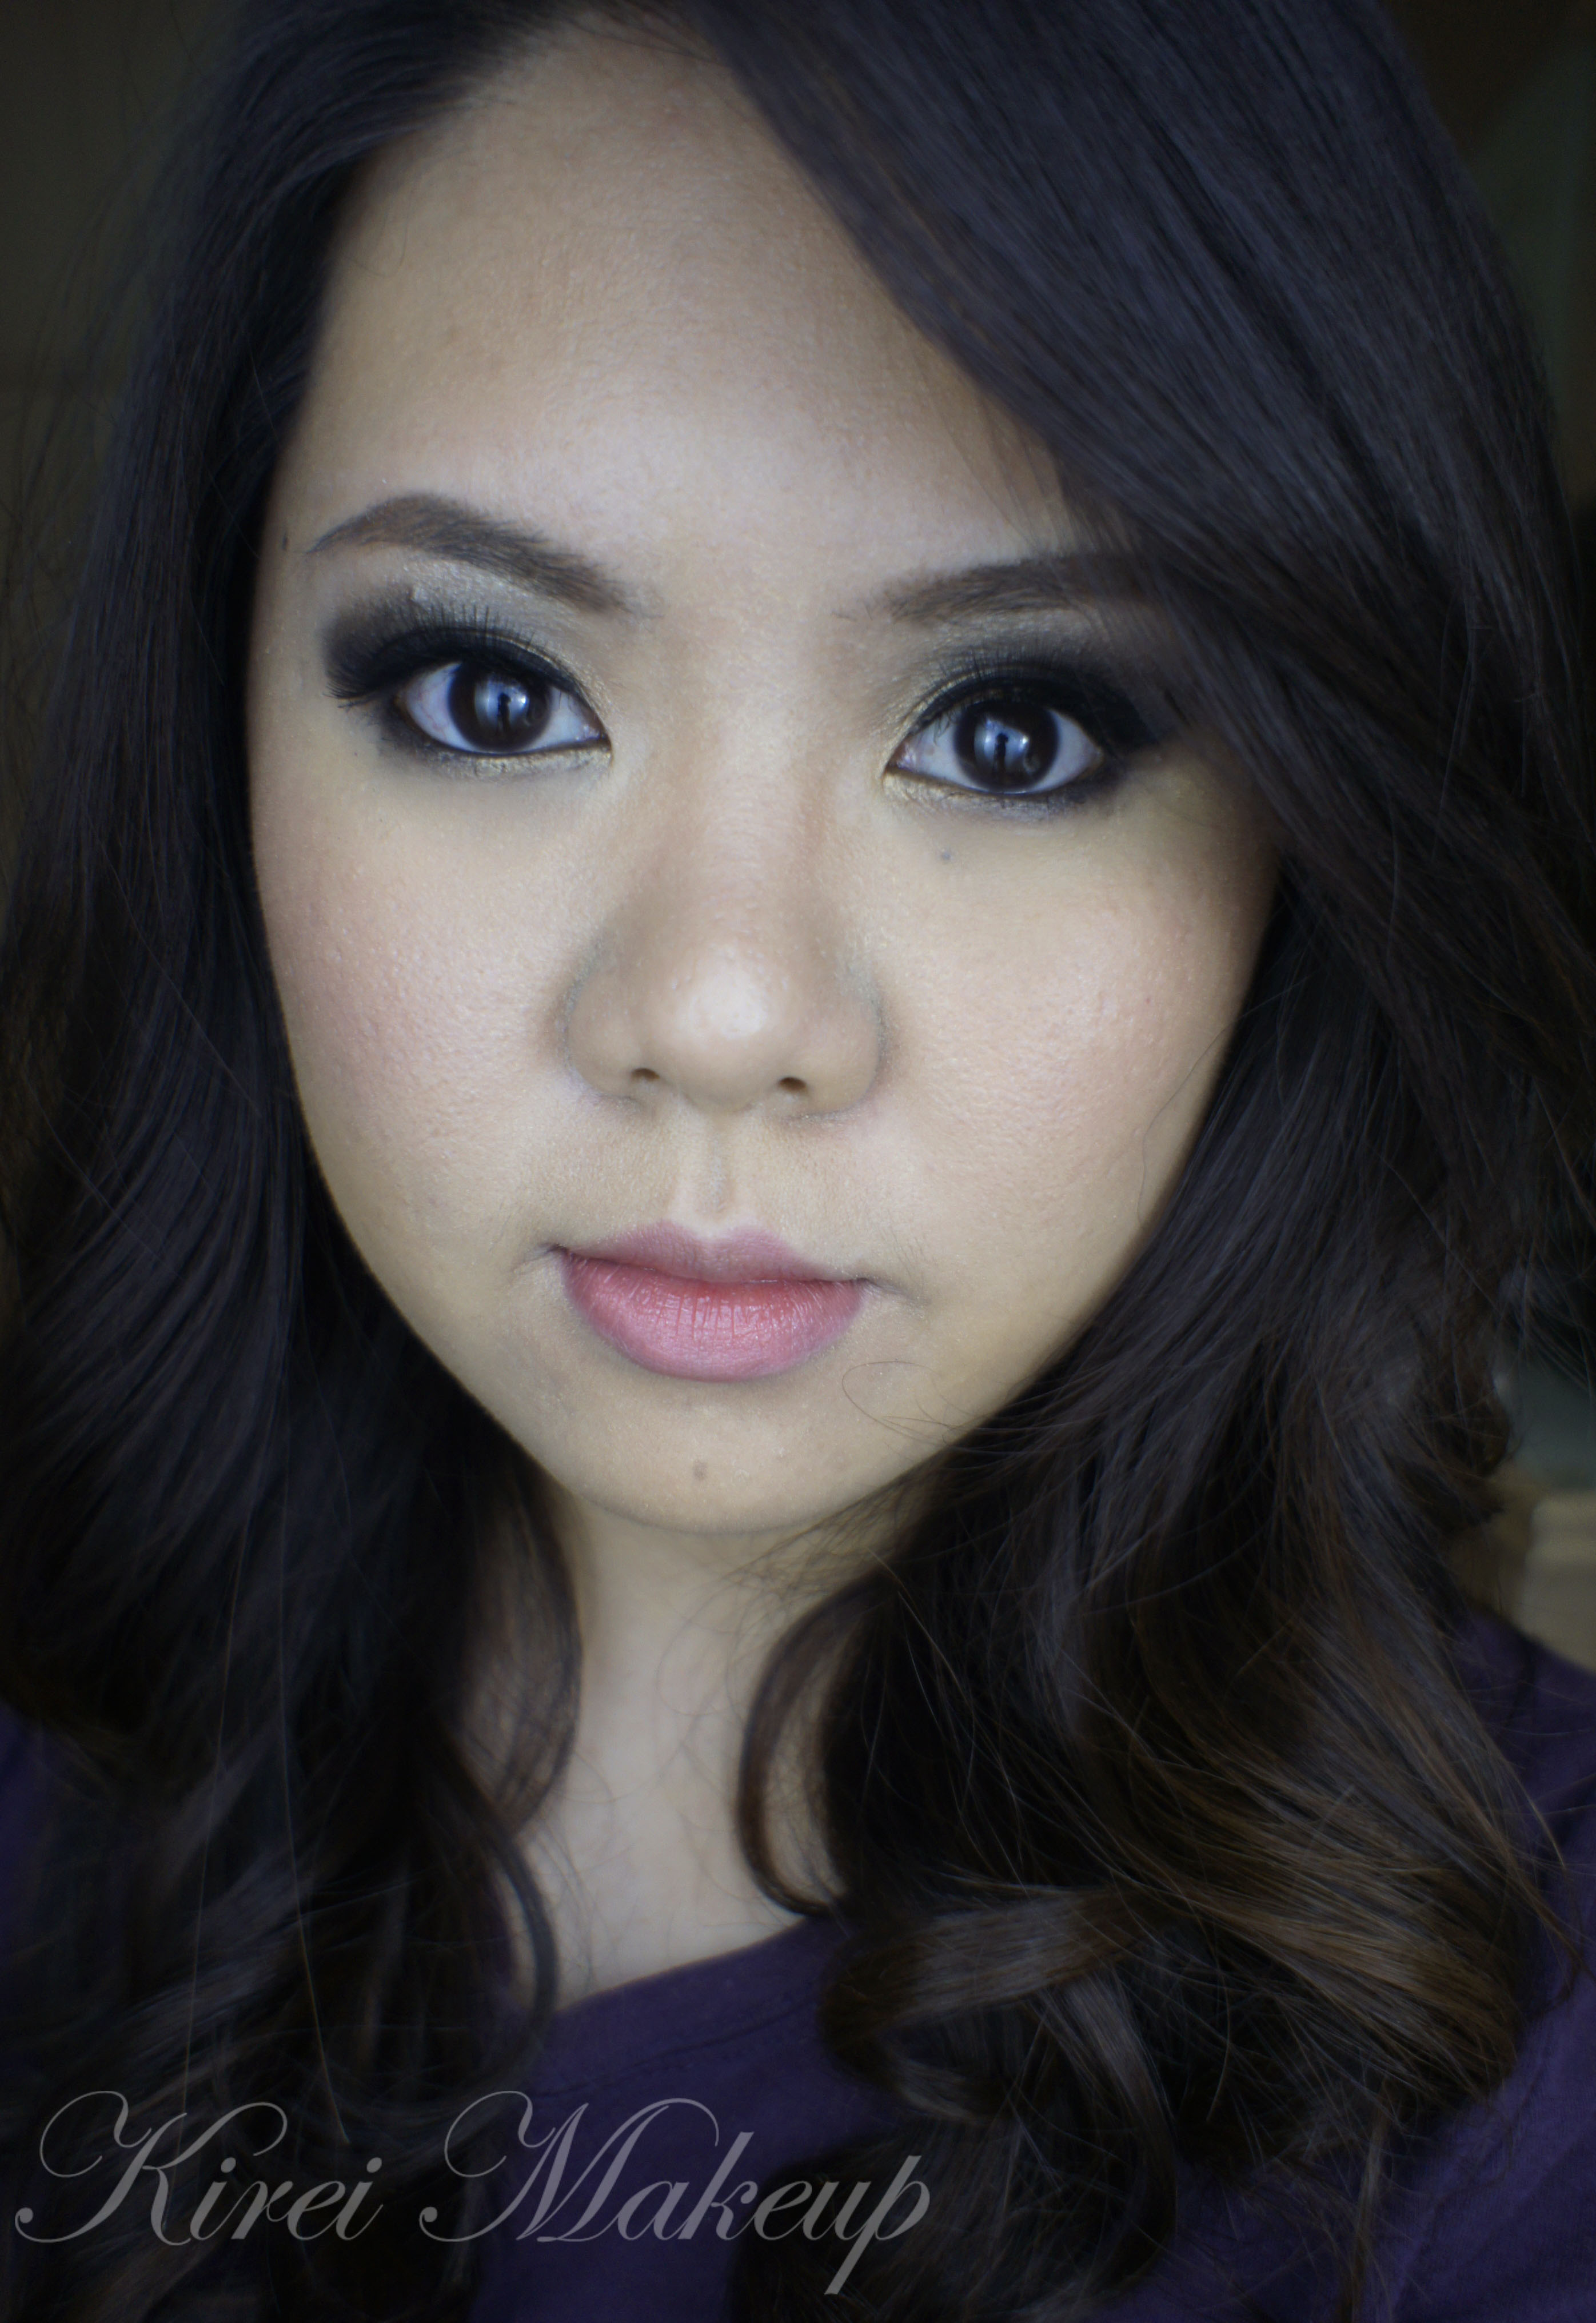
This week is like my non-colorful week! Today’s look used Urban Decay Naked Palette, and it’s perfect for daytime and bridal makeup. It’s packed with bronze goodness. The colors are perfect for every eye-colors and skintones. Very flattering, very warm and it’s really easy to achieve this look.

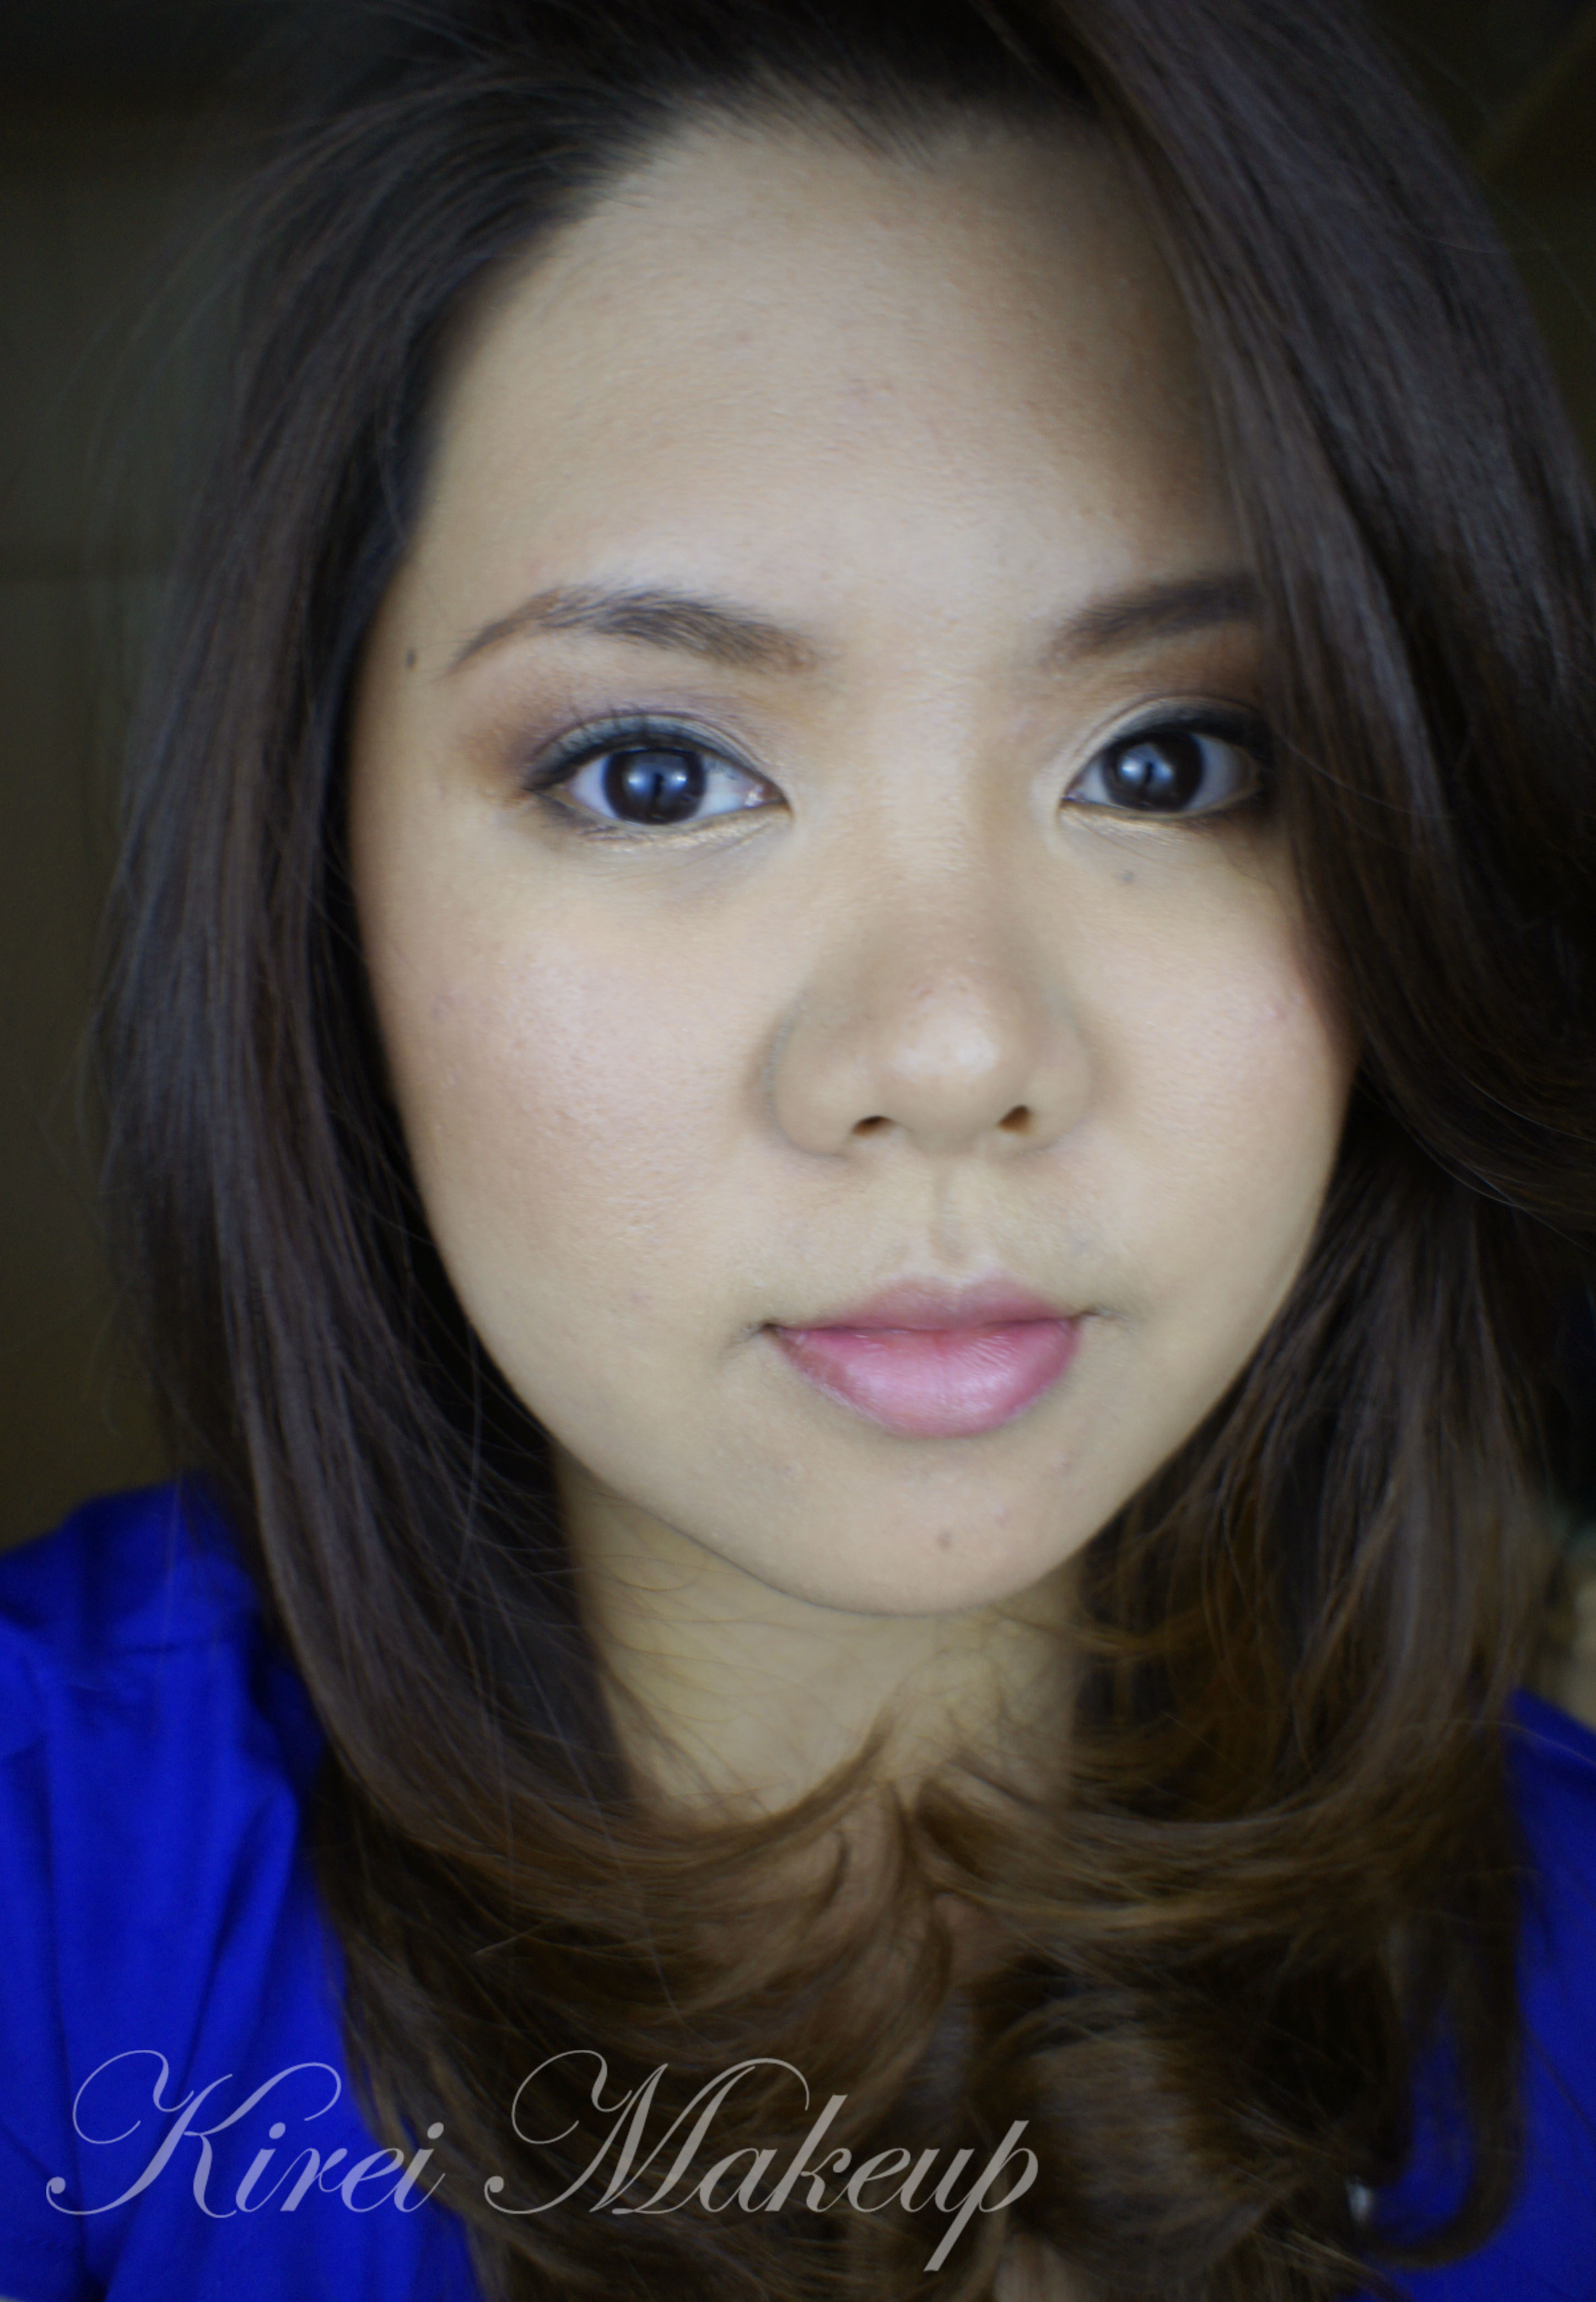
I love wearing this look for the summer. It might look like it’s a lot, but once you complete the face, the eyes look pretty natural looking. It really do brighten up the face too. This is my fav. way of wearing bronze eyeshadow. You can immediately turn this makeup to a night look just by adding black liner along the upper lashline and waterline, turning it into a smoky look.

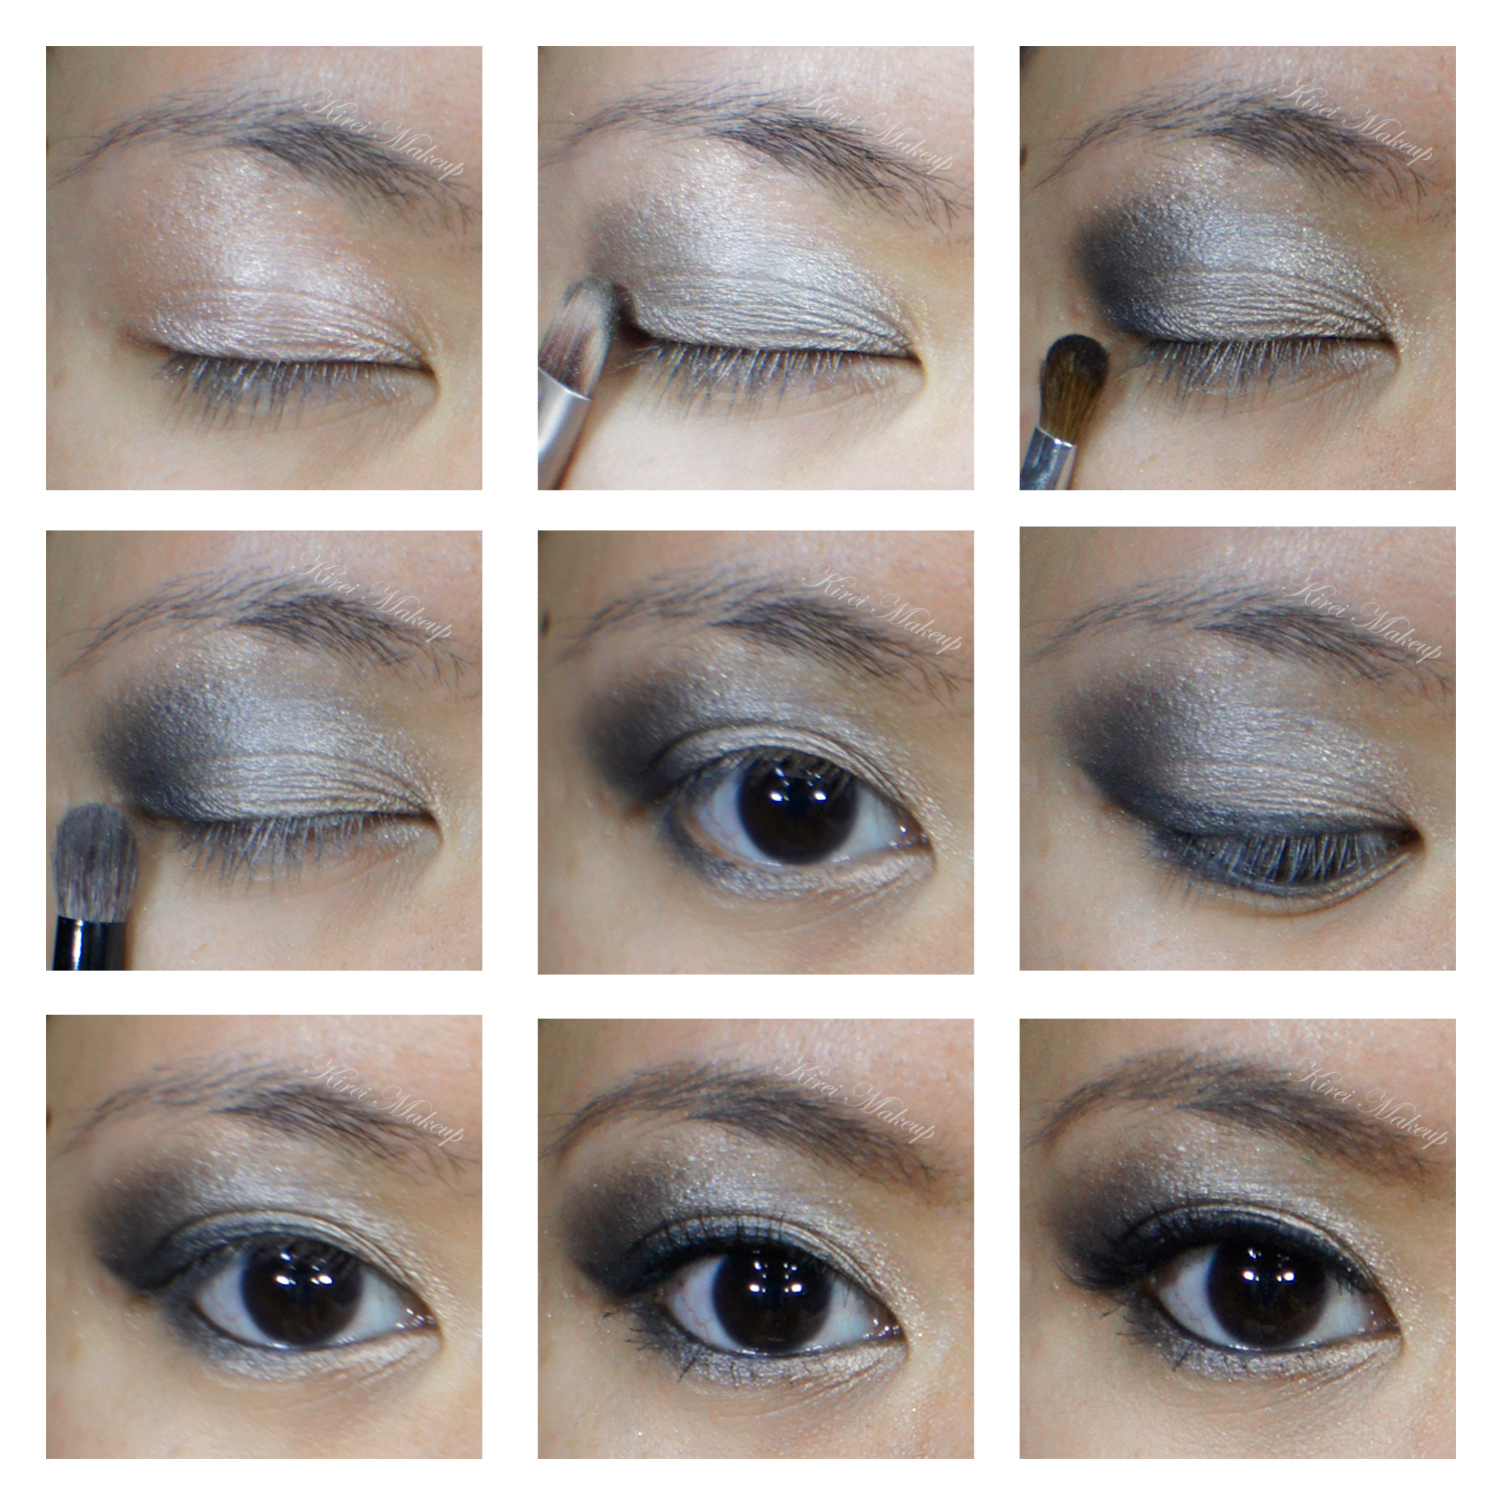
For tutorial on how to fill-in brows, please visit “Product of The Week: MUFE Aqua Brow“. For a smokier version of this look please visit “Baked It Up!

urban decay naked palette

How-to:

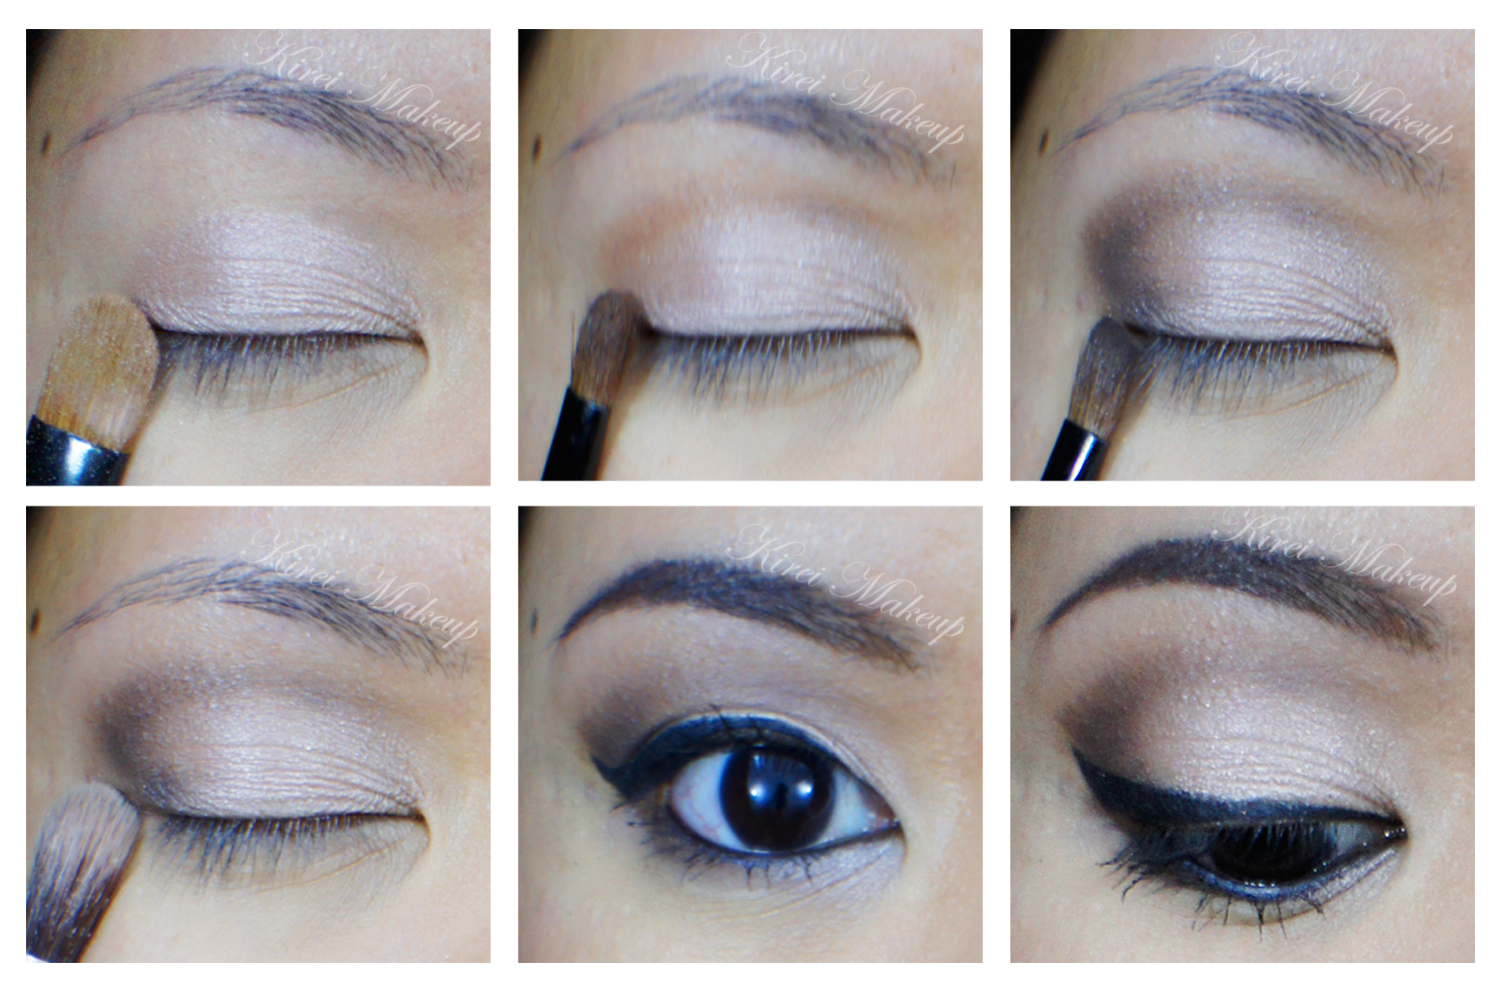
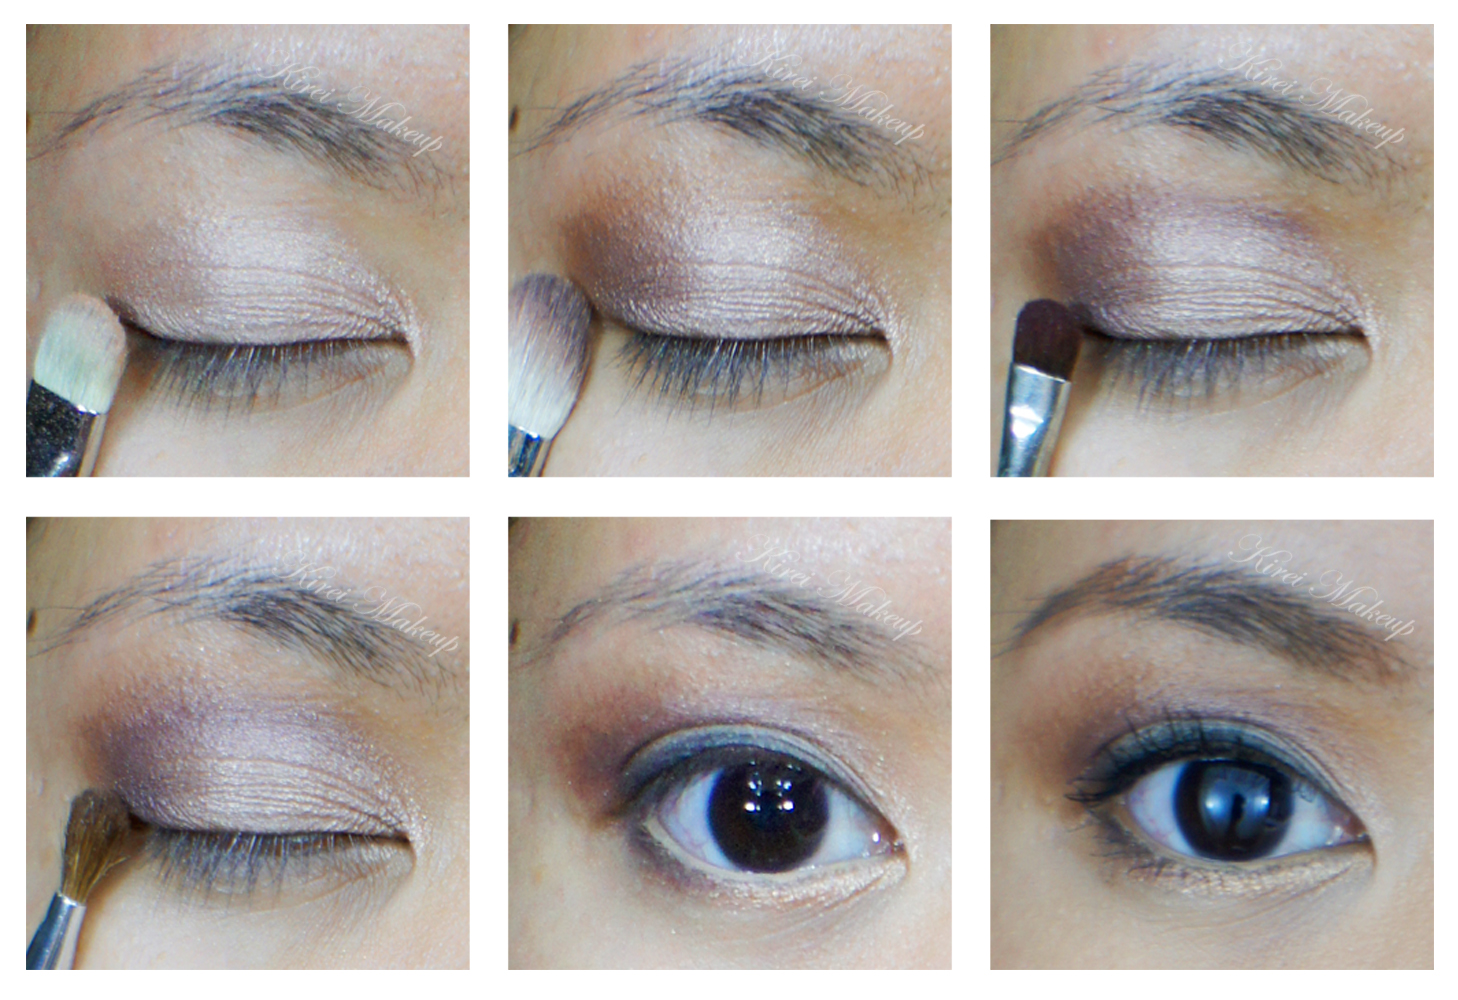
1. Using a flat eyeshadow brush, I applied UD Half-Baked all over the lid.

2. Using a flat fluffy brush, I applied UD Buck lightly on the crease and the outer V.

3. Using a fluffy blending brush, I applied a mixture of UD Smog + Snakebite on the outer half of the lid, blending in towards Half-Baked.

4. I applied UD Half-Baked on the inner corner of the lower lid, and UD Smog + Snakebite on the outer half using a small shader brush.

5. I created a winged liner along my upper lashline using Bobbi Brown Caviar Ink cream liner.

6. Using whatever is left on the brush, I applied the liner along the outer corner of the lower lid.

7. I curled my lashes and applied MUFE Smoky Lash mascara on both upper and lower lashes.

8. I filled my brows in using MUFE Aqua Brow.

urban decay naked palette

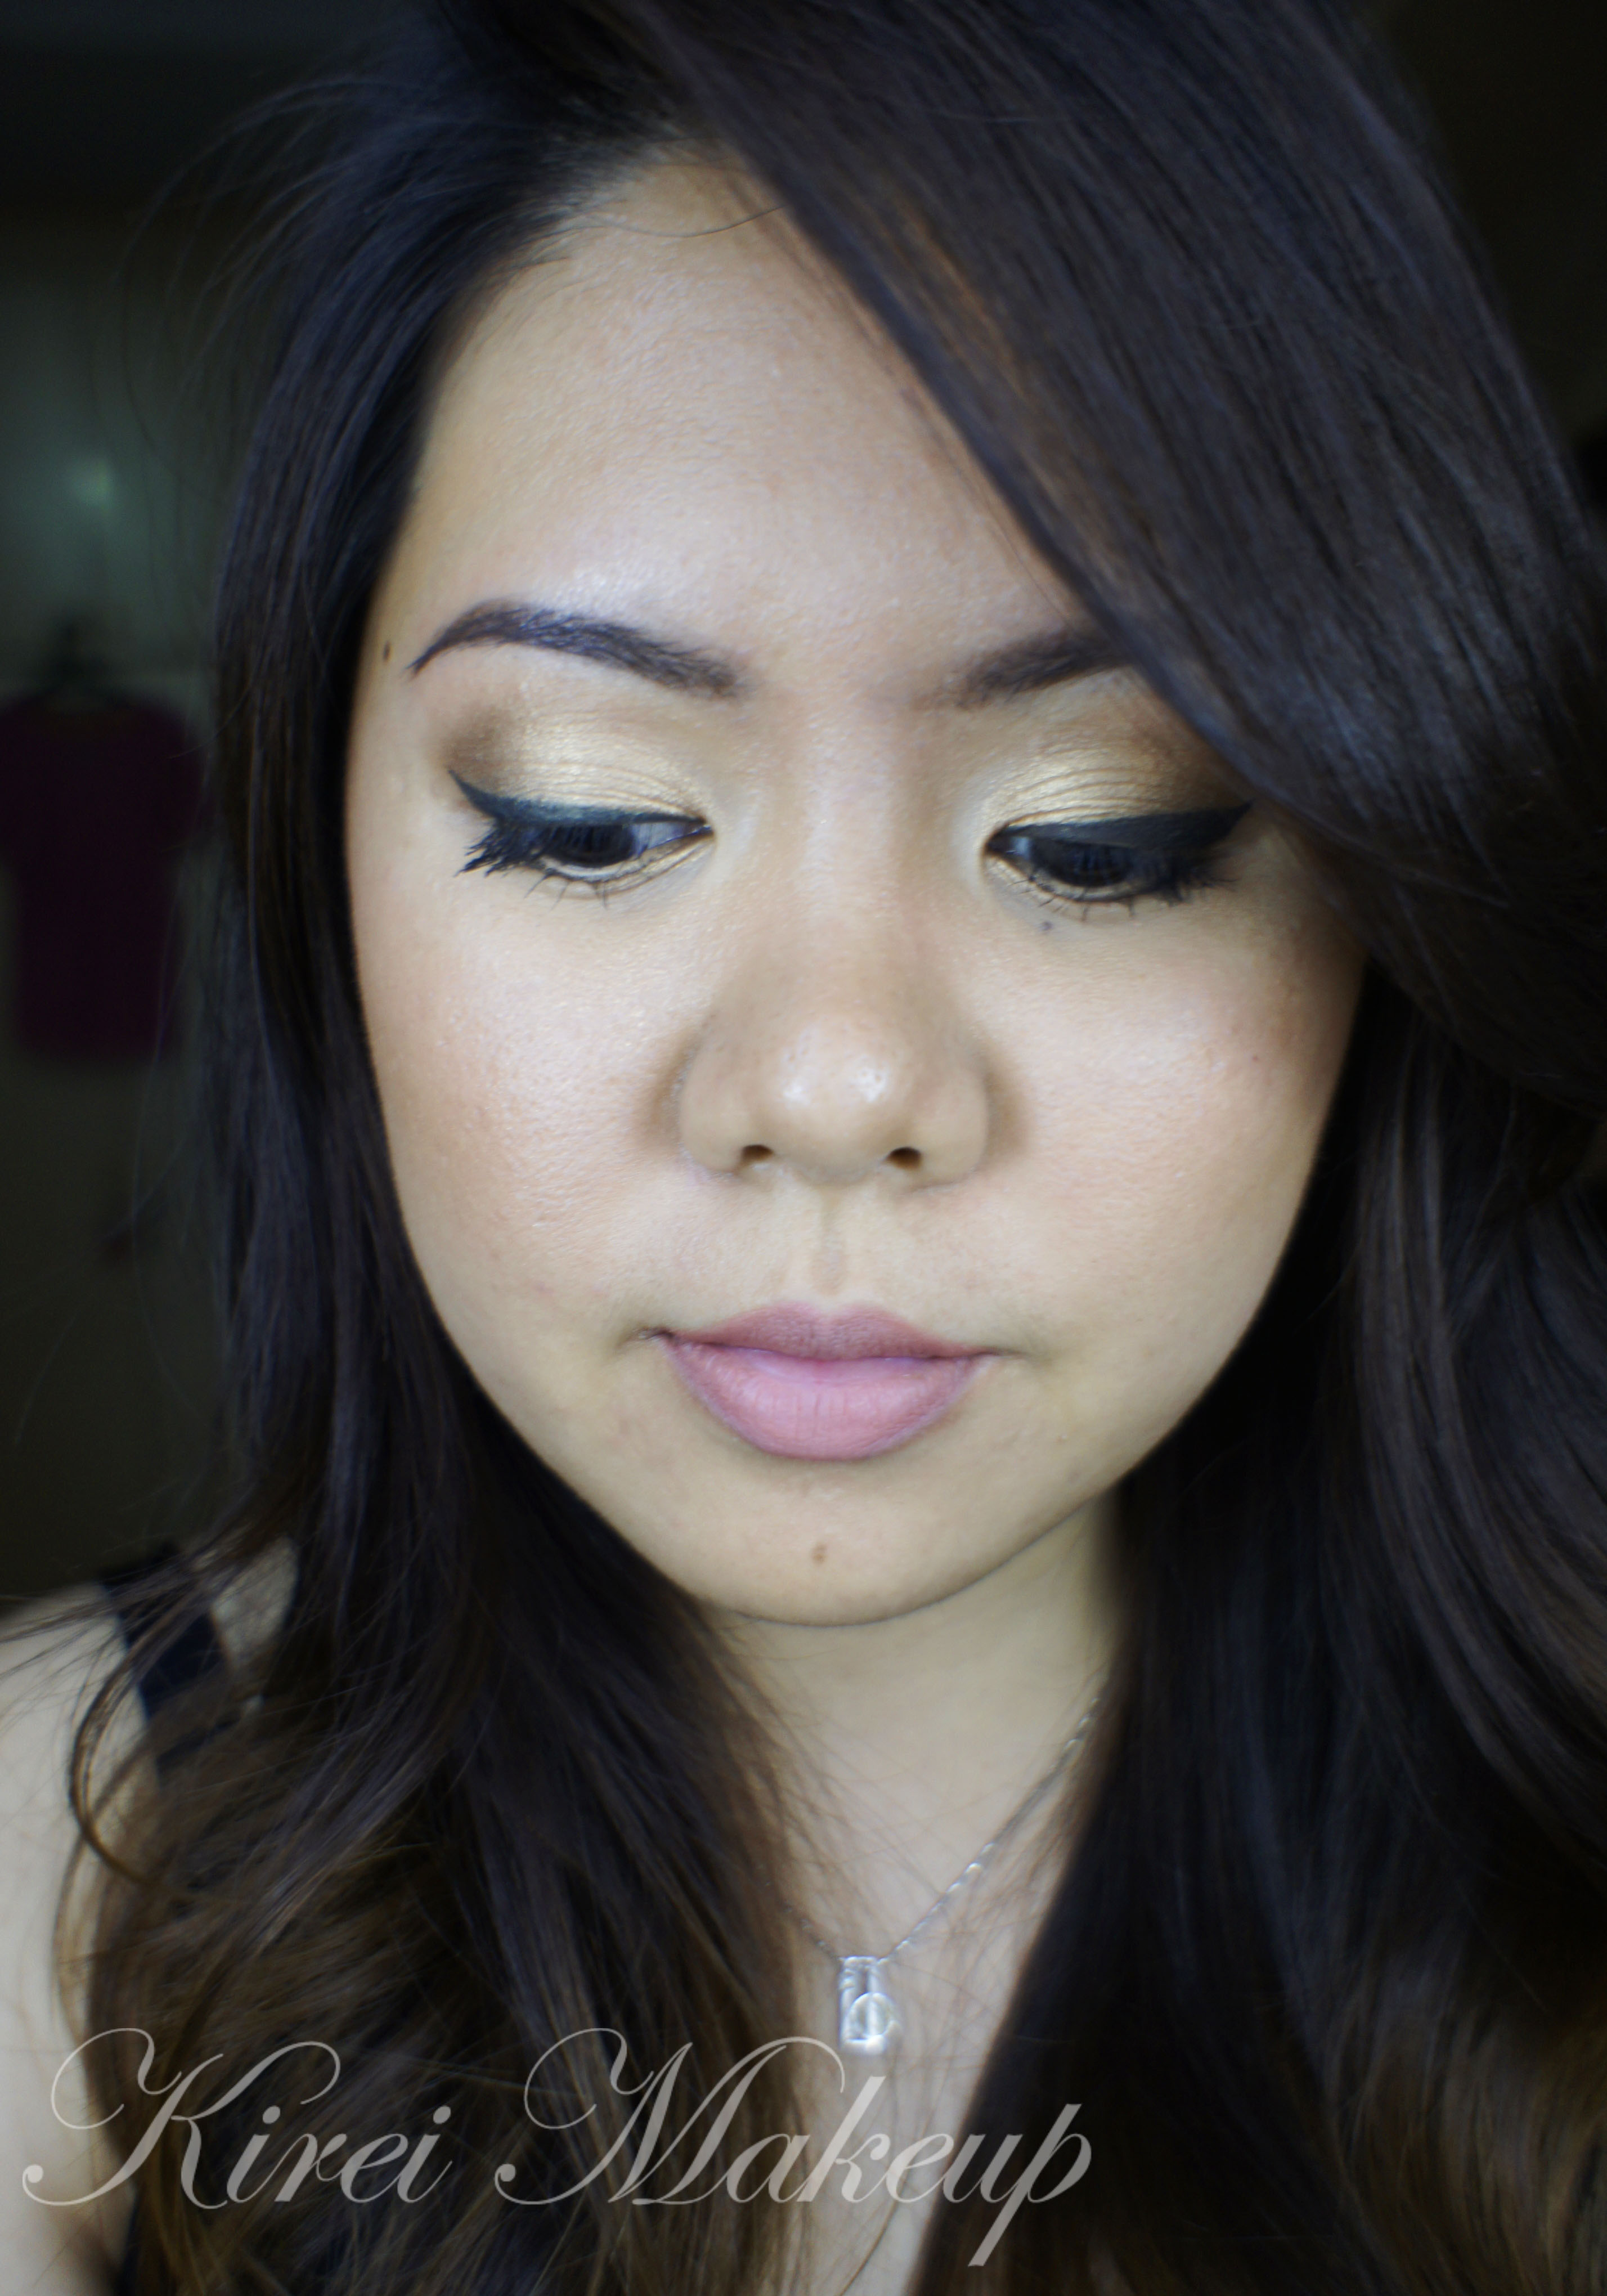
9. For my face, I applied Tarte Amazonian Clay BB Tinted Moisturizer.

10. I applied Benefit Dallas on my temples, the tip of my nose, my chin and my cheeks.

11. I also applied MAC Peaches on the cheeks.

12. For the lips, I applied L’oreal Colour Riche Lip Liner in Beyond Pink.urban decay naked palette

Neutral

I wanted to do a pretty makeup, something that will be good for brides, or prom goers, or just for anyone who wants an extra something something..bahahahaha..anyways! I love how it ended up and I think this look is perfect for brides, if they don’t want anything too smoky.

Anyways, I love how I’ve been using UD Naked palette more lately. I think I might do more tutorials using the Naked and Naked 2 palettes. Also, how do you like my brows? I managed to fix it today. Lately, I’ve played around with the MUFE Aqua Brow gel and I have to say, I’m loving it! More on that later on during the week.

How-to:

1. I applied UD Sin eyeshadow all over the lid using a flat eyeshadow brush.

2. On the crease, I applied UD Buck eyeshadow using a small blending brush.

3. Using the same brush, I applied MAC Brun on the outer V.

4. I clean the edge of the crease using a clean blending brush.

5. Using a small shader brush, I applied Sin on the inner corner of the lower lid and MAC Brun on the outer corner.

6. I created a winged liner along the upper lashline using MUFE Aqua Black gel liner and an angled eyeliner brush.

7. I lined my waterline using L’oreal Voluminous Smoldering eyeliner.

8. For my lashes, I applied MUFE Smoky Lash mascara on both top and lower lashes.

9. I filled my brows in using MUFE Aqua Brow.

natural makeup with urban decay naked palette

10. For the face, I applied UD Naked foundation using a foundation brush.

11. Under the eyes, I applied MAC Pro Conceal/Correct concealer in Medium.

12. I applied MAC Shadowy as a light contour and then MAC Cubic on my cheeks as blush.

13. For the lips, I filled it in using MAC Dervish lipliner.

asian bridal makeup

Silver Smoke

Please do forgive me for the unrully brows. I’ve been trying to grow them out so I can try out BrowHaus at Grand Indonesia, but I’m dying to tweeze them myself! *breathe in breathe out* Hopefully by the end of the week I can get them waxed!

If you read my tweets (follow my twitter: @KireiMakeup), I’ve wanted to do a tutorial using my Urban Decay Naked 2 Palette. Today’s look is a silver smoky makeup. I think the look would look great on brides and those who prefer smoky makeup for prom/parties. Lots of drama on this look. Very intense! Lots of silver, lots of shimmer and very dark around the lashes and outer V.

If you aren’t too comfortable with blending or applying eyeshadow on the outer V, alternatively what you can do is to apply silver all over the lid and create a heavy liner on upper and lower lashes with black eyeliner (as well as on the waterline). Top it off with lots and lots of mascara.

With this look, try to “wing” the smoky eyes slightly for an uplifting effect. You need a good blending brush (or two) for the smoky effect.

How-to:

1. I prepped my eyelid using Urban Decay Primer Potion in Sin.

2. On the lid, I applied Pistol from UD Naked 2 palette using a flat eyeshadow brush.

3. On the inner part of the lid, I applied Suspect from UD Naked 2 palette using a flat eyeshadow brush (not in picture).

4. Using a small fluffy blending brush, I applied  Blackout from UD Naked 2 palette on the outer V and slightly on the crease.

5. Using Smashbox bullet brush, I blended the crease out to ensure there’s no harsh line.

6. Using an angled eyebrow brush, I applied Suspect on the inner half of the lower lid and Blackout on the outer half.

7. Using Blackout, I created a winged liner along the upper lashline, making the liner thicker on the outer part and thinner on the inner part.

8. I lined my waterline using L’oreal Voluminous Smoldering eyeliner.

9. I curled my lashes and applied Maybelline Volume Express Turbo Boost mascara on both top and bottom lashes.

10. I filled my brows using Dollywinked brow pencil. I applied Foxy from Naked 2 palette under the brows.

11. (optional), I applied Ardell Demure and 110 false eyelashes on the upper lashes.

silver smoky eyes

12. For the face, I applied Estee Lauder double wear light foundation using a foundation brush from the center of the face blending it towards the outer perimeter of the face.

13. Under the eyes, I applied YSL Touche Eclat and blended it using my finger.

14. On the cheeks, I applied MAC Cubic.

15. I applied MAC Shadowy on the sides of the nose.

16. For the lips, I applied Chanel Confidentielle lip rouge.

urban decay naked 2

Warm Brown Smoky

Who says we have to stick to black and grey in creating a smoky eyes look? Brown gives a more softer approach, and definitely warmed up the face. Brown smoky eyes will look great on any eye color, especially blue and green! In this tutorial, I layered a few different browns to warm up the eyes and it’s okay if it is messy! It gives that bedroom eye vibe, without looking like a panda ;). If you’re having difficulty doing a smoky eyes makeup using black, try using brown, it’s more forgiving.

Funny enough, quite a few of brides also like this type of makeup, especially for those who prefer a more natural look. I think this look goes with anything! Bridal, prom, date, night-out. It’s so simple and easy without being too overpowering.

How-to:

1. Using a flat eyeshadow brush, I applied MAC All That Glitters all over the lid.

2. Using a fluffy blending brush, I applied MAC Mulch on the outer corner of the lid.

3. Using a small shader brush, I applied MAC Sketch on the outer V and crease of the eye.

4. Using a small fluggy blending brush, I dipped the brush very lightly into MAC Bronze eyeshadow and blended it on the crease.

5. I used a clean blending brush to blend the edge of the crease.

6. Using an angled eyeliner brush, I applied MAC Woodwinked on the inner corner of the lower lid and applied MAC Mulch on the outer corner of the lower lid.

7. I lined my waterline using MAC Chromagraphic eyeliner in NC30.

8. Along the upper lashline, I applied MAC Smolder eyeliner and smudged it using a  pencil brush. I also added Smashbox Blackout eyeshadow along the line to set it using an angled eyebrow brush.

9. Using a clean blending brush, I blended the edge of the outer V to erase the harsh line.

10. I filled my brows in using Chanel brow pencil in Mistre.

11. I curled my lashes and applied Maybelline Volume Express Turbo Boost mascara on the upper and lower lashes.

12. Below the brows, I applied MAC Blanc Type lightly using a flat eyeshadow brush.

bridal makeup

13. For the face, I applied MUFE HD Foundation using a Sigma Round Kabuki brush.

14. For the under eyes, I applied MUFE concealer.

15 For the contour, I applied MAC Shadowy on the hollows of the cheeks, temples and sides of the nose.

16. For the blush, I mixed MAC Well-Dressed and MAC Fleur Power and applied it on the cheeks.

17. For the lips, I applied Chanel Levres Scintillantes Glossimer no. 165 (Volupte).

asian smoky eyes

Baked It Up!

Who doesn’t love Urban Decay Half-Baked eyeshadow? It’s bronzy, it’s shiny, it’s shimmery and it’s just gooorgeous! I think it might work for brides-to-be who’d like to go for a smoky look, definitely a party makeup and might look great for prom! It suits every eye colors and skin color. The bronze might pop out even more on medium-dark skin. If you’re pale, opt for brown instead of black eyeshadow if this is too intense.

*Please do ignore the acne on my crease*

How-to:

1. I applied the brown eyeshadow from  Smashbox  Smokeout trio eyeshadow (discontinued) on the eyelid using a flat eyeshadow brush.

2. Using a small shader brush, I applied the black eyeshadow from Smashbox Smokeout trio eyeshadow on the outer V.

3. Using Smashbox bullet brush, I blended the black eyeshadow so there’s no harsh line.

4. Using a flat eyeshadow brush, I applied Urban Decay Half-Baked eyeshadow on the inner lid and center of the lid, carefully blending it towards the black eyeshadow.

5. At this stage, you can opt to add more black eyeshadow, or use the brown eyeshadow to blend the black eyeshadow towards the bronze using the flat eyeshadow brush on step 1.

6. Using a clean small shader brush, I applied Urban Decay Half-Baked eyeshadow on inner part of the lower lid, and the black eyeshadow on the outer part of the lower lid.

7. Using an angled eyeliner brush, I applied Clinique gel liner along the upper lashline as a winged liner.

8. I lined my waterline and tighline using L’oreal Voluminous Smoldering eyeliner.

9. I filled in my brows using Anastasia brow powder in Brunette.

10. I curled my lashes and applied L’oreal Voluminous Carbon Black mascara on both top and bottom lashes.

11. Optional – I applied M.A.C False Eyelashes no. 4 on the upper lashes just for some added drama. Made my eyes look bigger, I think 😀

Party Makeup

12. For the face, I applied yellow corrector from MAC Pro Correct and Conceal palette in Medium. I applied it under my eyes, on the bridge of my nose, on the temples and cupid’s bow.

13. Using MUFE HD foundation and a Sigma Kabuki Round Brush, I buffed the foundation all over my face.

14. I applied Clarins Instant Light Blush in Vitamin Pink on the cheeks using a foundation brush.

15. I powder my T-zone using Cinema Secret loose powder.

16. For the lips, I lined and filled my lips using MAC Dervish lipliner and applied L’oreal Colour Riche Caresse Shine Stain Lipcolour in Eternally Nude on top of it.

Prom Makeup