Etude House Precious Mineral BB Cream Cotton Fit

I’ve done a review on the Etude House Precious Mineral BB Cream Cotton Fit before, and if you remembered I disliked the product. However, you know how sometimes one product just doesn’t work and then you picked it up couple months (or a year) later, and for some reason you change your mind?

The Etude House Indonesia Precious Mineral BB Cream Cotton Fit is one of those products for me. I didn’t like it last year, but this year it was different. I was so ready to not like it, but for some reason, I do end up liking it.

I think the reason why I might have ended up liking it because I applied it with my new Real Technique foundation brush. Also might be because my skin is slightly in a more “normal” condition nowadays (thanks GlamGlow!). In addition, I am not as tanned as last year since I haven’t been going to the beach as much, so I’m slightly lighter this time around, which makes the shade somewhat workable this time. I don’t look as ghastly as last year when I applied it.

Korean BB Cream

So, let’s get on the review!

What is Etude House BB Cream Cotton Fit?

This all-day pearly bright skin BB Cream perfectly glides onto skin providing clear and bright complexion with a smooth, cotton-like powdery finish for flawless skin.

Nihon Mart, 2014

Packaging

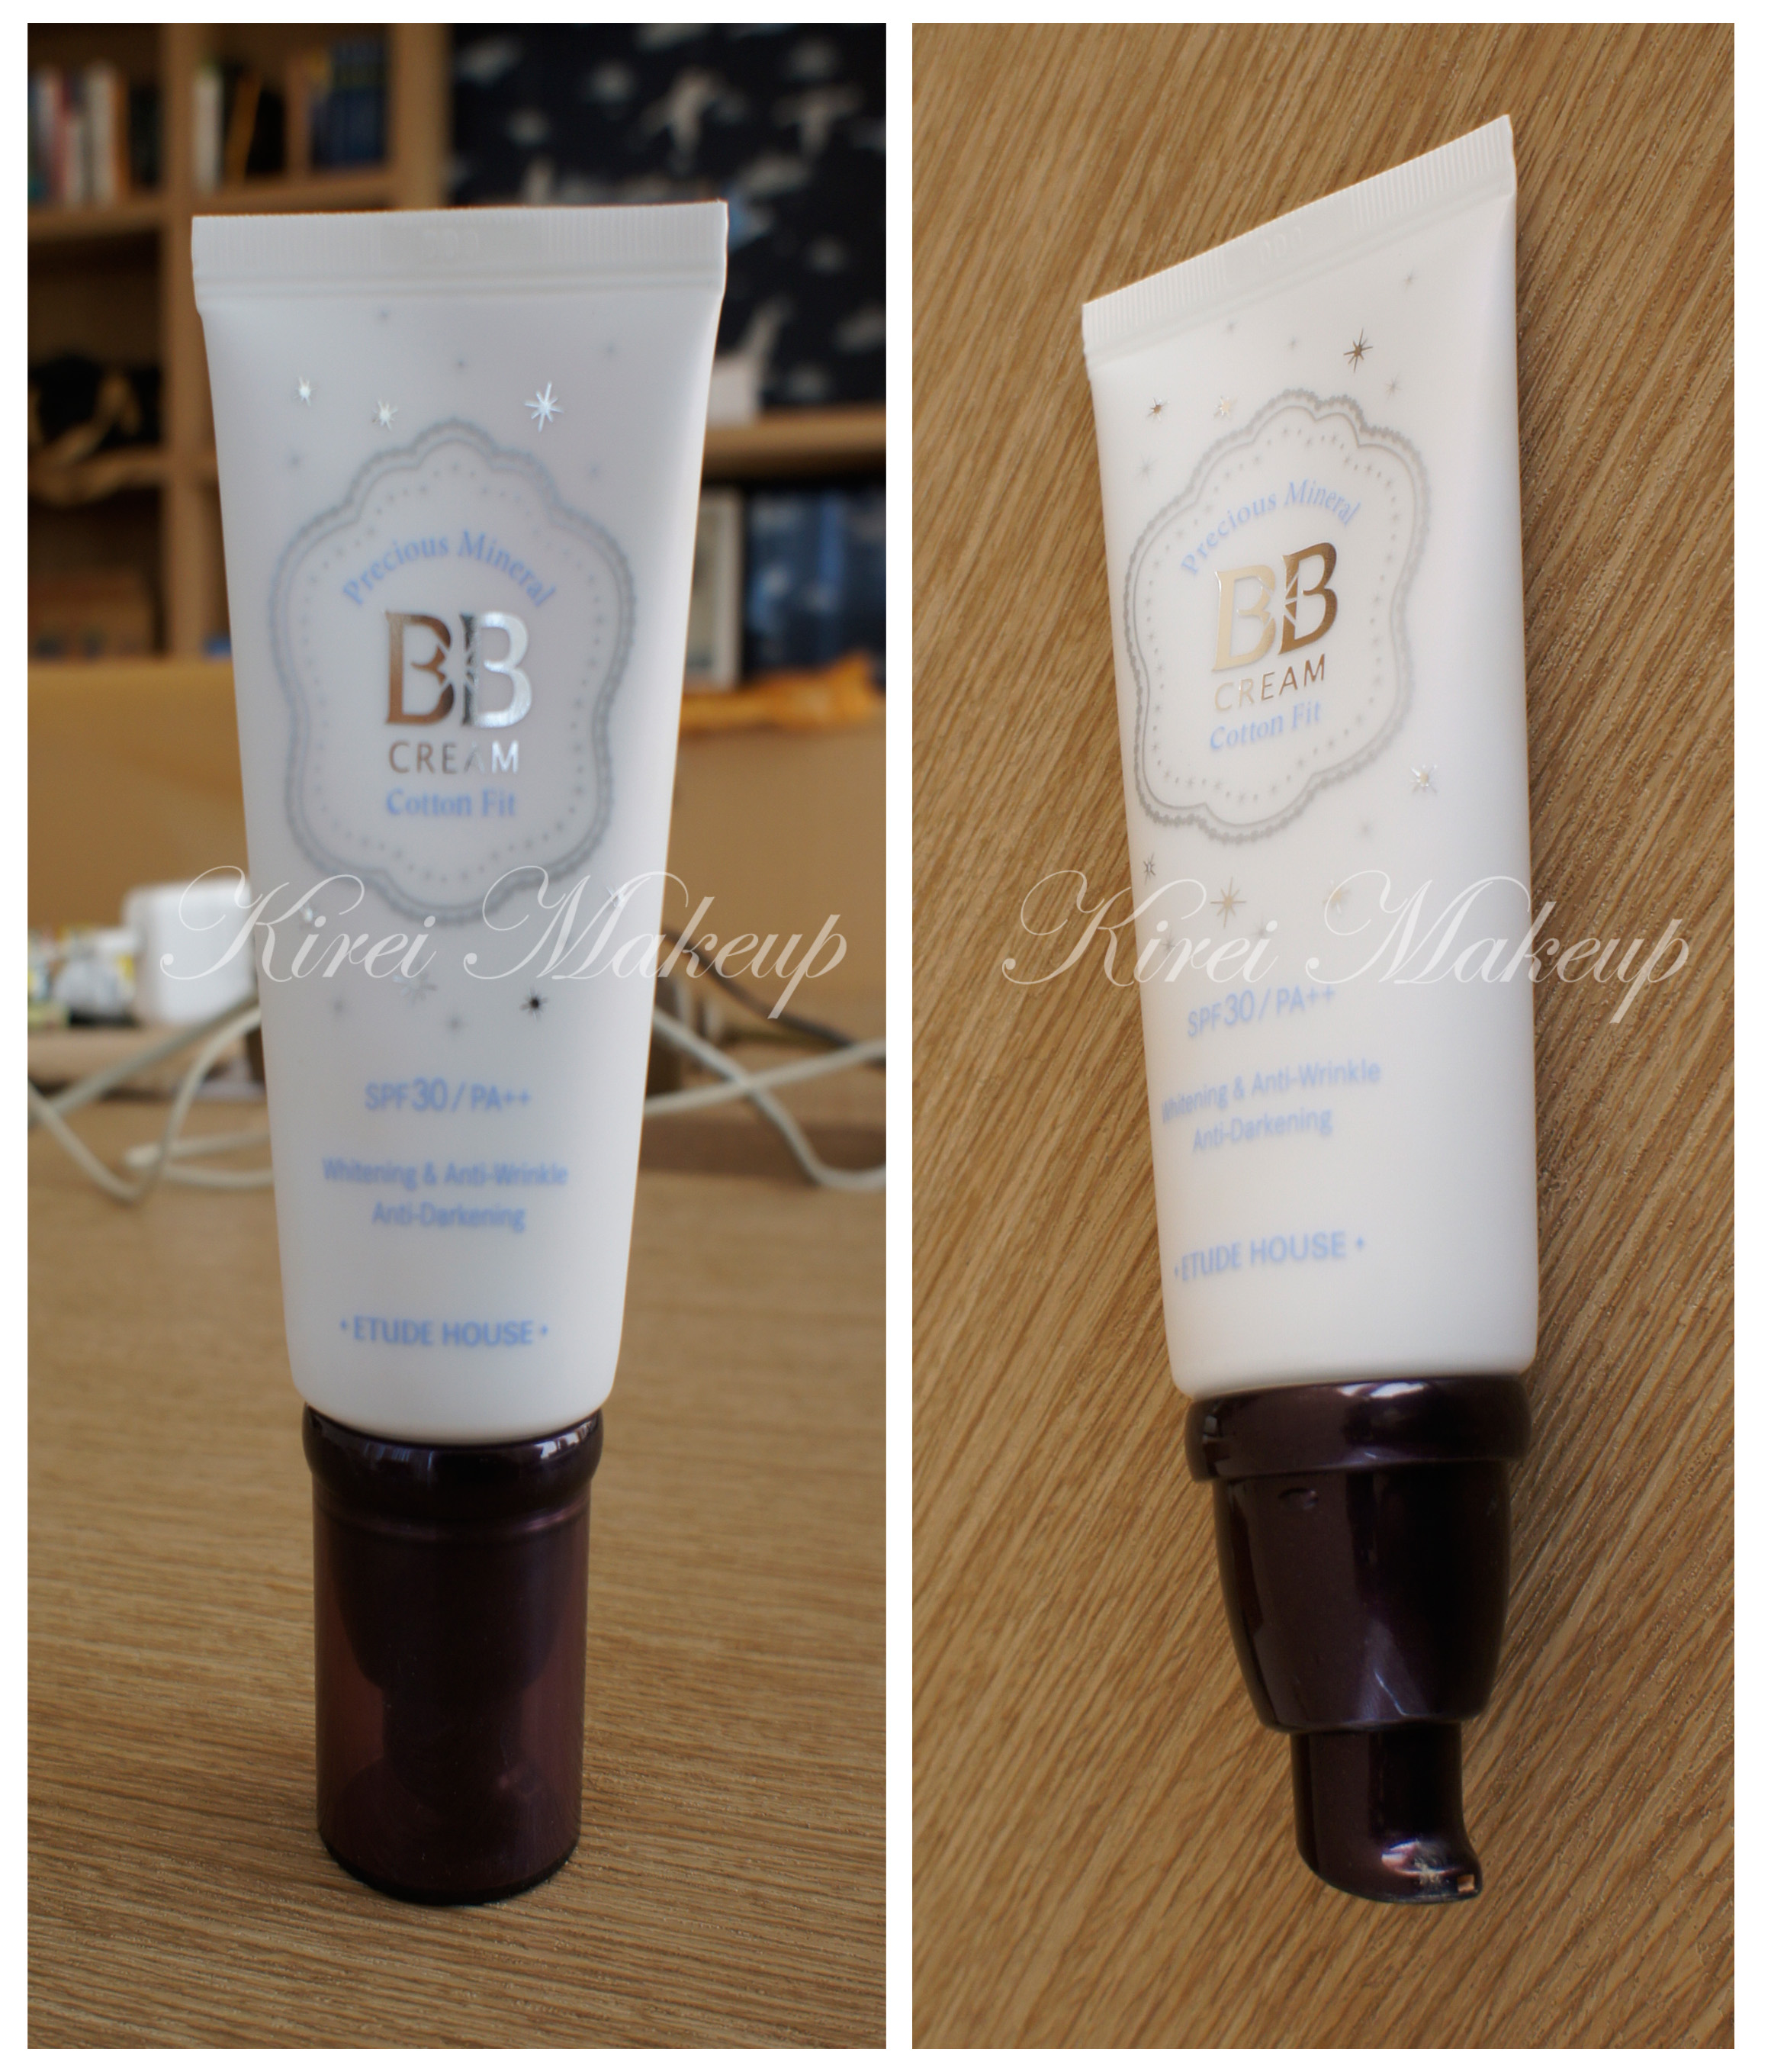
It comes in a very nice tube with a pump, which I think is great! The tube is flexible, so you don’t have to worry about it breaking when you travel (unlike glass containers), and the pump helps to dispense the product. Pump lightly, otherwise you might get too much product on your hand.

Shade

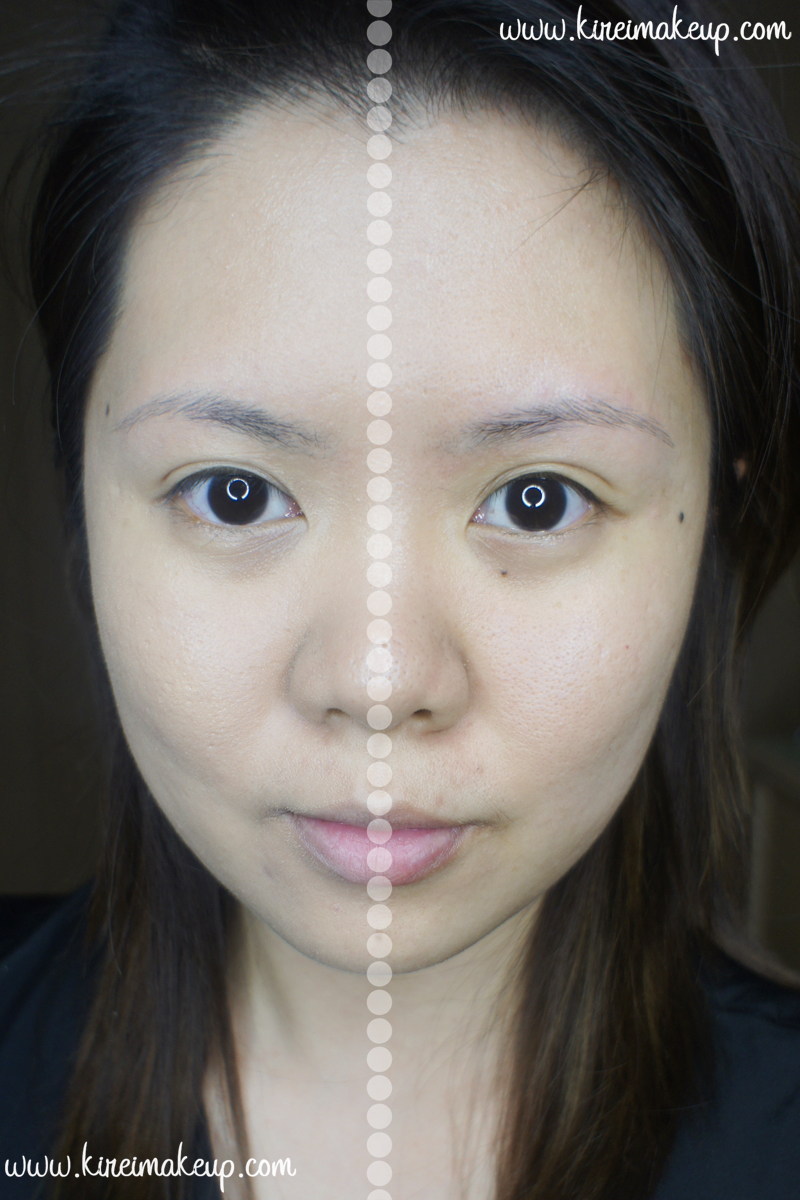
I’m not sure how many shades it comes with. From the website, there’s 2 – n02 and w13. However, mine is W24 which is also called Honey Beige, so I guess there’s 3 shades? Not sure, don’t quote me on this.

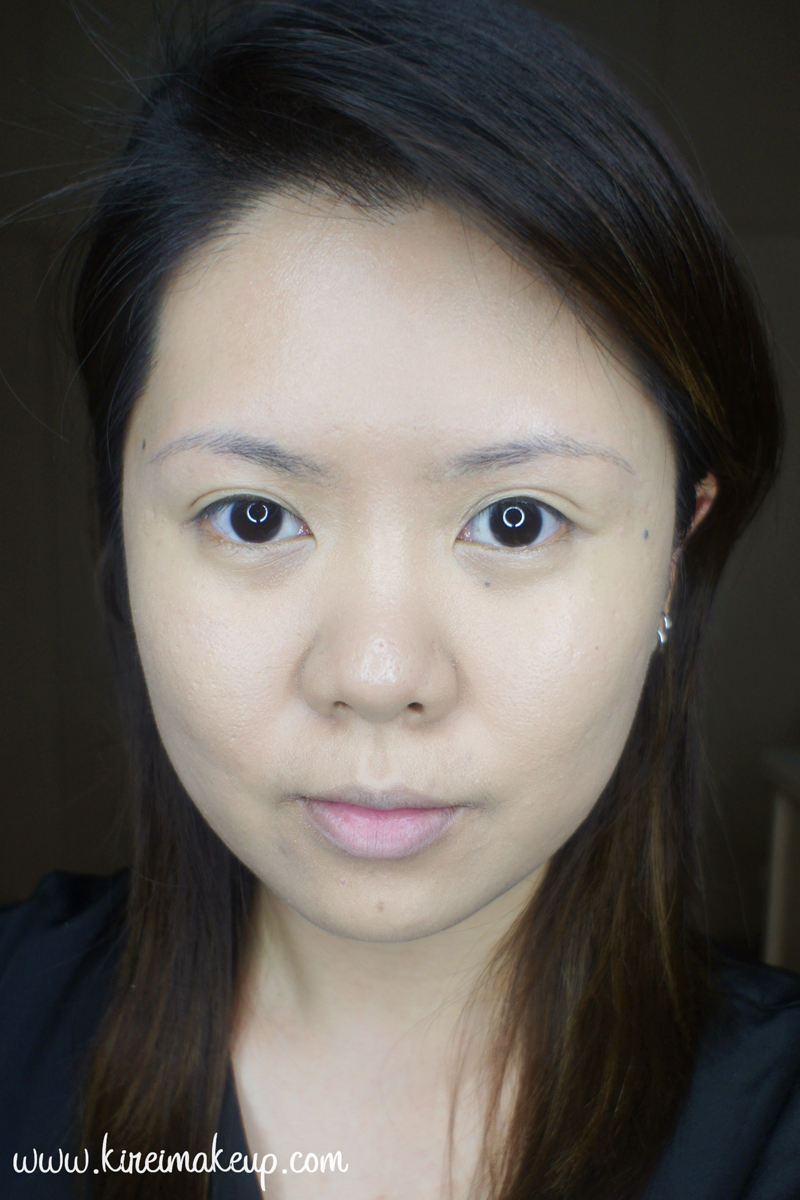
The range of the shade is very limited, it’s of no surprise. Korean brands generally only comes in 1 shade, so for this BB cream to come in 3 shades is already an achievement in itself. This shade W24 is not a perfect match. It’s a good match, but slightly too beige for my skin tone. I buffed it pretty well into my skin though, and if I apply my MAC powder on top it looks fine.

If you’re darker than NC27, this brand of BB cream won’t match you. It’ll be too light and might end up ashy on your skin.

Etude House BB Cream

Finish

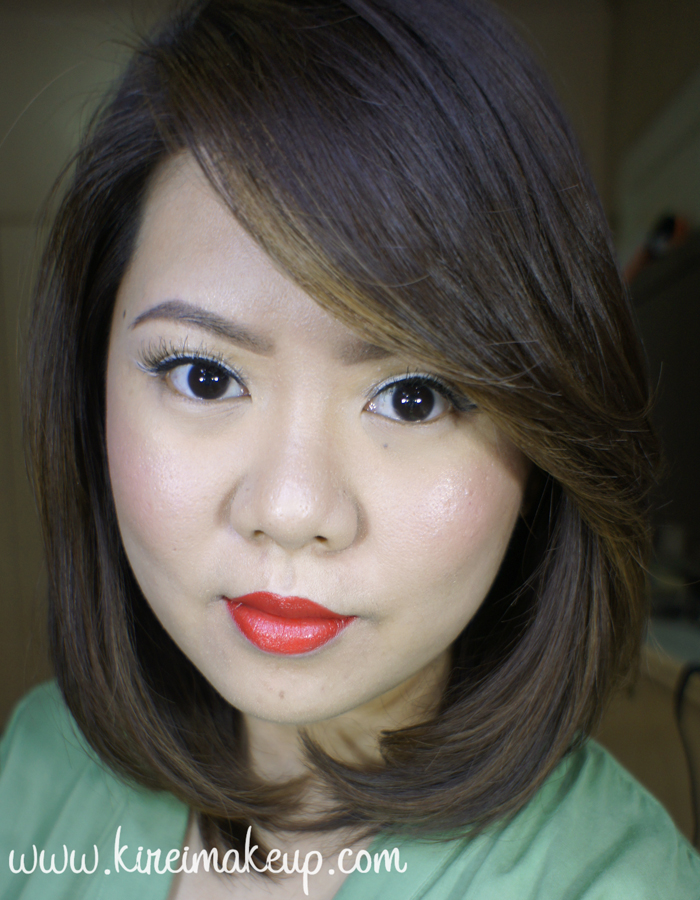
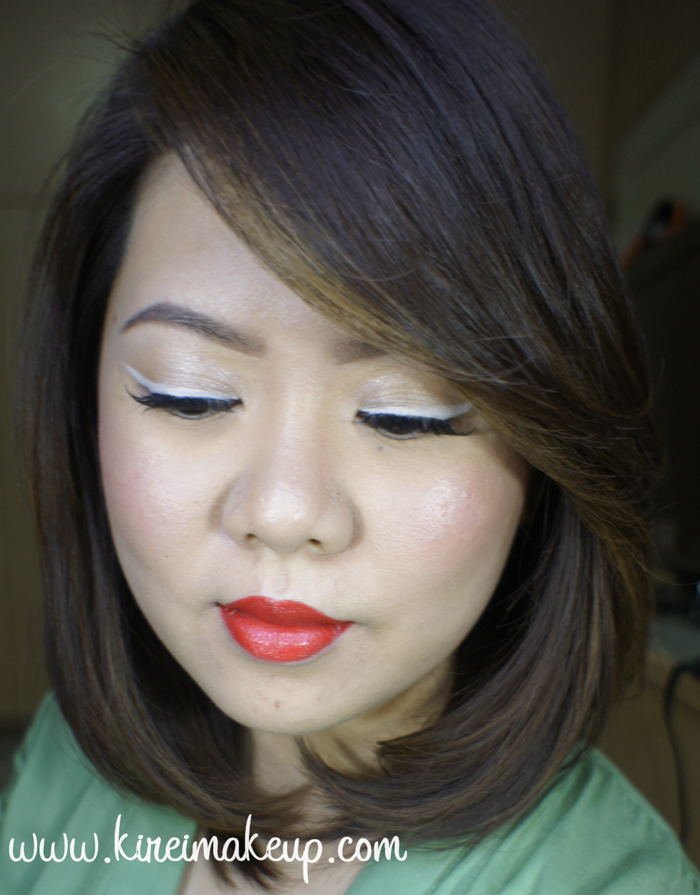
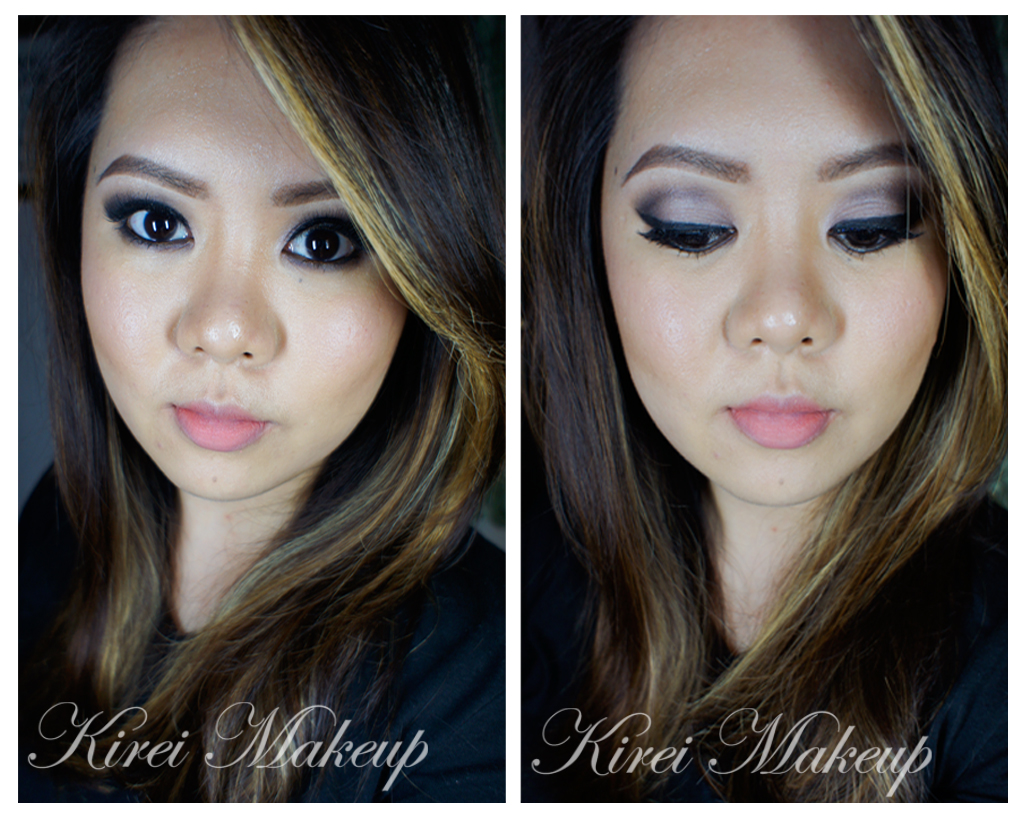
They claim that it has a pearly bright skin finish. I somewhat agree to this claim. It does have a very nice sheen to it. My skin looks pretty good, no? I’m not sure if it is “pearly”, but it has a semi-dewy finish. It’s not too dewy, but it’s not matte either. It’s not a natural finish though, in real life it looks slightly shinier than in picture.

Apparently this is a BB cream for oily skin, however, if you have super oily skin, you might want to powder this really well since it’s “pearly” finish might make you look slightly oilier. Dry skin people might want to stay away from this BB cream. It will cling to your skin and dry patches. I think this BB Cream is pretty good for those with combination skin.

Coverage

Medium coverage. If you want a light coverage, please do go light handed on it. Use very little product since it is quite pigmented.

Etude House BB cream cotton fit

Pros

  • It contains SPF 30

  • Great packaging

  • Nice pearly finish

  • Has a nice scent (similar to baby powder)

  • Doesn’t feel heavy if applied properly

  • Medium coverage

Etude House BB cream cotton fit


Cons

  • Limited range of shades and undertone – one might end up too pale and/or too ashy

  • Needs to be set with powder, if not it tends to move around

Etude House BB cream cotton fit


Shu Uemura Brave Beauty Competition

Hello everyone!!! Sorry I haven’t been updating my blog this week. I was busy since I entered Shu Uemura Brave Beauty Competition. So, if you haven’t been following me on Instagram (you should, btw..what are you waiting for? Go check out my Instagram to get the latest update!), I’d just do a quick recap of what happened. Last month, I was browsing on Instagram, and saw Shu Uemura Indonesia was organizing a makeup competition. I actually didn’t want to join for many reasons, but first and foremost because I’ve a case of stage fright. N, my sister, and Franky (fellow blogger) kept encouraging me to do it, since I’ve nothing to lose anyways. This was my first makeup competition!

So, I submitted my face chart, portfolio and went on my merry ways. I actually didn’t even remember I entered the competition. Couple days after Eid, I received an email and a call notifying that I was one of the top 10 finalists for Shu Uemura Brave Beauty competition. Fast forward couple days later, I had to attend a briefing for the competition (Monday, Aug. 11), and the competition itself was on the following day (Tuesday, Aug. 12). The other 9 finalists were nice and friendly. They’ve entered makeup competition prior to this one. So, really, I was the only one with no prior experience. Oh well, there’s always a first time for everything right?!

Shu Uemura Brave Beauty top 10 finalists


Makeup station at backstage

Photo above is my makeup station back stage. We were given 2.5hr to do the models’ complexion (skincare, base, foundation), hair, nails, and wardrobe. Nails were provided by Feliz Nail Art, and wardrobe was provided by Tex Saverio. My model is Juanita Haryadi and she’s amazing!

For the competition, we are not allowed to bring our own makeup products, except for our makeup brushes and lashes. All makeup and skincare products are given by Shu Uemura. So this competition was interesting since I don’t actually owned any Shu Uemura eyeshadows. I entered this competition without having any knowledge on how the eyeshadows going to blend and such. On the briefing day, we were given times to know the products and play with the colors. However, swatching and looking at colors are quite different from actually using it on the eyelid. Not to mention, there was no eyeshadow primer at all from Shu. That was quite a concern amongst the finalists.


Shu Uemura Brave Beauty top 10 finalists

Standing (L-R) – Suzi, Vony, Catherine, Irwan, Mirtha (Grand Prize Winner), Stephanie (Best Makeup Show winner). Sitting (L-R) – Shanti, myself, Sari

I, personally, was happy to actually join the competition. I am not a competitive person to begin with, and as I’ve mentioned before I’ve a case of a stage fright. I was like super nervous about this competition. I’ve never entered a competition before, so this was my first experience. I’m glad I did it because I managed to meet amazing makeup artists, and became friends with them. They are a bunch of great people, and we talked, shared and laughed together. We had tons of fun, and no one was mean to anyone. It was wonderful!

Also, we get to meet the legendary Kakuyasu Uchiide (Shu Uemura International Artistic Director), as well as internationally acclaimed Fashion designer Tex Saverio. Why is Tex Saverio there? That’s because Tex Saverio collaborates with Shu Uemura! 2 legendary people, and I was in between! Mr. Uchiide was like “oh come, you should stand in the middle”..OMG I ALMOST DIED!

I’ve met Rae Morris, now I’ve met Kakuyasu Uchiide! Dreams do come true! Master makeup artists! They are so friendly, humble, down-to-earth, and passionate about their work.

Kakuyasu Uchiide

(L-R): Tex Saverio, myself, Kakuyasu Uchiide

Shu Uemura Brave Beauty

Mr. Uchiide’s interpretation of Brave Beauty on the models

So, we were given 30 minutes ONLY to finish up our eye, lips and cheeks makeup. I barely had enough time to complete the look. My hands were shaking throughout the entire time. I think at one point I wasn’t even sure what I was doing. I was too nervous! Stage fright I tell ya! Anyways, 30 minutes was up and that was it!

The winners were announced – Stephanie won 2nd place (best makeup show), and Mirtha won 1st place (grand prize). I didn’t feel much disappointment. I thought they deserved to win since their makeup results were quite elaborate. I knew I wasn’t going to win because I think I have a different interpretation of what Brave Beauty was.

Anyways! I was very happy I entered this competition. I’ve made new friends, I gained experience, and I’ve definitely learn to manage my stage fright. I’ve met great people, and for me it was more than enough! I didn’t even expect to be in the top 10, so that in itself was already quite amazing!

So, I’d like to say thank you to everyone who have cheered and supported me throughout the whole time!

Shu Uemura Brave Beauty competition

(L-R): myself, Juanita, Dara, Mirtha.

Juanita Haryadi

Juanita Haryadi in Tex Saverio 

Shu Uemura Brave Beauty competition top 10

Top 10 Finalists with their models (L-R) –  Felita, Irwan, Stephanie, Sari, Jilly (me), Mirtha, Catherine, Shanti, Vony, Suzi

Shu Uemura Brave Beauty top 10 finalists

Left – my submission for Brave Beauty competition; Right – my creation for Brave Beauty competition top 10Juanita Haryadi

Juanita & me at backstage

White Eyeliner Makeup Tutorial

Ok, so this White Eyeliner makeup tutorial is actually my World Cup 2014 England Inspired Makeup, as requested by Nurina over on facebook. However, since World Cup is over, I didn’t want to title it as England inspired makeup. Not to mention, I feel like this look can be worn during Indonesia’s Independence Day which is coming up next month, or any country with a red/white flag.

Anyways, I think ever since I tried out the white eyeliner look in my Netherlands inspired makeup, I’ve been quite a fan of white winged eyeliner. It’s a fresh outtake on my usual black winged eyeliner, not to mention it does brighten up the eyes quite a bit. For my World Cup 2014 makeup series, please check my Brazil, Netherlands, Argentina, and Germany inspired makeup posts.

For this white eyeliner makeup tutorial, I wanted to show you how you can use tape to create your winged liner. I’ve done this before in my other tutorial, but just going to show it again. That tape will create a very clean edge for your eyeliner. All you have to do is run a diagonal line from the outer tip towards the inner corner of your eye. For a detailed tutorial on how to create winged eyeliner, please check my how-to post.

The only word of caution I’m going to mention again, is to be very careful when applying mascara. If you’re not careful you might end up with black spots from the mascara all over your eyeliner. The easiest way to fix this is to let the mascara dry first, run a clean cotton bud over the mascara spots, and then run the white eyeliner on top of it again.

white eyeliner makeup

How-to:

1. I applied MAC Pearl cream base all over the eyelid for some shine.

2. Then, I realized it started on crease on my eyelid, so I set it with Revlon Sand eyeshadow.

3. I placed a tape on my skin to create an angle for my eyeliner.

4. Using Revlon Photoready Kajal eyeliner in Carbon Cleopatra, I created a diagonal line from the outer corner of my eye towards the inner corner. I just dragged the pencil eyeliner on my lid, and filled in any gaps.

5. I set the eyeliner using Sleek Makeup iDivine Ultra Matte v1 Brights in Pow using an angled eyebrow brush.

6. I removed the tape, curled my lashes and applied MUFE Aqua Smoky Lash.

7. I applied Gwiyomi false eyelashes no. 3 for added drama.

8. I filled my brows using Anastasia Brow Wiz in Medium Ash.

white eyeliner makeup tutorial

9. I applied Giorgio Armani Maestro foundation using my fingertips all over my face. (Such an amazing foundation, btw!)

10. I applied Bobby Brown under eye brightener in Peach, and blended it out using my finger.

11. I set my face using NARS setting powder.

12. On my cheeks, I applied Smashbox Halo Powder blush in In Bloom.

13. For added shine, I applied MAC Soft and Gentle on top of my cheekbones, and the bridge of my nose.

14. I very lightly contoured my face using Smashbox contouring palette.

15. I lined and filled my lips using MAC Redd lip liner, then added L’oreal Super Lustrous lipstick in Ravish Me Red.

red lips makeup tutorial


World Cup 2014 Argentina Inspired Makeup

We are almost at the end of the World Cup 2014. Today I’m going to do Argentina inspired makeup, which consists mainly of light blue and white. I find it difficult to combine this shade with the rest of my makeup. I had to change my lip colors a few times before I was satisfied (and I’m still not that satisfied, btw..). I think I should’ve went with a cooler lip color, instead. Oh well…

Anyways, I actually found a little bit of difficulty when doing the tutorial since I kept coughing (yes, my cough returned…-__-lll). As you can see on the second pic (top middle), the blue shadow smudged a little to the center of the lid, even though I wanted to keep it bare. That’s because when I was doing the inner part, I coughed and the brush slide to the center of my eyelid. So, please if you decide to recreate this look, keep the middle part of the eyelid free of any blue shadow.

For the other World Cup 2014 makeup series, please check my Brazilian Inspired Makeup post and Netherlands Inspired Makeup. For the use of Sleek Makeup iDivine Candy palette, please check my Psychedelic and Very Purple tutorials.

world cup argentina makeup

How-to:

1. I applied NYX Jumbo Eyeshadow Pencil in Milk all over the eyelids.

2. Using a flat shader brush, I applied Bubble Gum from Sleek Makeup Candy palette on the outer and inner third of the eyelid, keeping the middle part free of any eyeshadow (see note above)

3. I used whatever was left on the brush on my crease.

4. Using a clean blending brush, I blended my crease so there’s no harsh line.

5. I applied Cream Soda from Sleek Makeup Candy palette in the middle part of my eyelid using a flat eyeshadow brush. I also added Pow from Sleek Makeup Ultra Matte v1 Brights palette on top of Cream Soda.

6. Using a small stiff shader brush, I applied Bubble Gum along the lower lash line.

7. I lined my waterline using Revlon Photoready Kajal eyeliner in Carbon Cleopatra.

8. I created a winged liner along the upper lash line using Kanebo Kate Super Sharp eyeliner.

9. I curled my lashes and applied MUFE Aqua Smoky Lash. I also applied Gwiyomi false eyelashes #3.

10. I filled my brows using Shu Uemura Brow Pencil.

argentina inspired makeup

11. I applied MAC Pro Longwear foundation on my face using MAC Masterclass Brush Oval 6.

12. I contoured and highlight my face using Motives Fire sculpt palette.

13. On my cheeks, I applied Benefit Coralista.

14. On my lips, I applied Revlon Colorstay Ultimate Suede Lipstick in Flashing Lights.

argentina inspired makeup

Products used:

Eyes – NYX Jumbo Eyeshadow Pencil in Milk; Sleek Makeup iDivine Candy palette (outer and inner eyelid/lower lash line: Bubblegum; center of eyelid: Cream Soda); Sleek Makeup iDivine Ultra Matte V1 Brights (center of eyelid: Pow); Kanebo Super Sharp Eyeliner; Revlon Photoready Kajal eyeliner in Carbon Cleopatra; MUFE Aqua Smoky Lash; Gwiyomi False lashes #3

Face – MAC Pro Longwear foundation; Motives Fire sculpt series palette; Benefit Coralista blush.

Lips – Revlon Flashing Lights colorstay ultimate suede lipstick.motives fire sculpt palette

World Cup 2014 Brazil Inspired Makeup

Are you guys following FIFA World Cup 2014?! I sure did, and I’m rooting for Brazil! Go Brazil!!! Anyways, since I’m showing my support for Brazil, I decided to do this Brazil Inspired Makeup. I’d probably do a World Cup inspired makeup series for the next couple weeks just for fun! I wanted to post this tomorrow, but decided to do it today.

Anyhow, for this Brazil Inspired Makeup tutorial, I wanted to create a wearable look that uses the colors of the team’s jersey – mainly yellow, a little bit of green and blue (as you can see from the jersey that I wore for today’s tutorial). I love the result, and I especially love that blue eyeliner! If you do re-create this look please TAG ME on twitter or instagram, and hashtag your work with #kireimakeup.

Since the eyes are so bright and bold, I decided to tone it down on my face. My face is kept very minimal, no contouring. My lips, I decided to go with a nude lip, with my new favorite lip pencil, MAC Spice. Since my lips were quite dry, I added Clinique Heaping Hazelnut chubby lip balm to keep it moist. I do apologize if my face doesn’t look that flawless, you can see a bit of breakout here and there, since my immune system is currently down. As you can see, I do not airbrush my face, so what you see is what I actually look like! 😉

brazil inspired makeup

How-to:

1. I applied a yellow cream face paint as a base all over my eyelid. For this tutorial, I used PAC , an Indonesian brand, but you can use any yellow cream base (e.g. MUFE Flash Palette), OR a white base (e.g. NYX Milk Jumbo Pencil in Milk). A good base is necessary so the yellow pops even more.

2. Using a flat eyeshadow brush, I applied MUFE eyeshadow no. 71 all over my eyelid.

3. Using a small blending brush, I applied Urban Decay Buck on outer V and extended it into the crease.

4. Using a dark blue cream face paint from PAC and an angled eyeliner brush, I created a winged liner along the upper lash line.

5. *VERY IMPORTANT STEP* I SET the cream eyeliner using Urban Decay Chaos with another clean eyeliner brush. If you don’t set your cream face paint, it’ll crease.

6. On the bottom lash line, I applied Dragon Fly from Sleek Makeup iDivine Ultra Matte V1 Brights.

7. I lined my tightline and waterline using L’oreal Voluminous Smoldering eyeliner.

8. I curled my lashes, applied mascara, and applied Ardell Demi Luvies falsies.

9. I filled my brows using Anastasia Brow Wiz in Medium Ash.

world cup inspired makeup brazil

10. For my face, I decided to keep it simple. I applied Marc Jacobs Gel foundation using CoverFX cream foundation brush.

11. I applied a little bit of yellow corrector from MAC Conceal/Correct palette in Medium under my eyes.

12. I dusted MAC Mineralized Skinfinish powder all over my face.

13. I applied Smashbox Halo Blush powder in In Bloom.

14. I lined and filled my lips using MAC Spice lip liner. On top of it, I applied Clinique Chubby lip balm in Heaping Hazelnut.

brazil inspired makeup


Very Purple with Sleek Makeup Candy Palette

As mentioned in my previous post, I wanted to share this tutorial with you guys! Today’s look uses Sleek Makeup Candy Palette (Limited Edition) that I bought from Luxola! Don’t worry, the palette that I’m giving away is totally brand new, and unused!

Oh, you didn’t know about the giveaway that’s going on? Check out my Sleek Makeup Candy Palette Giveaway post for details! This giveaway will last until Thursday (June 12, 2014) at 11.59pm.So, hurry up and check out that post for more info!

I also want to mention that since my images were getting used without my permission nor credits, I’m putting a huge watermark in the middle of all my pictures from here onwards. I do apologize if the watermark is bothering the picture, but I have to protect my work. I do want to thank all of you who have been kind enough to let me know whenever someone used my pictures (aka plagiarism). I appreciate all your kindness! A big thank you, hugs, and kisses for you who have been supporting me!

Anyways, let’s get the tutorial started!

sleek makeup idivine candy paletteEyelids are prepped using Urban Decay Primer Potion in Eden. All shades for the eyes are from Sleek Makeup iDivine Candy Palette.

How-to:

1. Using Smashbox bullet crease brush, I applied Flump slightly above my crease.

2. Using a small blending brush, I applied Parma Violet on the outer V and the crease. You can apply this using a small shader brush for a more precise application.

3. Using the same bullet crease brush as step 1, I blended out Parma Violet to remove any harsh edge on the crease. I also slightly winged the outer part.

4. Using a flat eyeshadow brush, I applied Aniseed all over my eyelid.

5. Using a small shader brush, I applied Bon Bon on the inner corner of my eyes, and then I applied Parma Violet along the lower lash line.

6. I used my face powder (MUFE 118 Pro Finish) and a blending brush under my brows, blending it into the purple shades slightly to remove any harsh edge.

7. I lined my upper lash line using Kanebo Kate Super Sharp Eyeliner. On the waterline, I applied black eyeliner pencil.

8. I curled my lashes, applied mascara, and then applied Ardell Demi Wispies lashes. (As you can see, Ardell demi wispies falsies are my current favorite lol).

9. For the brows, I applied Anastasia Brow Wiz in Medium Ash. I lightly set it with Anastasia Brow Powder duo in Brunette.

sleek makeup candy tutorial

10. For my face, I applied Motives Fire highlight/contour palette. I applied the lightest highlight color on the high planes of my face – cheekbones, bridge of the nose, cupid’s bow, forehead, chin, below hollows of the cheeks, and under my eyes. I applied the darkest contour color on the hollows of my cheeks, sides of my nose, and temples. I blended them out using a damped beauty blender sponge and MUFE HD Foundation in 118.

11. For my cheeks, I applied Smashbox Halo blush in In Bloom.

12. For the lips, my new favorite, I applied L’oreal Color Riche Extraordinaire Liquid Lipstick in Rose Symphony

Red Lips with Revlon Fire and Ice

Another lips look, as mentioned, but this time I’ve decided to use this gorgeous shade – Revlon Fire and Ice. Apparently, this shade was first launched in the 50s, so of course I have to have it!To find out more about the history of this iconic shade, feel free to read about it in Fire and Ice, and Everything Nice.

The best part about this shade is the fact that it is a neutral red – it has both warm and cool undertone, which makes it the perfect shade for everyone. To be honest, I personally find this shade to be slightly on the brighter side compared to the other red lipsticks that I owned, but I don’t mind it. On myself, the shade looks slightly on the coral side. However, this shade might look different depending on your own skin tone, which I think is great since it’ll be a unique color to each person.

I applied the lipstick without any lip liner, and straight from the tube. I didn’t blot and powder it for this tutorial so you can see its true shade and texture. Revlon Fire and Ice is a super lustrous lipstick, which means it’s slightly more on the creamier side. I don’t find this shade to be drying at all.

Also, if you noticed, I’ve been switching my makeup from eyes to lips lately. I actually rocked a red lip last weekend to attend a friend’s wedding (after doing her makeup and hair). Curious to see which red lips I wore last weekend? Check out my Instagram!

For my eyes, I’m using the Kat Von D Monarch palette. I’ve done a tutorial using this palette before in Kat Von D Monarch Palette makeup tutorial.

kat von d monarch palette look

How-to:

1. I prepped my eyelids using Urban Decay Primer Potion in Sin.

2. On my crease, I applied Buck from Urban Decay using a fluffy blending brush.

3. Using a small crease brush, I defined my crease a bit more using Shadow Box from Kat Von D Monarch palette.

4. I applied Deadhead from Kat Von D Monarch palette on the outer V using a small shader brush.

5. On the eyelid, I applied Telepathy using a flat eyeshadow brush.

6. I created a winged liner using L’oreal Infallible Gel Lacquer in Blackest Black.

7. I lined my lower lid using L’oreal Voluminous Smoldering eyeliner.

8. On the lower lid, I applied Deadhead on the outer half and Telepathy on the inner corner.

9. I also lightly dust Entomology from the Kat Von D palette on the inner corner of my eyes.

10. I curled my lashes and appied Ardell demi wispies falsies.

11. On my brows, I applied Anastasia Brow Wiz in Medium Ash.

Red Lips on asian

12. For my face, I applied MUFE HD Foundation in 120.

13. I contoured my face using Cover FX N110 cream foundation.

14. On my cheeks, I applied NARS Mata Hari.

15. On my lips, I applied Revlon Fire and Ice lipstick.

Summer Lips with NARS Schiap

I posted a picture of this look on Instagram, and asked if anyone would like to see it since I don’t actually love how it turned out. However, lots of my followers on Instagram commented to post this tutorial, to my surprise. I think my mistake with this look is with the eyes. May be for future look using NARS Schiap lipstick, I wouldn’t be using the NAKED 3 on my eyes.

Since my Instagram followers love the result, I want to post this up for them! I’d suggest skipping the eyeshadow entirely and just use the winged liner on the eyes to complement the lips. If you want to figure out how to apply winged eyeliner, please check my how-to winged liner post!

I’m just going to skip the step-by-step on the eyes, and instead will list all the products used below.

urban decay naked 3 tutorial

Products used

Eyes – Urban Decay Naked 3 palette (Lid: Buzz, Above crease: Factory, Crease/lower lid: Nooner); L’oreal Super Liner Ultra Sharp Tip; Anastasia Brow Wiz in Medium Ash; Ardell false eyelashes in 110.

Face – Cover FX cream foundation in G40 as base; Cover FX N110 as contour.

Blush – NARS Matahari.

Lips – NARS Schiap.nars schiap

Available for Bookings in Jakarta, Indonesia

Hi all!

I just wanted to share my current works with you, while I’m in Jakarta. Just to let you know, I am available for makeup, eyelash extension, as well as beauty workshop bookings in Indonesia.

If you have followed me on Instagram, and Facebook, you’d probably already seen these pictures! If you want to find out what’s the story behind each of these lovely ladies, and which products I used for their makeup, please check my Instagram page! It’s all in the description box.

Again, I’m available in Jakarta for bookings! For more pictures of my work please check my Photos page.

jakarta makeup artist

jakarta makeup artist

mature skin makeup makeup artist jakarta

Lavender Grey using NARSissist Palette

For this week’s tutorial, I decided to use my NARSissist Palette again! I fell in love with this palette all over again. I feel like it’s such a great palette with a more mature color option. For today’s tutorial, I picked out my favorite shades which were in the range of grey, lavender, and violet. I know the picture doesn’t show much of the lavender/violet on the lid, but I assure you it’s such a pretty grey with very subtle hint of lavender/violet in it. If you’re one not to wear color, and prefer a much neutral option, this would be a great addition to your makeup wardrobe.

Oh, just to let you guys know, I have been trying to update my Instagram daily. I’m going to try to do a weekly “Monday Makeup Inspiration”, and regram/repost-ing every look that YOU guys do if you FOLLOW me (@kireimakeup) and add #kireimakeup to your Instagram pictures! I’d love to see your makeup and/or your re-creation of any of my looks!

narsissist smoky eyes

How-to:

1. I’ve prepped my eyelid using Urban Decay Primer Potion in original. Using a blending brush (from UD Naked 3 palette), I applied NARS Brousse II on my crease.

2. Using a small shader brush, I applied NARS Pandora II on the outer V of my eyelid.

3. I blended my crease by applying NARS Madrague I using a clean blending brush. I used this shade as a transition color.

4. I applied NARS Ashes to Ashes on my entire eyelid using a flat eyeshadow brush. I also added a little bit of NARS Lhasa on top of it.

5. I created a winged liner along my upper lash line using L’oreal Infallible Gel Lacquer 24hr in Blackest Black and an angled eyeliner brush. Using whatever was left on the brush, I ran it along the lower lash line, and waterline.

6. I also used a small shader brush and applied NARS Ashes to Ashes along my lower lid.

7. I filled my brows using Anastasia Brow Wiz in Ash Blonde and Brunette. I cleaned up the edges of my brows using Cover FX G20 cream foundation. If you want to know how I fill my brows, please check my brow tutorial.

8. I curled my lashes and applied Cover Girl Lash Blast mascara. I also applied falsies (Korean’s falsies, not sure what it’s called since the brand is not in English).

NARSissist Lavender Grey smoky eyes

9. On my face, I applied Cover FX Cream Foundation in G40 using MAC Masterclass Brush Oval 6.

10. I lightly applied highlight and contour using CoverFX cream foundations in G20 & N110. Check out my BACON post to find out how I used CoverFX to do my highlight and contour.

11. On my cheeks, I applied Revlon cream blush in Pinched.

12. On my lips, I applied Revlon Mauve it Over matte lipstick.