NARS Mekong Smoky Eyes (NARSissist palette)

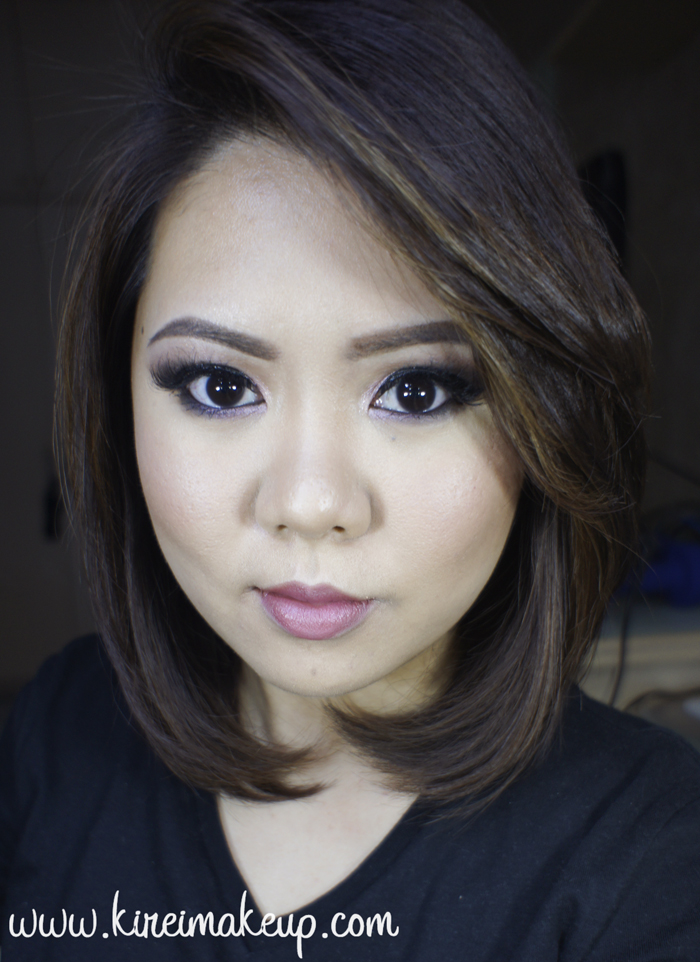
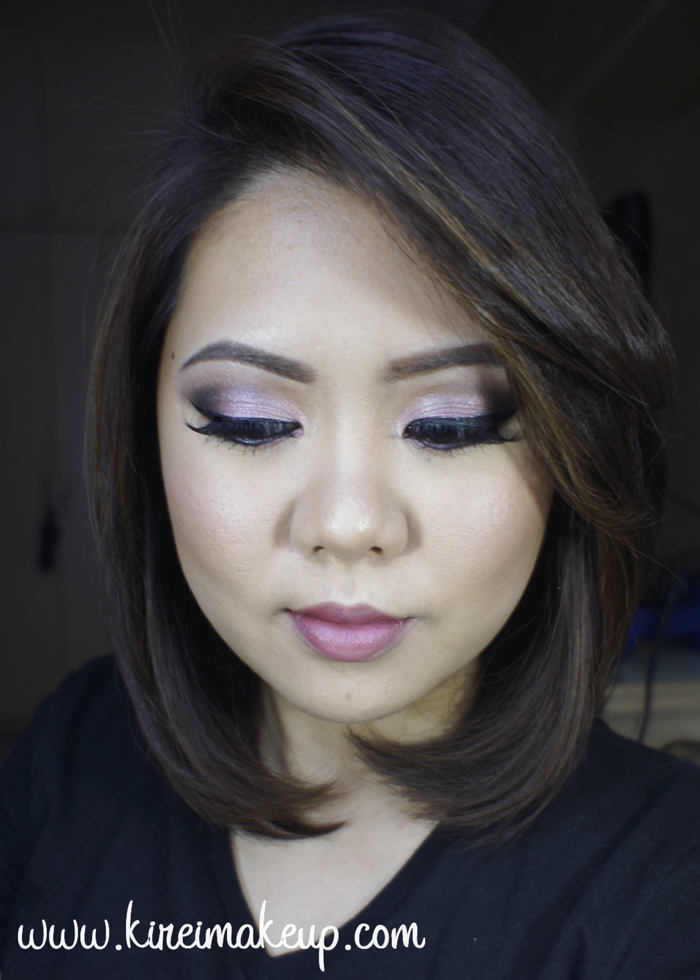
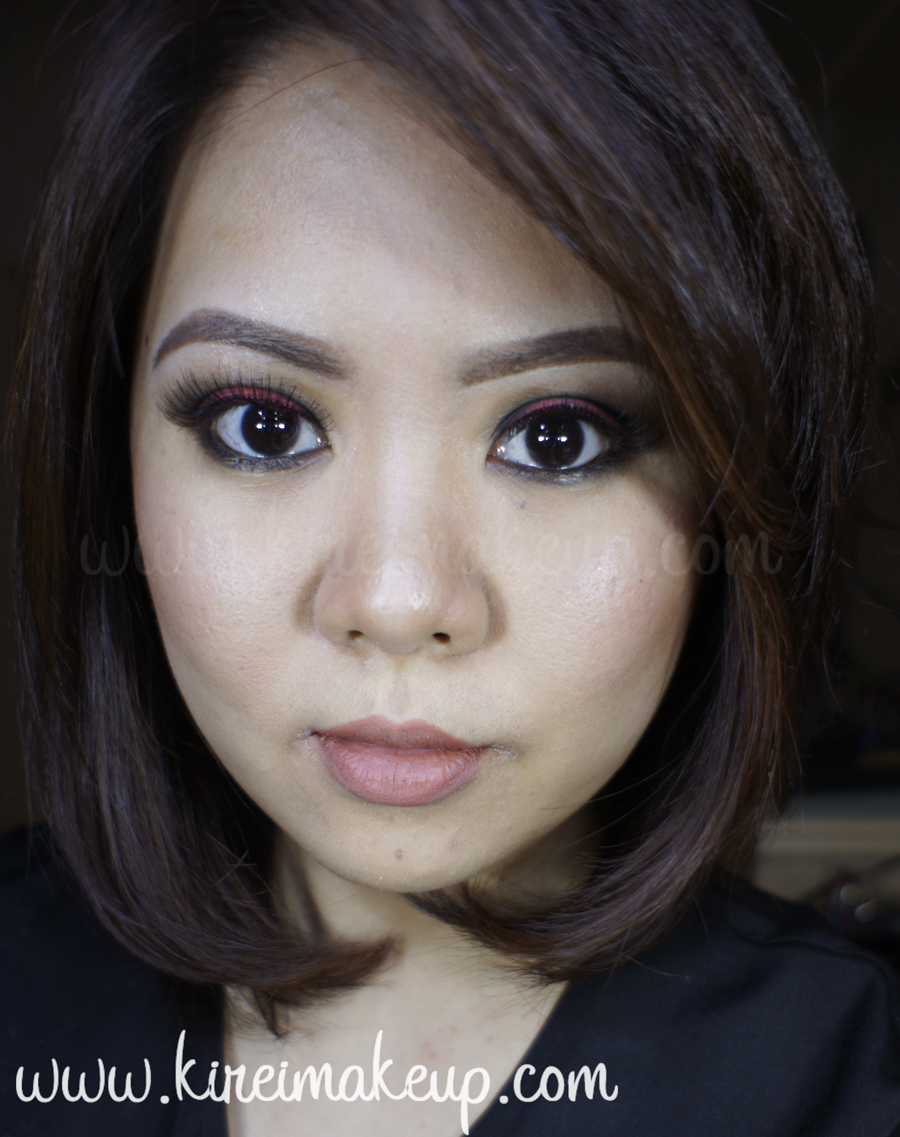
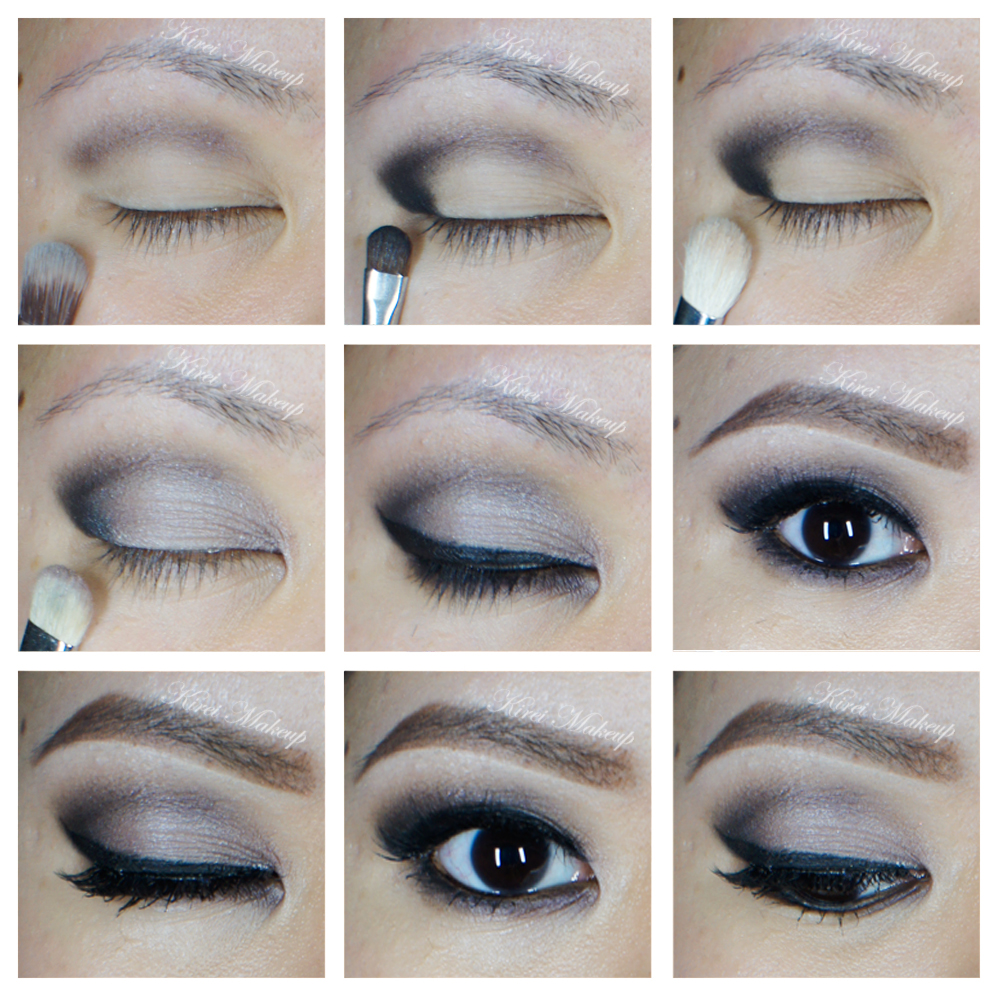
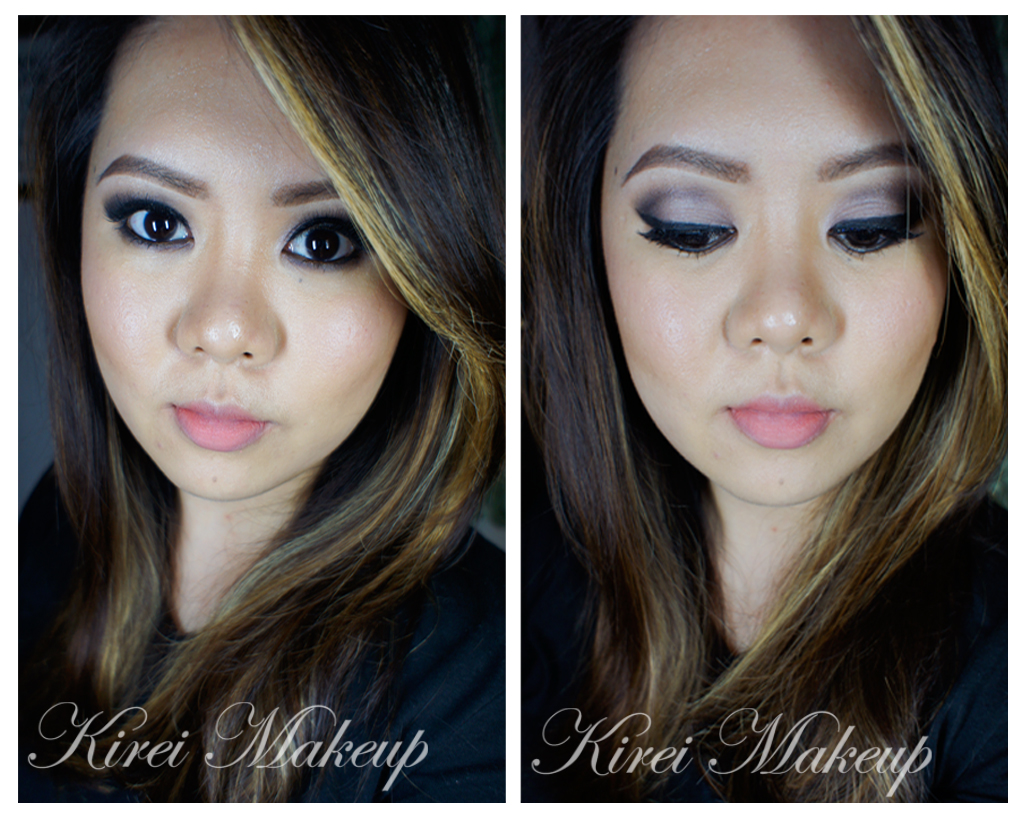
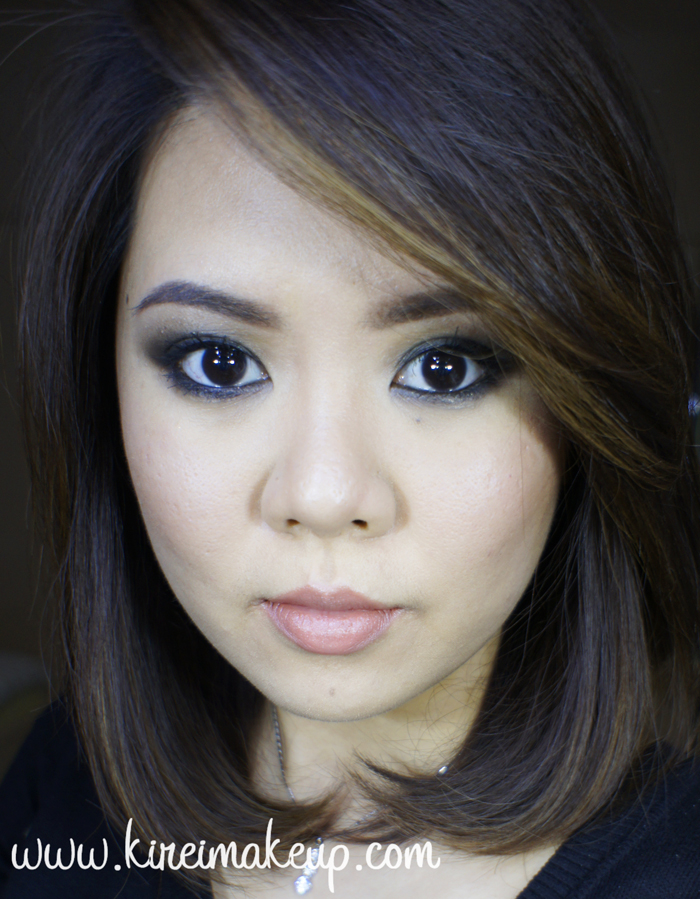
Who doesn’t love a good smoky eyes? I sure do! I’m sure my friend, Finency, loves it too! She showed me this picture on Instagram, and it showed a smoky eyes using NARS Mekong eyeshadow. I love how simple, easy, and definitely I’ll wear this for a night out.

I skipped the whole false lashes so this look is more grungy, and more me. I don’t usually wear falsies, so this really stay true to how I’d wear my smoky eyes. I also filled my brows without shaping it using any concealer. Again, just want to stay true to how I usually do my makeup. As I said, it’s very simple and quick. No fuss, sexy, and sultry. I like my makeup to be as simple as possible. This is just how I prefer to do my makeup, but if you like more of a glam look you can take a look at my other tutorials under smoky eyes.

For this tutorial, I used NARS eyeshadows from the NARSississt palette. I’ve done tutorials, and review of this palette. Please feel free to check them out.
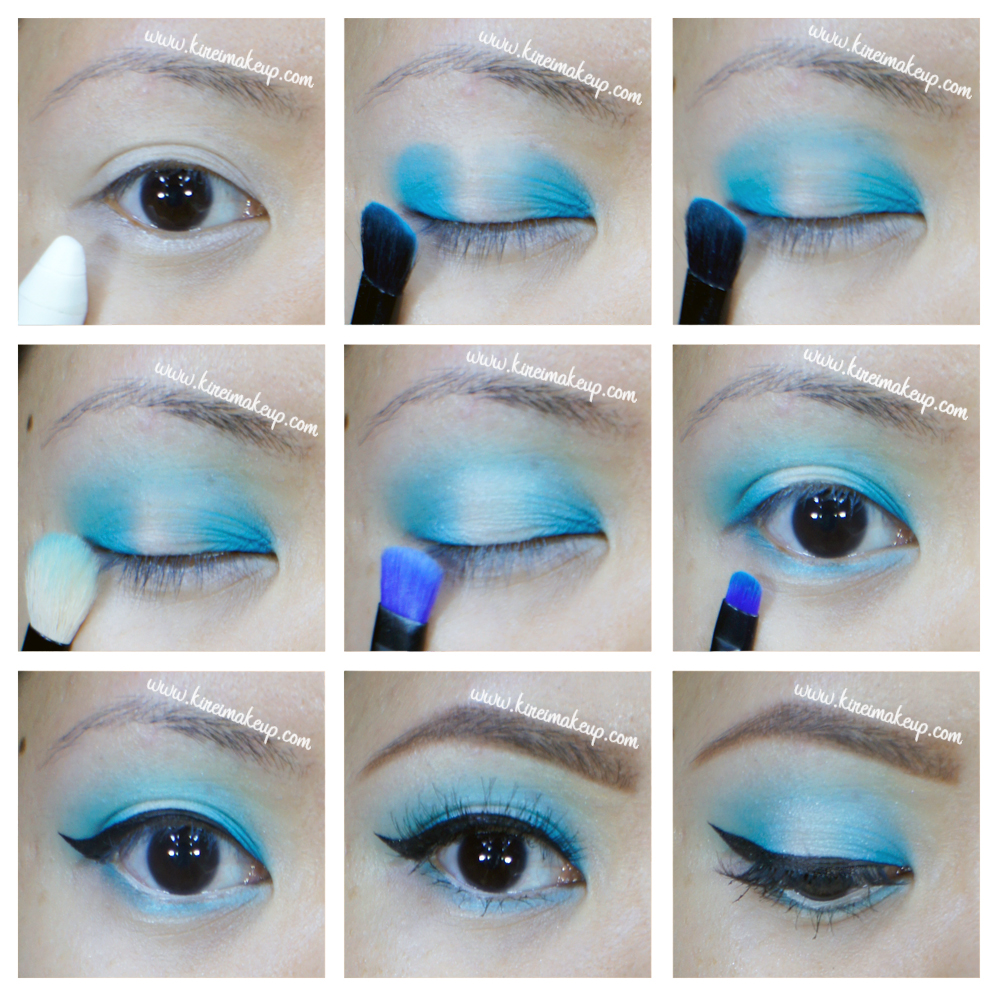
NARS Mekong tutorial

How-to:

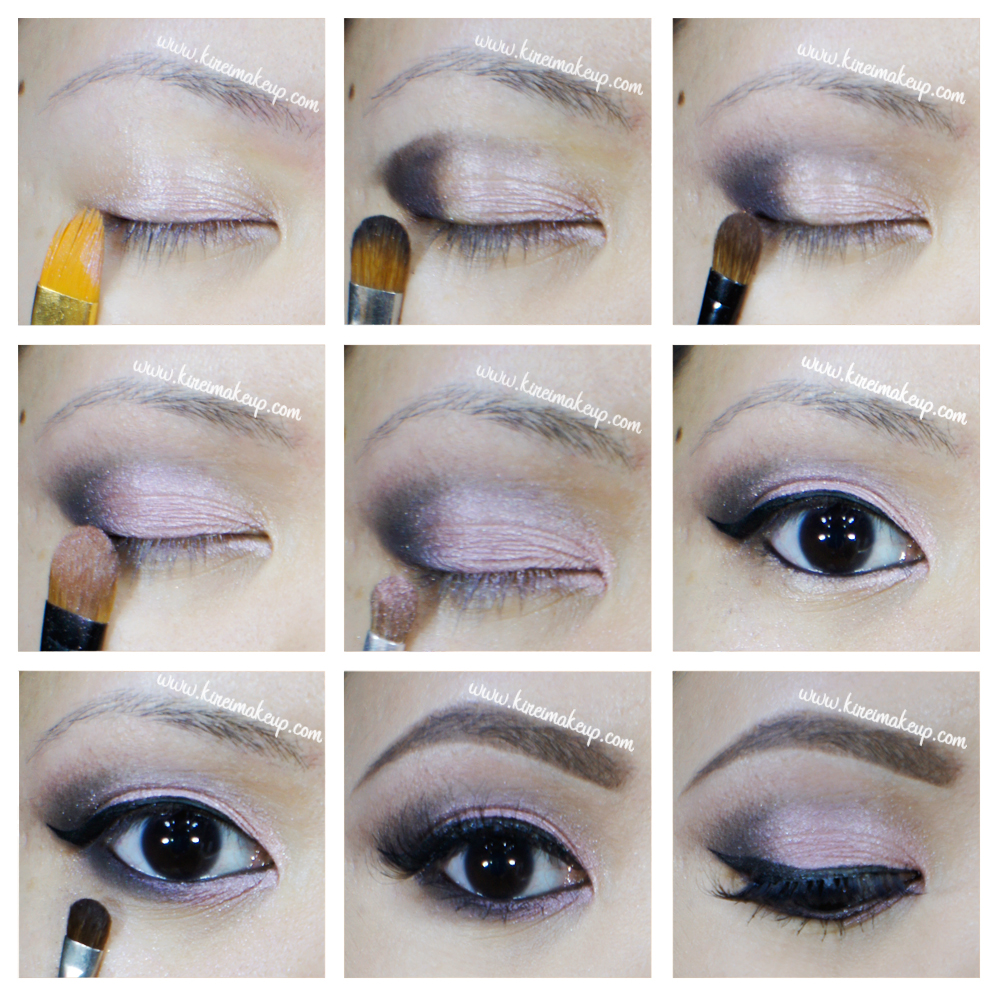
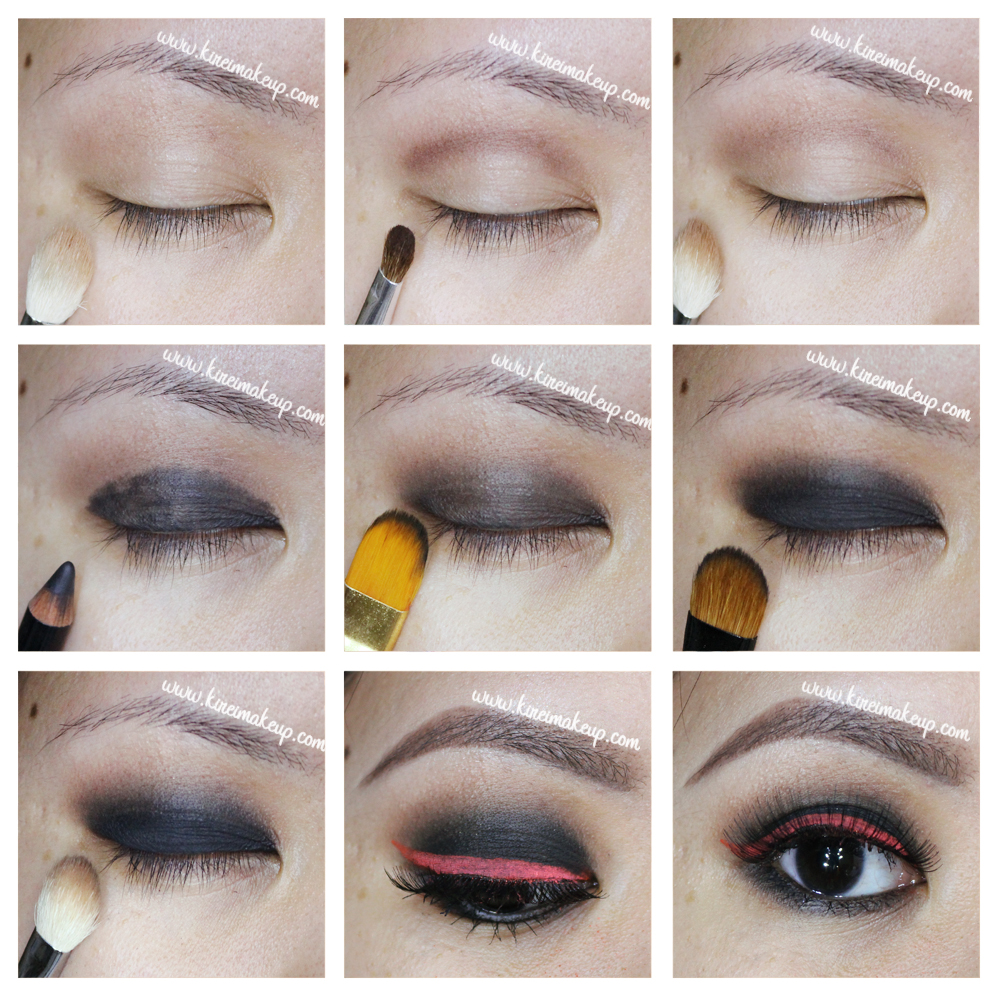
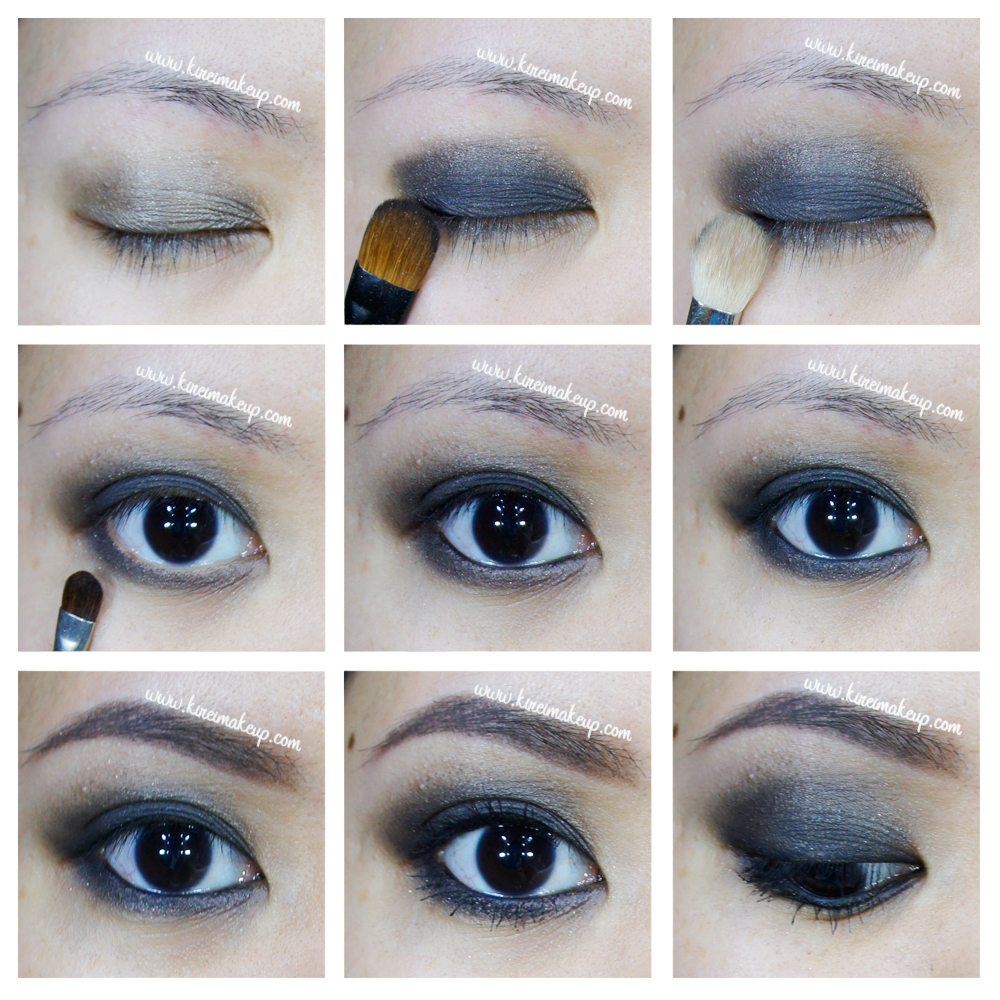
1. I prepped my eyelids by applying a cream-base eyeshadow. I used Smashbox limitless 15-hour cream shadow in Stone.

2. Using a flat eyeshadow brush, I applied NARS Mekong eyeshadow all over my eyelid. The camera didn’t pick it up, but there’s lots of gorgeous golden flecks on my lids.

3. Using a fluffy blending brush, I applied NARS Madrague I on the crease to diffuse the color out.

4. I applied NARS Mekong on the lower lash line using a small shader brush.

5. I lined my waterline, tightline, and upper lash line using L’oreal Voluminous Smoldering eyeliner.

6. Using an angled eyebrow brush, I applied NARS Pandora II along the upper lash line. I kind of winged mine a little, but you don’t have to.

7. I filled my brows using Anastasia Brow Wiz in Medium Ash.

8. I curled my lashes and applied MUFE Aqua Smoky Lash mascara on both upper and bottom lashes.

NARS Mekong smoky eyes

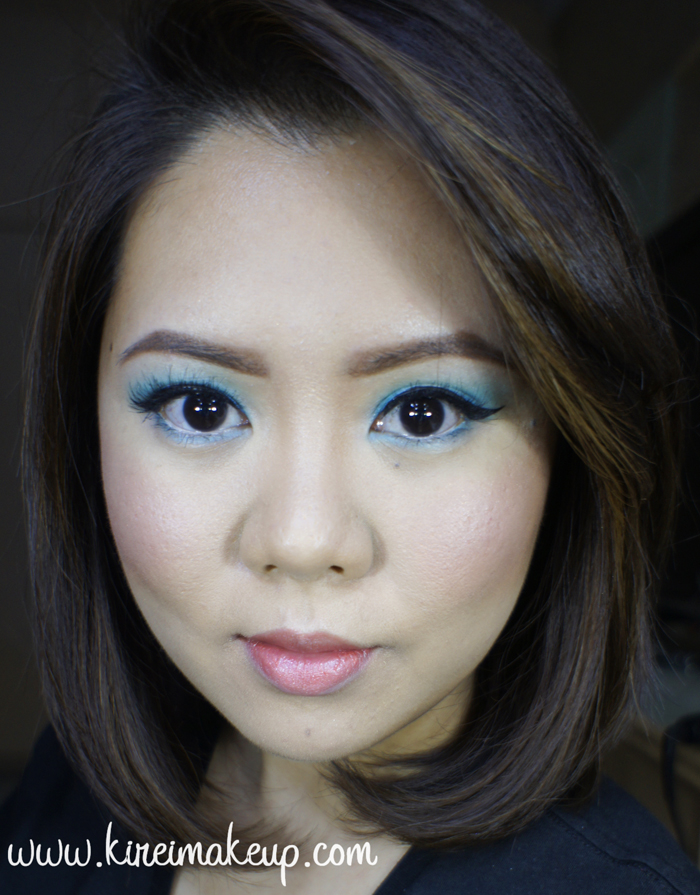
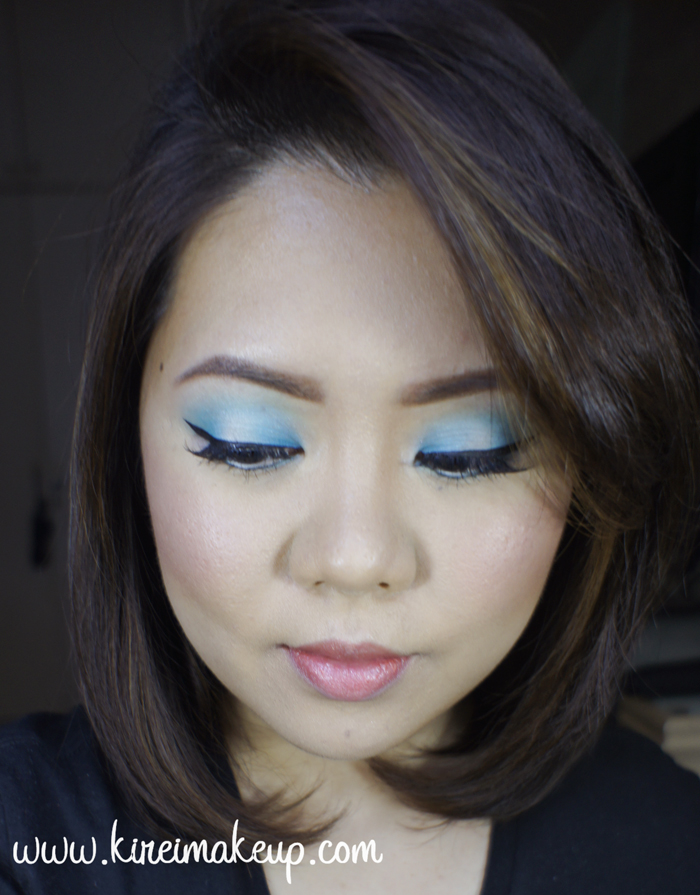
9. On my face, I applied Smashbox Liquid Halo Foundation using CoverFX cream foundation brush.

10. I highlighted (under my eyes, bridge of my nose, cupid’s bow, chin, & forehead) my face using YSL Touche Eclat.

11. I set my face using Cover FX translucent powder.

12. I lightly contoured my face using Smashbox contour palette.

13. On my cheeks, I applied Chanel Blush de Horizon.

14. I filled my lips using MAC Spice lip liner, and Clinique Heaping Hazelnut Chubby Stick lip balm.
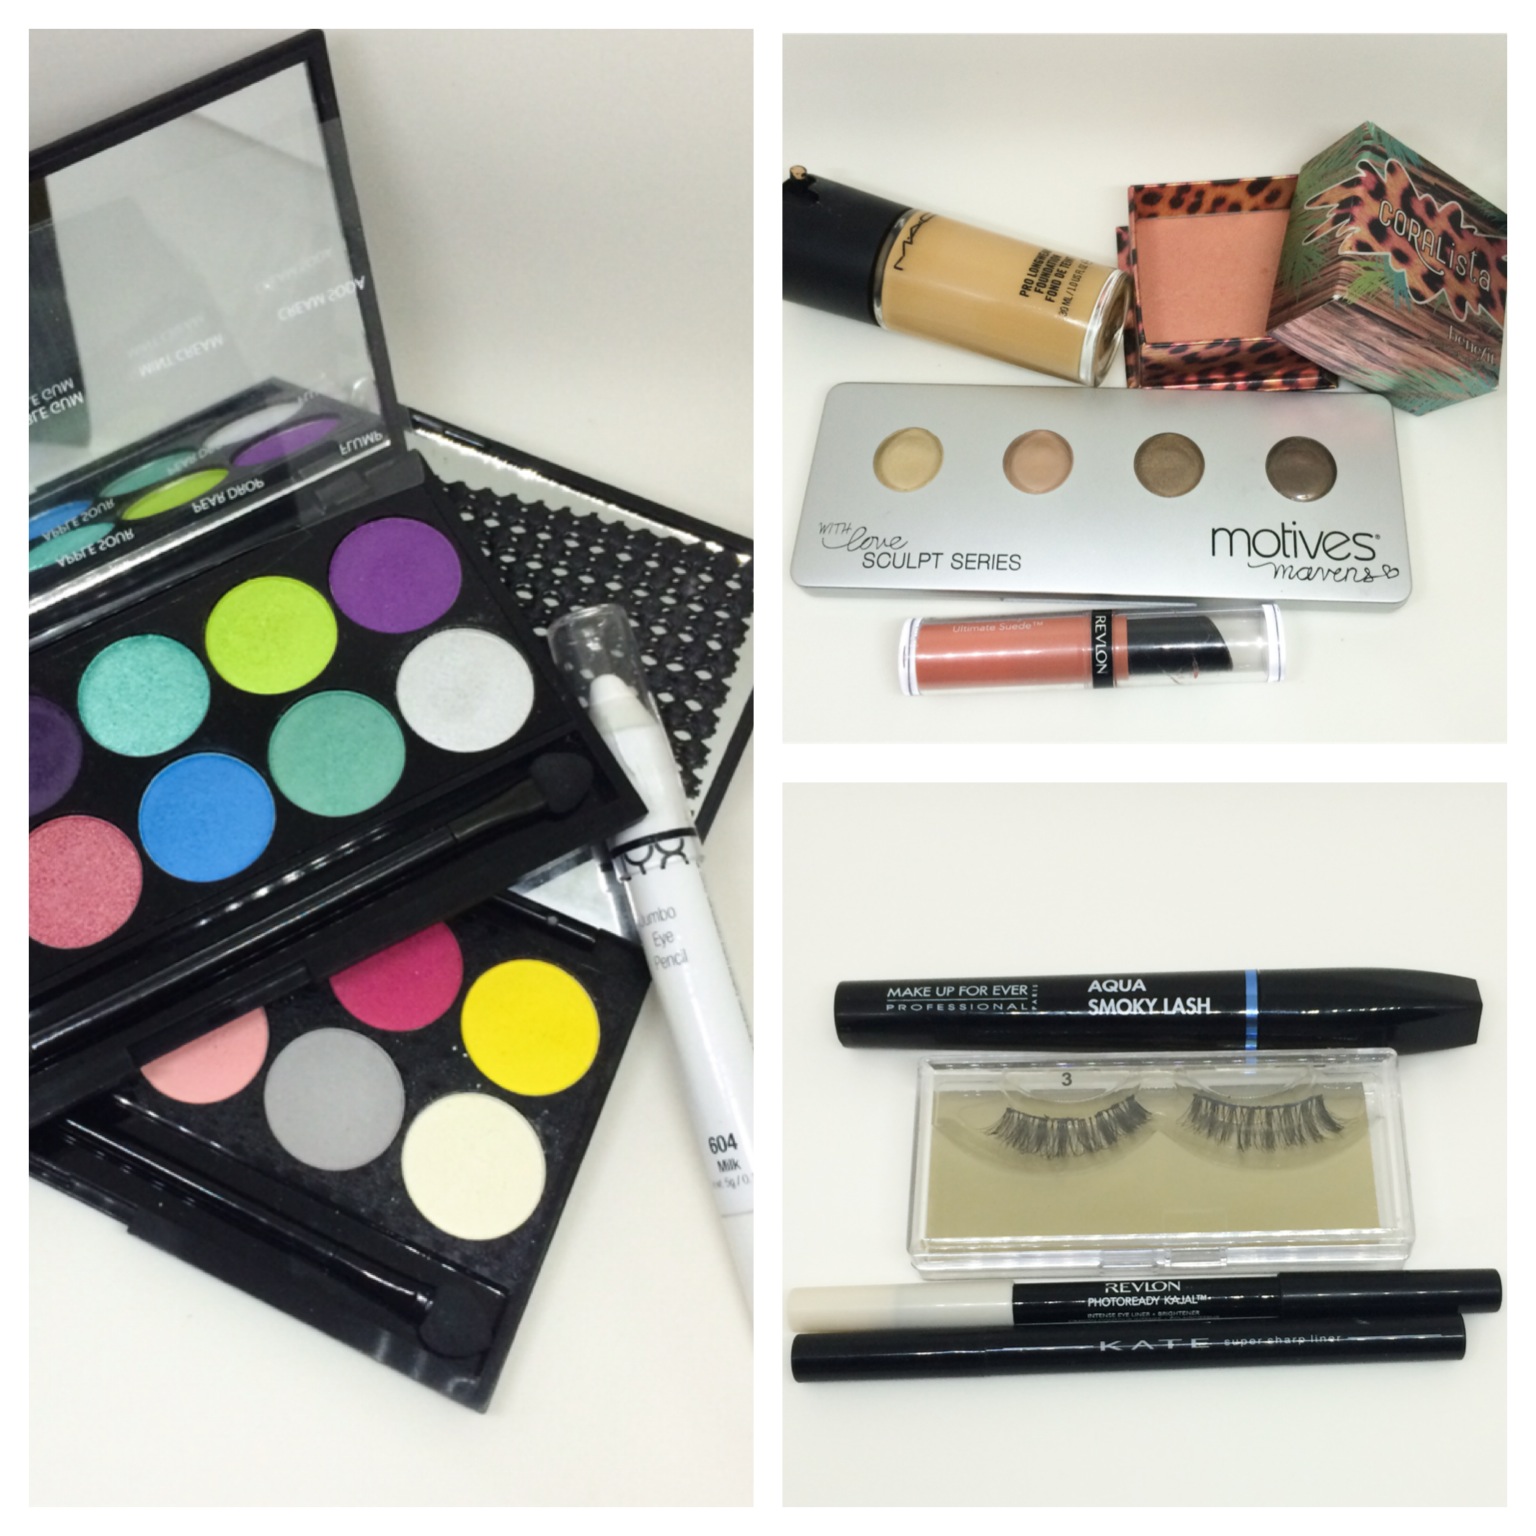
 

Products used

Eyes – Smashbox limitless 15-hour cream shadow in Stone; NARSissist eyeshadow palette (Lid: Mekong, crease: Madrague I, liner: Pandora II); Anastasia Brow Wiz in Medium Ash; MUFE Aqua Smoky Lash mascara

Face – Smashbox Liquid Halo foundation; YSL Touche Eclat; Cover FX Translucent Powder; Smashbox contour powder; Chanel Blush de Horizon

Lips – MAC Spice lip pencil; Clinique Heaping Hazelnut chubby stick

World Cup 2014 Argentina Inspired Makeup

We are almost at the end of the World Cup 2014. Today I’m going to do Argentina inspired makeup, which consists mainly of light blue and white. I find it difficult to combine this shade with the rest of my makeup. I had to change my lip colors a few times before I was satisfied (and I’m still not that satisfied, btw..). I think I should’ve went with a cooler lip color, instead. Oh well…

Anyways, I actually found a little bit of difficulty when doing the tutorial since I kept coughing (yes, my cough returned…-__-lll). As you can see on the second pic (top middle), the blue shadow smudged a little to the center of the lid, even though I wanted to keep it bare. That’s because when I was doing the inner part, I coughed and the brush slide to the center of my eyelid. So, please if you decide to recreate this look, keep the middle part of the eyelid free of any blue shadow.

For the other World Cup 2014 makeup series, please check my Brazilian Inspired Makeup post and Netherlands Inspired Makeup. For the use of Sleek Makeup iDivine Candy palette, please check my Psychedelic and Very Purple tutorials.

world cup argentina makeup

How-to:

1. I applied NYX Jumbo Eyeshadow Pencil in Milk all over the eyelids.

2. Using a flat shader brush, I applied Bubble Gum from Sleek Makeup Candy palette on the outer and inner third of the eyelid, keeping the middle part free of any eyeshadow (see note above)

3. I used whatever was left on the brush on my crease.

4. Using a clean blending brush, I blended my crease so there’s no harsh line.

5. I applied Cream Soda from Sleek Makeup Candy palette in the middle part of my eyelid using a flat eyeshadow brush. I also added Pow from Sleek Makeup Ultra Matte v1 Brights palette on top of Cream Soda.

6. Using a small stiff shader brush, I applied Bubble Gum along the lower lash line.

7. I lined my waterline using Revlon Photoready Kajal eyeliner in Carbon Cleopatra.

8. I created a winged liner along the upper lash line using Kanebo Kate Super Sharp eyeliner.

9. I curled my lashes and applied MUFE Aqua Smoky Lash. I also applied Gwiyomi false eyelashes #3.

10. I filled my brows using Shu Uemura Brow Pencil.

argentina inspired makeup

11. I applied MAC Pro Longwear foundation on my face using MAC Masterclass Brush Oval 6.

12. I contoured and highlight my face using Motives Fire sculpt palette.

13. On my cheeks, I applied Benefit Coralista.

14. On my lips, I applied Revlon Colorstay Ultimate Suede Lipstick in Flashing Lights.

argentina inspired makeup

Products used:

Eyes – NYX Jumbo Eyeshadow Pencil in Milk; Sleek Makeup iDivine Candy palette (outer and inner eyelid/lower lash line: Bubblegum; center of eyelid: Cream Soda); Sleek Makeup iDivine Ultra Matte V1 Brights (center of eyelid: Pow); Kanebo Super Sharp Eyeliner; Revlon Photoready Kajal eyeliner in Carbon Cleopatra; MUFE Aqua Smoky Lash; Gwiyomi False lashes #3

Face – MAC Pro Longwear foundation; Motives Fire sculpt series palette; Benefit Coralista blush.

Lips – Revlon Flashing Lights colorstay ultimate suede lipstick.motives fire sculpt palette

Pink Smokey Eyes Tutorial with UD Naked 3

If you guys followed my Instagram account, you’d have known that last night I was doing a tutorial, yes? Anyways, today’s look is a Pink Smokey Eyes tutorial using Urban Decay Naked 3 palette. Yes, again! Naked 3 again! I know you guys might have gotten bored with Naked 3, but I have not. I loved this palette and wanted to make use of this palette as much as I can. If you want to check out my other Naked 3 tutorials, please take a look at Urban Decay Naked 3, and UD Naked 3.

I created this look since I wanted a more girly take on the smoky eyes. At the same time, I wanted a darker, more glam, and sultrier looking smoky eyes using the Naked 3 palette. Check out my review on the naked 3 palette.

I would like to mention that I absolutely love how my skin looks like in this tutorial. I, for some reason, love how MAC Pro Longwear foundation photographs. It makes my skin looks absolutely flawless, at the same time it doesn’t feel heavy at all. I really should give this foundation more compliment. I’ll try to do a review of this foundation next time.

rose smoky eyes

How-to:

1. My eyelids are primed using Maybelline Inked in Pink cream eyeshadow.

2. Using a flat eyeshadow brush, I applied Blackheart on the outer third of the eyelid, extending it slightly on to my crease.

3. Using a small fluffy blending brush, I applied Nooner on my crease to blend Blackheart out.

4.  I applied Buzz on the eyelid using a flat eyeshadow brush.

5. To add extra sparkles, I applied Dust using a small eyeshadow brush on the inner corner, and in the middle of my eyelid.

6. I created a winged liner along my upper lash line using Kanebo Kate Super Sharp eyeliner, and lined my waterline using L’oreal Voluminous Smoldering eyeliner.

7. I also applied Blackheart along the lower lash line, and Buzz on the inner third of the lower lash line.

8. I curled my lashes and applied Buxom Lash mascara. I, then, applied Lavie Lash Bluebell falsies.

9. I filled my brows using Anastasia Brow Wiz in Brunette.

naked 3 makeup tutorial

10. I applied MAC Pro Longwear foundation all over my face using MAC Masterclass brush Oval 6.

11. I lightly contoured and highlight my face using Motives Fire sculpting palette.

12. On my cheeks, I applied Maybelline Master Glaze in Make A Mauve.

13. I set everything using CoverFX Translucent powder.

14. I filled my lips using MAC Whirl lip liner. Next, I applied Revlon Just Bitten Kissable lip balm in Honey Douce just in the center of my lips. I blended the 2 shades together by pursing my lips.

naked 3 smoky eyes look

I forgot to take pictures of the products, so I’m just going to list them here.

Products used:

Eyes – Maybelline Inked in Pink; Urban Decay Naked 3 (eyelid: Buzz, outer V: Blackheart, inner corner: Dust); Kanebo Kate Super Sharp eyeliner; L’oreal Voluminous Smoldering eyeliner; Buxom Lash mascara; Lavie Lash Bluebell falsies; Anastasia Brow Wiz in brunette.

Face – MAC Pro Longwear foundation; Motive Fire sculpting palette; Maybelline master glaze in Make A Mauve; Cover FX Translucent setting powder.

Lips – MAC Whirl lip pencil; Revlon Just Bitten Kissable Lip Balm in Honey Douce.

World Cup 2014 Netherlands Inspired Makeup

Go, Oranje! Today’s look is a Netherlands Inspired Makeup, a second installment to my World Cup 2014 series! I know this look is super orange, so feel free to change the lip color if you’d like. I just wanted to make everything orange for fun. If you want to know which team I chose to do on my first World Cup 2014 series, check out my tutorial here!

Let me just tell you, the white eyeliner is a bit tricky once you start putting mascara on. Be very careful! If not you might end up with black spots all over the white eyeliner, and it ain’t easy to remove. I’d suggest going for a white liquid eyeliner, or a water-based white face paint. I used a cream face paint because that’s what I have, but maaan it was so troublesome when the eyeliner wasn’t set. Whenever I blinked or open my eyes, the white cream went into the lines on my eyelids.

Anyhow, I hope you guys enjoy this look. It’s actually super simple and fast to do! If you do wear it to support Netherlands, please take a picture and tag me on it (or add #kireimakeup on instagram or twitter or facebook!).

For a list and pictures of products used in this tutorial, please scroll all the way down!

orange and white makeup

How-to:

1. I mixed yellow and red cream-based face paint to create orange on my palette. Then, I applied the orange cream-based on my eyelid using a synthetic brush. I used my finger to blend this cream face paint.

2. Using a shader brush, I applied Strike from Sleek Makeup iDivine Ultra Mattes v1 Brights on the eyelid. I focused on packing the color along the lash line and center of the lid while blending it upwards.

3. Using a white face paint, I created a winged eyeliner along the upper lash line. (Check out my how-to create winged eyeliner tutorial if you want to learn how to do the perfect feline flick).

4. I set my eyeliner using Pow from Sleek Makeup iDivine Ultra Matte v1 Brights palette.

5. I lined my waterline using a white eyeliner from Revlon Photoready Kajal eyeliner in Carbon Cleopatra.

6. I also applied Strike on the lower lid using the tip of a flat eyeshadow brush.

7. I filled in my eyebrows using Anastasia Brow Wiz in Ash Blonde first, and then I lightly applied Brunette to create depth.

8. I curled my lashes using MUFE Aqua Smoky Lash.

9. I applied Gwiyomi “Claire” false eyelashes for an added winged effect.

netherland oranje makeup

10. I mixed MUFE HD foundation and Benefit Moon Beam to create a dewy foundation. I applied this mixture on my face using a foundation brush.

11. I applied concealer from MAC Pro correct/conceal palette in Medium under my eyes.

12. I set my foundation using Cover FX translucent powder.

13. I applied Benefit Coralista on my cheeks.

14. On my lips, I applied L’oreal Color Riche Extraordinaire Liquid Lipstick in Orange Tempo.

netherlands inspire makeup tutorialProducts List

Eyes – PAC Face Paint (eyelid: red/yellow mix, eyeliner: white); Sleek Makeup iDivine Ultra Matte V1 Brights (eyelid: Strike, eyeliner: Pow); Revlon Photoready Kajal eyeliner Carbon Cleopatra; MUFE Aqua Smoky Lash; Anastasia Brow Wiz Ash Blonde/Brunette; Gwiyomi Boutique Claire false eyelashes.

Face – MUFE HD foundation; Benefit Moon Beam; MAC Pro Correct/Conceal in Medium; CoverFX Translucent Powder; Benefit Coralista blush.

Lips – L’oreal Color Riche Extraordinaire Liquid Lipstick in Orange Tempo.

l'oreal color riche extraordinaire liquid lipstick orange tempo

World Cup 2014 Brazil Inspired Makeup

Are you guys following FIFA World Cup 2014?! I sure did, and I’m rooting for Brazil! Go Brazil!!! Anyways, since I’m showing my support for Brazil, I decided to do this Brazil Inspired Makeup. I’d probably do a World Cup inspired makeup series for the next couple weeks just for fun! I wanted to post this tomorrow, but decided to do it today.

Anyhow, for this Brazil Inspired Makeup tutorial, I wanted to create a wearable look that uses the colors of the team’s jersey – mainly yellow, a little bit of green and blue (as you can see from the jersey that I wore for today’s tutorial). I love the result, and I especially love that blue eyeliner! If you do re-create this look please TAG ME on twitter or instagram, and hashtag your work with #kireimakeup.

Since the eyes are so bright and bold, I decided to tone it down on my face. My face is kept very minimal, no contouring. My lips, I decided to go with a nude lip, with my new favorite lip pencil, MAC Spice. Since my lips were quite dry, I added Clinique Heaping Hazelnut chubby lip balm to keep it moist. I do apologize if my face doesn’t look that flawless, you can see a bit of breakout here and there, since my immune system is currently down. As you can see, I do not airbrush my face, so what you see is what I actually look like! 😉

brazil inspired makeup

How-to:

1. I applied a yellow cream face paint as a base all over my eyelid. For this tutorial, I used PAC , an Indonesian brand, but you can use any yellow cream base (e.g. MUFE Flash Palette), OR a white base (e.g. NYX Milk Jumbo Pencil in Milk). A good base is necessary so the yellow pops even more.

2. Using a flat eyeshadow brush, I applied MUFE eyeshadow no. 71 all over my eyelid.

3. Using a small blending brush, I applied Urban Decay Buck on outer V and extended it into the crease.

4. Using a dark blue cream face paint from PAC and an angled eyeliner brush, I created a winged liner along the upper lash line.

5. *VERY IMPORTANT STEP* I SET the cream eyeliner using Urban Decay Chaos with another clean eyeliner brush. If you don’t set your cream face paint, it’ll crease.

6. On the bottom lash line, I applied Dragon Fly from Sleek Makeup iDivine Ultra Matte V1 Brights.

7. I lined my tightline and waterline using L’oreal Voluminous Smoldering eyeliner.

8. I curled my lashes, applied mascara, and applied Ardell Demi Luvies falsies.

9. I filled my brows using Anastasia Brow Wiz in Medium Ash.

world cup inspired makeup brazil

10. For my face, I decided to keep it simple. I applied Marc Jacobs Gel foundation using CoverFX cream foundation brush.

11. I applied a little bit of yellow corrector from MAC Conceal/Correct palette in Medium under my eyes.

12. I dusted MAC Mineralized Skinfinish powder all over my face.

13. I applied Smashbox Halo Blush powder in In Bloom.

14. I lined and filled my lips using MAC Spice lip liner. On top of it, I applied Clinique Chubby lip balm in Heaping Hazelnut.

brazil inspired makeup


Smoky Eyes with a Neon Eyeliner

Hey ya’ll! I hope everyone is doing great this weekend! I posted this look on Instagram last night, and I almost forgot to upload it today. Anyways, as mentioned on my Instagram account, this smoky eyes with a neon eyeliner look is a recreation from @jenmiamakeup. She’s one of the many great makeup artists who I follow on Instagram. I love how she does hers with a neon yellow. I tried this one with the only neon pigment I owned – MAC Neo-orange loose pigment.

If you are going to recreate this look, I’d suggest using a mixing medium instead of water, like I did. I used water and for some reason the pigment didn’t want to mix smoothly. I ran out of my mixing medium so I have to go get one in the near future. The other issue that I kept having is the fact that my smoky eyes kept creasing. Ugh, I should have used a different eyeshadow base (and probably should have prime my eyelid first). So, I’d suggest for you to use an eyelid primer to avoid creasing.

Anyhow, let’s get the tutorial started!

smoky eyes for asian

How-to:

1. Using a light brown eyeshadow (mine was a sample, and it has no brand nor name), I applied this shade just above my crease using a clean blending brush. I used this shade as a transition color, the shade is just slightly darker than my own skin color.

2. Using a deep chocolate brown (again, this was a sample with no brand and no name), I applied this shade right on the crease using a small crease brush.

3. Using the same blending brush as step no. 1, I blended the chocolate shade.

4. I applied Revlon Photoready Kajal eyeliner in Carbon Cleopatra, I applied the black eyeliner all over my eyelid, and waterline.

5. I lightly blended the eyeliner using a synthetic art brush.

6. I applied Kat Von D Monarch palette Deadhead eyeshadow on top of the black base using a flat eyeshadow brush. I also applied this eyeshadow along the lower lash line using a small shader brush.

7. Using the same brush as step no. 1, I blended out the edge of Deadhead so there’s no harsh line.

8. I mixed water and MAC Neo-Orange loose pigment to create the neon winged eyeliner.

9. On my brows, I used Anastasia Brow Wiz in Medium Ash to fill them.

10. On my lashes, I applied Ardell 105 false lashes.

mac twig lipstick

11. On my face, I applied MARC JACOBS gel foundation using CoverFX foundation brush. I concealed using MUFE HD concealer, and set my face using CoverFX translucent powder.

12. I applied Benefit Moon Beam highlighter on the bridge of my nose, cupid’s bow, chin and cheekbones.

13. I lightly contoured my face (sides of the nose, under my cheeks, jawline, and temples) using NARS ITA kabuki brush and MAC Blunt powder.

14. I applied MAC Dainty on my cheeks.

15. For the lips, I applied MAC Spice lip pencil all over.

Very Purple with Sleek Makeup Candy Palette

As mentioned in my previous post, I wanted to share this tutorial with you guys! Today’s look uses Sleek Makeup Candy Palette (Limited Edition) that I bought from Luxola! Don’t worry, the palette that I’m giving away is totally brand new, and unused!

Oh, you didn’t know about the giveaway that’s going on? Check out my Sleek Makeup Candy Palette Giveaway post for details! This giveaway will last until Thursday (June 12, 2014) at 11.59pm.So, hurry up and check out that post for more info!

I also want to mention that since my images were getting used without my permission nor credits, I’m putting a huge watermark in the middle of all my pictures from here onwards. I do apologize if the watermark is bothering the picture, but I have to protect my work. I do want to thank all of you who have been kind enough to let me know whenever someone used my pictures (aka plagiarism). I appreciate all your kindness! A big thank you, hugs, and kisses for you who have been supporting me!

Anyways, let’s get the tutorial started!

sleek makeup idivine candy paletteEyelids are prepped using Urban Decay Primer Potion in Eden. All shades for the eyes are from Sleek Makeup iDivine Candy Palette.

How-to:

1. Using Smashbox bullet crease brush, I applied Flump slightly above my crease.

2. Using a small blending brush, I applied Parma Violet on the outer V and the crease. You can apply this using a small shader brush for a more precise application.

3. Using the same bullet crease brush as step 1, I blended out Parma Violet to remove any harsh edge on the crease. I also slightly winged the outer part.

4. Using a flat eyeshadow brush, I applied Aniseed all over my eyelid.

5. Using a small shader brush, I applied Bon Bon on the inner corner of my eyes, and then I applied Parma Violet along the lower lash line.

6. I used my face powder (MUFE 118 Pro Finish) and a blending brush under my brows, blending it into the purple shades slightly to remove any harsh edge.

7. I lined my upper lash line using Kanebo Kate Super Sharp Eyeliner. On the waterline, I applied black eyeliner pencil.

8. I curled my lashes, applied mascara, and then applied Ardell Demi Wispies lashes. (As you can see, Ardell demi wispies falsies are my current favorite lol).

9. For the brows, I applied Anastasia Brow Wiz in Medium Ash. I lightly set it with Anastasia Brow Powder duo in Brunette.

sleek makeup candy tutorial

10. For my face, I applied Motives Fire highlight/contour palette. I applied the lightest highlight color on the high planes of my face – cheekbones, bridge of the nose, cupid’s bow, forehead, chin, below hollows of the cheeks, and under my eyes. I applied the darkest contour color on the hollows of my cheeks, sides of my nose, and temples. I blended them out using a damped beauty blender sponge and MUFE HD Foundation in 118.

11. For my cheeks, I applied Smashbox Halo blush in In Bloom.

12. For the lips, my new favorite, I applied L’oreal Color Riche Extraordinaire Liquid Lipstick in Rose Symphony

Sleek Makeup Candy Palette Giveaway!

Hello makeup junkies in Indonesia! Today I want to share a GIVEAWAY for my INDONESIAN FOLLOWERS! I will be posting a tutorial using this LIMITED EDITION Sleek Makeup Candy palette on my next post!

Currently, I have 1 FREE SLEEK MAKEUP IDIVINE CANDY PALETTE up for grab! This contest is open for anybody who are currently living in Indonesia. This limited edition palette is so beautiful, full of colors, and very pigmented! Check out my next tutorial if you want to see how gorgeous this palette is!

Interested in joining my Sleek Makeup iDivine Candy Palette Giveaway? Keep reading!

Rules & Regulations:

1. Subscribe to my blog – enter your email address on the “Subscribe To Us” box on the left sidebar.

2. Comment below when you’ve done subscribing – only comments posted on THIS giveaway page is valid.

3. Follow me on Instagram (handle name: @KireiMakeup), REPOST my giveaway picture (pic below) with #kireimakeupgiveaway.

4. Open only to those living in Indonesia currently.

5. I will pick a winner at random next Thursday (June 12, 2014) by 11.59pm.ONE winner will be announced on Friday (June 13, 2014) via Instagram and on my blog!

6. Only 1 entry per person.

7. Another winner will be picked at random if the first person I picked does not reply me within 24hr.sleek makeup candy palette


Disclaimer:

This giveaway is not sponsored by Sleek Makeup nor Luxola. I personally purchased this palette.

Summer Lips with NARS Schiap

I posted a picture of this look on Instagram, and asked if anyone would like to see it since I don’t actually love how it turned out. However, lots of my followers on Instagram commented to post this tutorial, to my surprise. I think my mistake with this look is with the eyes. May be for future look using NARS Schiap lipstick, I wouldn’t be using the NAKED 3 on my eyes.

Since my Instagram followers love the result, I want to post this up for them! I’d suggest skipping the eyeshadow entirely and just use the winged liner on the eyes to complement the lips. If you want to figure out how to apply winged eyeliner, please check my how-to winged liner post!

I’m just going to skip the step-by-step on the eyes, and instead will list all the products used below.

urban decay naked 3 tutorial

Products used

Eyes – Urban Decay Naked 3 palette (Lid: Buzz, Above crease: Factory, Crease/lower lid: Nooner); L’oreal Super Liner Ultra Sharp Tip; Anastasia Brow Wiz in Medium Ash; Ardell false eyelashes in 110.

Face – Cover FX cream foundation in G40 as base; Cover FX N110 as contour.

Blush – NARS Matahari.

Lips – NARS Schiap.nars schiap

Lavender Grey using NARSissist Palette

For this week’s tutorial, I decided to use my NARSissist Palette again! I fell in love with this palette all over again. I feel like it’s such a great palette with a more mature color option. For today’s tutorial, I picked out my favorite shades which were in the range of grey, lavender, and violet. I know the picture doesn’t show much of the lavender/violet on the lid, but I assure you it’s such a pretty grey with very subtle hint of lavender/violet in it. If you’re one not to wear color, and prefer a much neutral option, this would be a great addition to your makeup wardrobe.

Oh, just to let you guys know, I have been trying to update my Instagram daily. I’m going to try to do a weekly “Monday Makeup Inspiration”, and regram/repost-ing every look that YOU guys do if you FOLLOW me (@kireimakeup) and add #kireimakeup to your Instagram pictures! I’d love to see your makeup and/or your re-creation of any of my looks!

narsissist smoky eyes

How-to:

1. I’ve prepped my eyelid using Urban Decay Primer Potion in original. Using a blending brush (from UD Naked 3 palette), I applied NARS Brousse II on my crease.

2. Using a small shader brush, I applied NARS Pandora II on the outer V of my eyelid.

3. I blended my crease by applying NARS Madrague I using a clean blending brush. I used this shade as a transition color.

4. I applied NARS Ashes to Ashes on my entire eyelid using a flat eyeshadow brush. I also added a little bit of NARS Lhasa on top of it.

5. I created a winged liner along my upper lash line using L’oreal Infallible Gel Lacquer 24hr in Blackest Black and an angled eyeliner brush. Using whatever was left on the brush, I ran it along the lower lash line, and waterline.

6. I also used a small shader brush and applied NARS Ashes to Ashes along my lower lid.

7. I filled my brows using Anastasia Brow Wiz in Ash Blonde and Brunette. I cleaned up the edges of my brows using Cover FX G20 cream foundation. If you want to know how I fill my brows, please check my brow tutorial.

8. I curled my lashes and applied Cover Girl Lash Blast mascara. I also applied falsies (Korean’s falsies, not sure what it’s called since the brand is not in English).

NARSissist Lavender Grey smoky eyes

9. On my face, I applied Cover FX Cream Foundation in G40 using MAC Masterclass Brush Oval 6.

10. I lightly applied highlight and contour using CoverFX cream foundations in G20 & N110. Check out my BACON post to find out how I used CoverFX to do my highlight and contour.

11. On my cheeks, I applied Revlon cream blush in Pinched.

12. On my lips, I applied Revlon Mauve it Over matte lipstick.