Shu Uemura Lightbulb Foundation Review

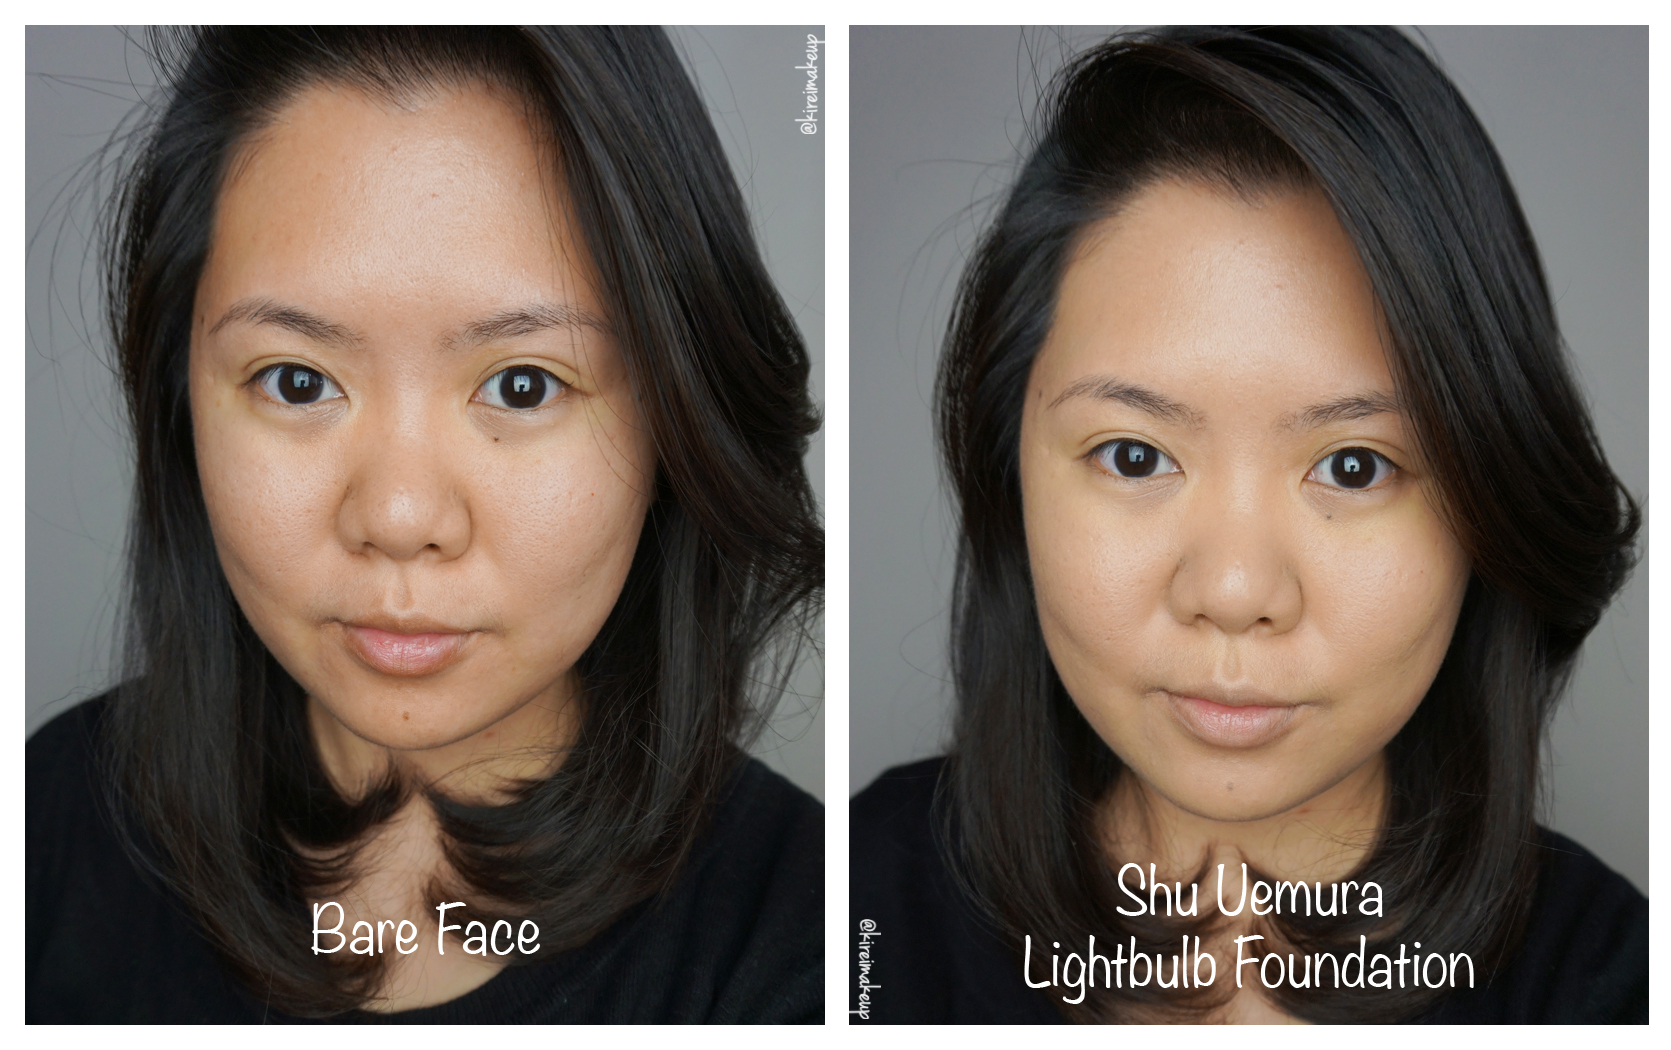
As the weather gets colder and my skin gets drier, I’ve been craving for a more luminous dewy skin. For this reason, I’ve recently picked up the Shu Uemura Lightbulb Foundation, and used it on myself for couple days. As you know, I was picked as one of the winners for the Shu Uemura Haute Street Style Instagram competition, and one of the products that they gave me was this foundation. However, just to be clear, even though I received the foundation for free, my review is based on my experience and honest opinion.

Shu Uemura Lightbulb Foundation reveiw

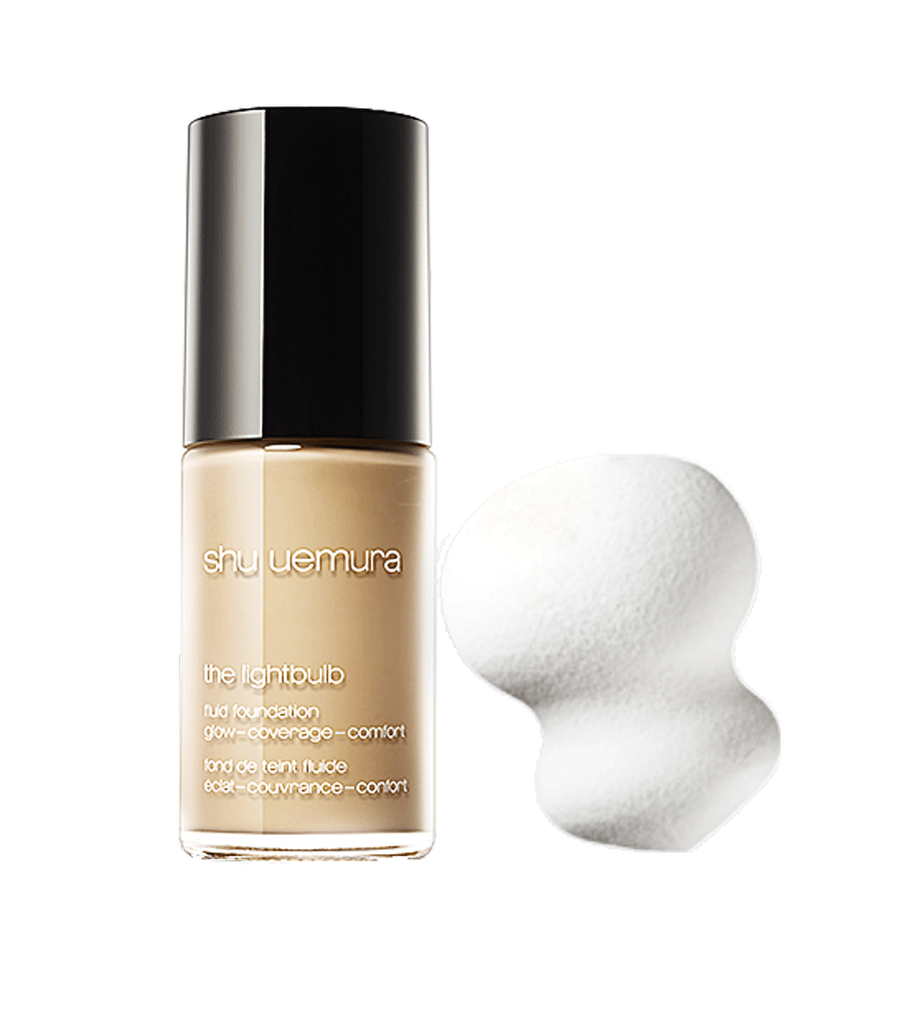
Picture courtesy of Shu Uemura Canada

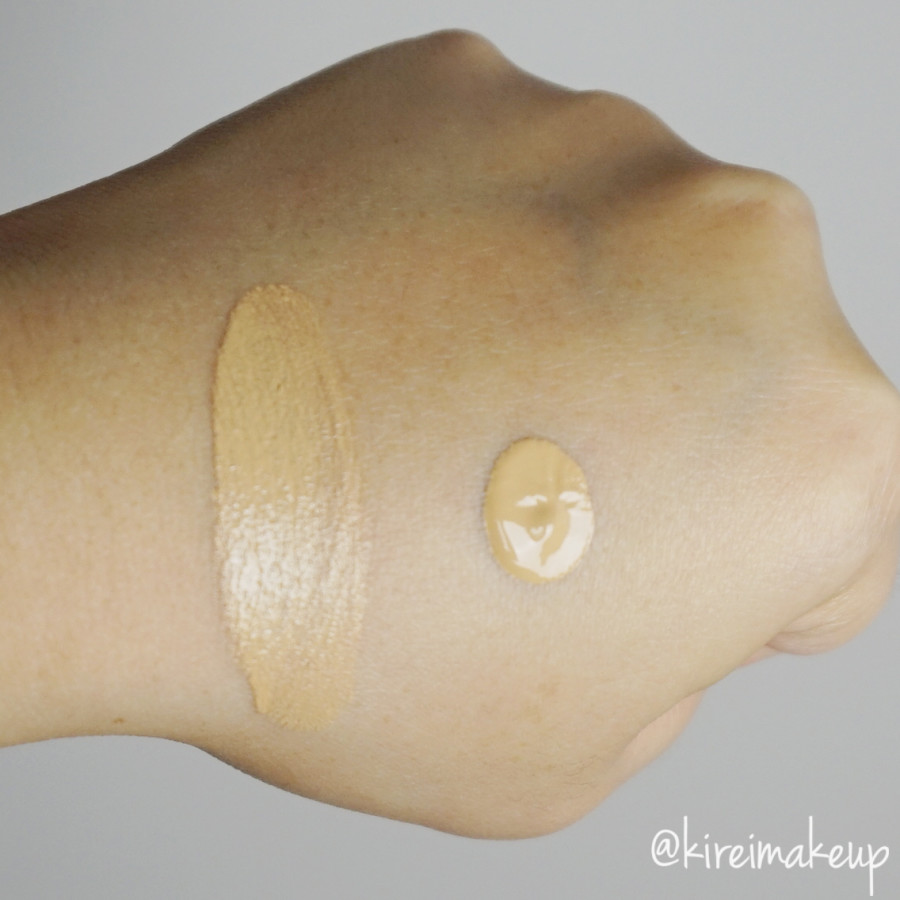
First of all, I did not use the Shu Uemura lightbulb foundation sponge because I didn’t have one. Instead, I used a damped sponge to apply this on my face. Secondly, this foundation is shade 754, which is Medium Beige. It’s a pretty good match for my skin, which is an in-between MAC NC25-30, or Diorskin Star foundation 030, or MUFE HD Foundation 120 (now called Y245).

If you are not familiar with the Shu Uemura foundation shades, it comes with 3 digits, the first digit represents the skin undertone, and it is either a 3, 5 or 7 (and sometimes 9). 3 is for Pink undertone, 5 for Neutral undertone, and 7 for Yellow undertone (and 9 is very yellow).

Shu Uemura Lightbulb Foundation 754

Packaging

The Shu Uemura Lightbulb foundation comes in a gorgeous glass bottle. Even though it’s glass, the bottle is very lightweight and transparent. The bottle also comes with a pump, and 1 pump can cover the whole face!

Application

If you want to do just 1 pump of foundation to cover your whole face, my advice is to do it the way I do it:

  1. Squeeze 1 pump at the back of hand or clean palette.
  2. Pick a bit of foundation using your ring finger.
  3. Dot it on your face, and blend it using a damped sponge.

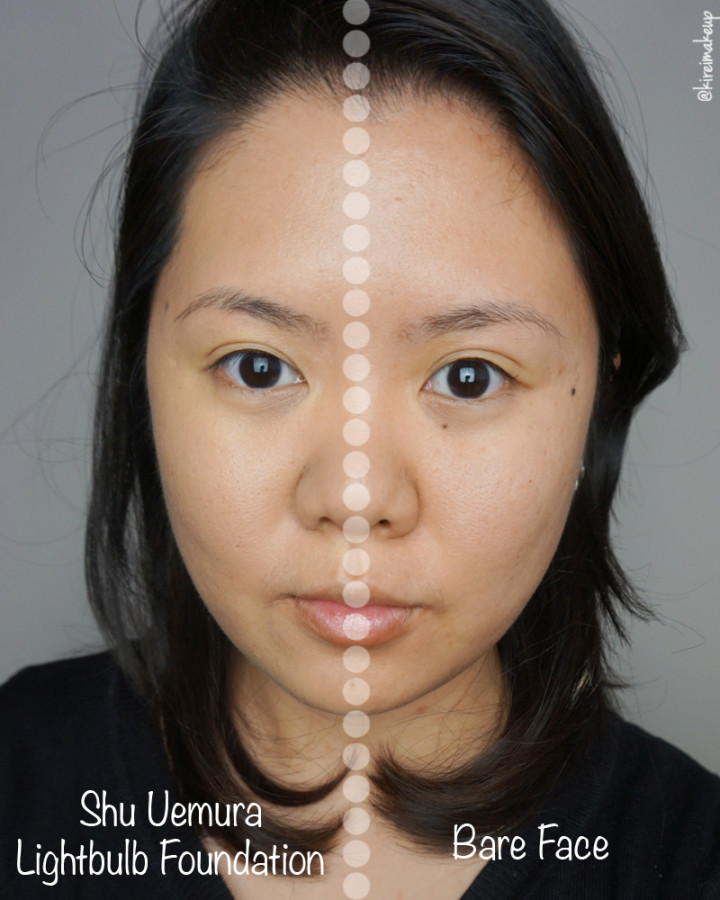
You can apply the Shu Uemura Lightbulbfoundation using your finger, or foundation brush. However, if you want that luminous finish, I really suggest applying the foundation using a damped sponge (lightbulb sponge/beauty blender/any non-latex sponge).

Longevity

If you do not set this foundation and have combination/oily skin, this foundation might not last long. You need to set the foundation with a translucent powder, or if you prefer to keep the luminous finish check out the Shu Uemura Lightbulb Glowing Face Powder. For this review I did not set my foundation.

If you don’t set your foundation and has combination/oily skin, this foundation will last may be around 4-5 hours. It’s quite slippery, and within an hour you will look like an oil slick if you don’t set it. If you set the foundation, it’s good for 7-8 hours.

Shade/Finish/Coverage

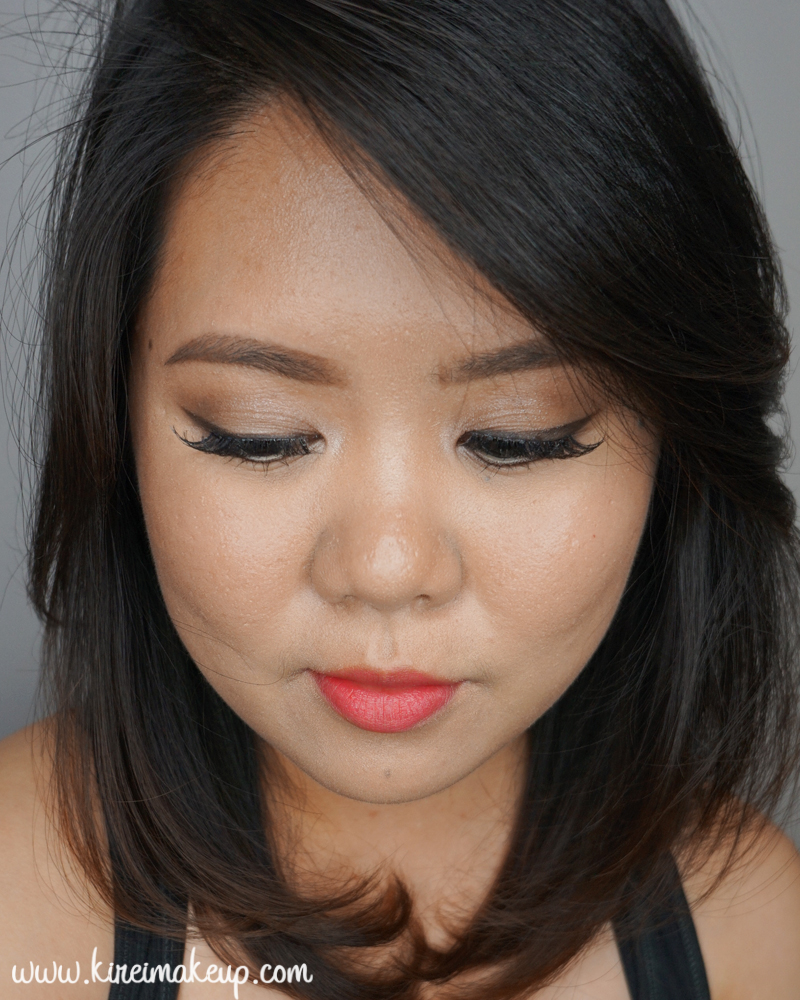
13 shades ranging from light to medium shades, with pink, neutral and yellow undertones. The finish is luminous, with full coverage.

The Shu Uemura Lightbulb foundation has a full coverage, but it feels very lightweight on the skin. Its luminous dewy finish makes my skin looks quite like skin. I really like this dewy finish especially for winter when my skin is looking a bit dry.

Price

CAD$66 for 0.9 fl.oz./27 mL.


Shu Uemura Lightbulb Foundation review

Pros

  • Full coverage but lightweight
  • Luminous glowing finish
  • Great for dry/normal skin
  • Skin looks like skin but better
  • Match really well for my Asian skin
  • Blurs out imperfection

Cons

  • Combination/oily skin might find this to be too oily
  • Pricy

Shu Uemura Lightbulb Foundation for nc30

Day of the Dead Skull Makeup

I think this Day of the Dead Skull Makeup will be my last look for this month. This is a requested look from a friend on Instagram. Before we begin, I’d like to say that I respect the Mexican culture and those who celebrate the Day of the Dead. There’s no intent of cultural appropriation. I created this look because I was interested in the way the Mexican culture celebrates their loved ones who are no longer with us. Its vibrant and colorful use of face paintings serve as a reminder to remember those who have passed as well as celebration of life.

In any case, should you decide to dress up as a Catrina, or have Sugar Skull painted on your face for Halloween, please reconsider. The Day of the Dead is a festival where people pay respect to those who have passed. It is a culture! Be respectful, please.

Anyways, I do not have a step-by-step tutorial for this look.

Products used

  • White base – MAC Acrylic Paint in White
  • Eyeshadows – UD Electric palette in Urban, Slow Burn, Freak, Thrash
  • Eyeliner (for teeth & line works) – Shu Uemura Calligraphy ink liner
  • Face paints – WolfeFX Essential palette

*Check here for Halloween Makeup Looks*

day of the Dead

Dark Forest Nymph (Halloween Makeup)

I’m back!!! I apologized for missing last week, I was down with a cold and fever, not to mention I had guests staying over. I finally was able to recover on the weekend, and started cleaning up. I realized that Halloween is in like 2 weeks, so I had to start this week with a Halloween Makeup tutorial.

As you all know, I have been doing several creatives with Daniela of Daniela Majic Photography. She is an amazing photographer, and she has a thing for flowers and anything gorgeous. Anyways, I think I got the flower bug from her, because I decided to go make myself a Flower Crown. Michael’s was having a sale on some of the fake flowers, so I grabbed some and created my own Flower Crown.

Since I made the Flower Crown, I wanted to do a creepy but pretty Halloween makeup so I decided to do this dark fairy look. I was going to draw teeth on my lips, but decided to do a puckered lips area instead. Also, I added squiggly lines under my eyes because I thought why nooot?! I didn’t want to make my under eyes too plain. Since I draw inspiration from the flowers, I thought we can just say the squiggly lines were inspired by roots and such.

halloween makeup

Anyways, I used mostly Kat Von D for this look. Another reason why you should get Kat Von D Shade + Light face and eye palettes! They are amazing! So, for this look, mostly just contouring with different shades of browns and greys, and black to add depth. Always start with the lightest brown, then deepen it with grey, and eventually with black, especially on the neck area. I left the highlighting last. I highlighted using mostly using the white and yellow-beige from the Shade+Light face/eye palettes.

You don’t have to do the nose the way I did it, I wanted to show a the nose is somewhat degraded since everything else in the face is pretty sunken in.

For the eyes, at first I wore the red/white (bloodshot?) contacts at first which looks pretty sultry. Then, I decided I wanted to give the whiteout contacts, which give a totally different feel altogether. The one thing with the whiteout contacts, though, you can’t really see much when you wear it. It’s quite uncomfortable since  my sight was quite compromised.


halloween makeup

Products used

Foundation – Kat Von D Lock-it Tattoo foundation

Contour (and everything on the face) – Kat Von D Shade + Light Eye and Face palettes

Eyebrows – Anastasia Beverly Hills Brow Wiz in Taupe

Eyeliner – Kat Von D Tattoo Liner in Trooper

Lips – Kat Von D Liquid Lipstick in Damned

halloween makeup

Disclaimer:

  • Please do your research before buying and/or trying  contact lenses
  • Please seek professional advice from an eye doctor/opthamologist before buying/wearing contact lenses
  • If you decide to wear contact lenses, you might do so at your own risk
  • I shall not be held liable for any reaction/irritation/infection should you decide to wear contacts lenses

ABH Shadow Couture World Traveler Tutorial #2

I hope everyone is having a great week! Today I’m going to do another ABH Shadow Couture World Traveler tutorial! I’ve been doing lots of colorful look, so this time around, I wanted to do a more neutral color with a little bit of purple. I have used this palette to do another look, which you can find in my ABH Shadow Couture World Traveler tutorial #1.

Anyways, I have family members over this whole week till next week, so I do apologize if I’m running low on blog posts since I’ve been busy and running around. I do want to line up several Halloween tutorials, so hopefully I’ll be able to post it next week. I’ll try to do a post at least 1 more before the Thanksgiving (Canada) weekend.

Anyhow, for this look, I wanted to do a little bit of a cut crease and reversed winged liner. I cleaned the line up in between the purple liner and the outer corner of the upper lid using MAC Chromagraphic eyeliner in NC30. You can use any beige eyeliner, or white. I don’t really like using white pencil since I thin it’s too stark, the beige liner looks more natural.

ABH Shadow Couture World Traveler tutorial

Products used

Eyes

  • Primer – Urban Decay Primer Potion “Anti-aging”
  • Transition – ABH Shadow Couture “Soft Peach”
  • Crease – ABH Shadow Couture “Fudge”
  • Eyelid – ABH Shadow Couture “Belini”
  • Inner corner – ABH Shadow Couture “Chic”
  • Lower lid – ABH Shadow Couture “Heirloom”
  • Waterline/Tightline – L’oreal Voluminous Smoldering eyeliner
  • Mascara – NARS “Audicious” mascara
  • Falsies – Esqido “BFF”


ABH Shadow Couture World Traveler tutorial

Face

Cheeks

Lips

  • Lipstick – Revlon Colorstay Ultimate Suede lipstick “Flashing Light”

ABH Shadow Couture World Traveler look

IMATS Toronto 2015

Hi everyone! Today’s post is not a tutorial nor review. I want to talk about the IMATS (International Make-up Artist Trade Show)! Beauty lovers all around the world should know that IMATS is the biggest makeup trade show in the world. I have attended the IMATS Toronto since 2010, with the exception of 2014 when I was in Jakarta with my family. This year, the IMATS Toronto 2015 will be held at the Metro Convention Center, from September 26-27. Are you going to be there?

*Check out my IMATS posts from prior years!*

IMATS

This year, I will be attending the IMATS again (on Saturday), and I can hardly wait! Let me tell you that (in my opinion) the best part about the IMATS is actually the workshops! Really and truly, for $45/day, you will learn so much from the workshops. The keynote speakers of these workshops are well-known celebrity makeup artists who will show you loads of tips and tricks. I met with Rae Morris in 2013, and that was totally surreal! She was so approachable and kind. In 2012, I sat in Gordon Smith session, where he talked a lot about  his works and the future of prosthetics/animatronics. These workshops are a must to attend!

Rae Morris

This year, the 2 keynote speakers are Adrien Morot and Gregory Arlt. I can’t wait to be sitting on their workshops and just absorb everything they have to say. Adrien Morot is an Oscar Nominee for his work in Barney’s Version. He will be doing a demo on stage on special effects makeup.

Gregory Arlt, everyone knows who he is right??? Gregory Arlt is MAC Pro’s Director of Makeup Artistry, and Katy Perry’s makeup artist! His works can be seen in the runways from Paris to New York. His list of celebrity clients include Dita Von Teese, Alicia Keys, Gwen Stefani, and Victoria Beckham. Gregory Arlt of Mac Pro will be showing attendees how to achieve a flawless skin without filter! This is a must to attend! I’ll be at the front seat, just you all wait and see.

Other speakers include the wizard of makeup Kevin James Bennett, master of reverse contouring Eve Pearl, makeup veteran Randy Daudlin, and many more! Check out the IMATS speaker’s bios to see who will be there, and their schedules.

OPI Nail Polishes

Besides the workshops, of course there’s the shopping! There were deals everywhere you see, and these deals were awesome! I cannot wait to see which brands will show up this year. I’m definitely eyeing for new sets of lashes, perhaps more brushes, and nail polishes. I will do an IMATS Tips post next week to prepare us (and our wallet) when we enter the show.

Lastly, one of the main events of the IMATS that I find very enjoyable is the Battle of the Brushes. Battle of the Brushes is IMATS makeup competitions, which are split into 2 groups – beauty/fantasy (2hr time limit) and character/prosthetics (3hr time limit). The competition yields amazing final results, and it is such an inspiring event to attend to. I, especially, love seeing the results from the character/prosthetics competition! Some of the pieces were mind blowing, and you wouldn’t know that they are all done by students or fresh graduates from makeup school!

IMATS Student Competition


Have you been on the IMATS before? What are your thoughts about it? If you have not, are you going to consider going to the show?


Sleek Makeup Candy Palette

My Sleek Makeup Candy Palette is back in my hands again! I accidentally left it back in Jakarta last year, and my brother brought it back to Canada for me! Woohooo!!! So happy to have this Sleek Makeup Candy palette back to create many colorful looks.

So the inspiration behind this colorful look is actually a “Batik” top (worn in pictures below) I received yesterday from Sofia via my brother. My friend, Sofia from @Sophie_Tobelly, is an amazing fashion designer, and she actually created this top and sold it in her store. A big THANK YOU and shout out to Sofia!!! You guys should really check her out on Instagram (IG)! She also sent down a clutch she created, I posted it on my IG account so please do check it out and follow me on IG!

The top has several different colors like red, purple, white, and blue. I was going to use the blue from the palette, but it ended up being too chalky, so I changed it to green instead. I do love the end result, it almost has a watercolor feel to it. Should you decide to replicate this look, please do tag me on IG or add #kireimakeup.

*For other Sleek Makeup Candy Palette tutorials, please check out Psychedelic and Very Purple*

sleek makeup candy palette tutorial

Products used

Eyes

  • Primer – Urban Decay Primer Potion “Original”
  • Base – MAC Mineralized Skinfinish “Medium Plus”
  • Transition – Sleek Makeup Candy Palette “Pear Drop”
  • Outer V – Sleek Makeup Candy Palette “Mint Cream”
  • Inner V – Sleek Makeup Candy Palette “Bon Bon”
  • Center lid – Sleek Makeup Candy Palette “Cream Soda”
  • Lower lid – Sleek Makeup Candy Palette “Parma Violet”
  • Waterline – MAC “Smolder” kohl pencil
  • Winged liner – Kanebo “Kate Super Sharp Eyeliner”
  • Brows – Anastasia Beverly Hills Brow Pomade “Taupe” + “Medium Brown”
  • Mascara – Lancome “Hypnose”
  • Lashes – Ardell falsies “120s”

sleek makeup candy palette look

Face

  • Primer – Bobbi Brown “Vitamin Enriched Face Base”
  • Foundation – Diorskin Star Foundation “031”
  • Concealer – Diorskin Star Concealer “03”
  • Setting powder – Diorskin Nude Air Healthy Glow Invisible Loose Powder “#30″

Cheeks

  • Blush – Benefit “Hervana”

Lips

  • Lipstick – Revlon ColorStay Ultimate Suede Lipstick “Flashing Lights”

sleek makeup candy palette tutorial


UD Naked Smoky Tutorial “Iconic Smoky Eye”

As you know from my Instagram, I recently purchased and received my UD Naked Smoky Palette. I was so excited when I got it yesterday, and couldn’t wait to play around with it, so I created this UD Naked Smoky Tutorial! I bought mine online from Sephora since the palette was an online exclusive. It arrived within 3 days of my order, pretty fast and I’m one happy gal!

Anyways, I’ll try to do a review of the palette pretty soon. For now, I just wanted to share with you this look that I re-create from their leaflet. The palette came with a leaflet that contained several different looks you can achieve, and I chose to do the Iconic UD Smoky Eye look. I replaced some of the products, like the eyeliner, blush, lipstick etc since I don’t own those. Nevertheless, I used all the shades mentioned in the leaflet accordingly.

Personally, for me, this kind of smoky eye look is supposed to be messy and worn in, I skipped wearing false lashes. False lashes tend to make everything look more glamorous. If you prefer, though, feel free to add the falsies.

UD Naked Smoky makeup look

The transition shade, Combust, doesn’t really show up on pictures below because it’s very similar to my skin color. However, this step is very important whether the color shows up or not because this transition shade will allow for a smooth edge on your smoky eyes. It will diffuse the grey eyeshadow on the crease into your skin seamlessly.

The brow bone shade, Thirteen, is a vanilla shade. It might look like there’s nothing on the brow bone at first (top middle row) in the pictorial, but as you add those darker colors on the lid, the highlight becomes more prominent. If you like a highlight on the brow bone, feel free to add more at the end of the look. If you have a hooded lid, I recommend not to add too much or any since it might create a hooded effect even more.

UD Naked Smoky makeup look

Products used

Eyes

  • Primer – Urban Decay Primer Potion “Original”
  • Base – MAC Mineralized SkinFinish “Medium Plus”
  • Transition – UD Naked Smoky “Combust”
  • Brow bone – UD Naked Smoky “Thirteen”
  • Eyeliner/waterline – L’oreal “Voluminous Smoldering” Eyeliner
  • Eyelid/lower lash line – UD Naked Smoky “Smolder”
  • Crease/lower lid – UD Naked Smoky “Password”
  • Inner Corner – UD Naked Smoky “High”
  • Lashes – Dior “Diorshow” Mascara
  • Brows – Anastasia Beverly Hills Brow Wiz “Medium Brown”


Urban Decay Naked Smoky tutorial

Face

Cheeks

Lips

  • Lip pencil – UD lip pencil “Naked 2”
  • Lip Balm – vaseline

Big Dolly Eye Makeup Tutorial

Today’s Big Dolly Eye Makeup tutorial is for those who’d like to make their eyes look enlarged and more doll-like! I think this type of makeup look is very popular in Asia, and I know personally in my home country, Indonesia, girls love this kind of look since it makes their eyes look bigger. For me, this look is already pretty heavy, and I would not wear this out for a day makeup. I’ll probably wear it if I go to party, but again, it’s up to your preference.

The key to this look is heavy eyeliner and lots of lashes. I could have done something a bit more extreme, and made it look even bigger, but I also wanted to make the look more wearable. If you want to make your eyes even bigger and more doll-like, feel free to substitute the black eyeliner on the waterline with a beige or white eyeliner. If you have monolids, you can use eyelid tape/glue/fiber to create a fold, it’ll help to open up the eyes more and make it look bigger.

Also, add more lashes, you can stack 2 lashes on the upper lashes and a bottom falsies. I don’t have bottom falsies, so I didn’t put any. The falsies I’m using is already thick and long, so I didn’t stack my falsies.

dior eye reviver tutorialI used my Dior Eye Reviver palette for this tutorial. I’ve used this palette on my other tutorial, so if you’d like to see the shades that correspond with the number I listed below, please check out my Summer Wedding Guest Makeup Tutorial post. I have a picture of the palette there with the shades’ numbers.

Products used

Eyes

  • Primer – Urban Decay Primer Potion “Original”
  • Base – Dior Eye Reviver palette “#1”
  • Transition – Dior Eye Reviver palette “#3”
  • Outer V/Crease – Dior Eye Reviver palette “#5”
  • Eyelid – Dior Eye Reviver palette “#2”
  • Outer half of lower lash line – Dior Eye Reviver palette “#5”; Kat Von D Eye Contour Shade + Light “Shax”
  • Inner half of lower lash line – Dior Eye Reviver palette “#4”
  • Winged liner – Kat Von D Tattoo Liner “Trooper”
  • Waterline (outer half only) – L’oreal Paris Voluminous Smoldering eyeliner
  • Falsies – Gwiyomi falsies “Putri”
  • Brows – Anastasia Brow Wiz Taupe; Kat Von D Tattoo Brown “Medium Brown”

ysl pop water glossy stain Eau de Corail

Face

Cheeks

  • Contour – Kat Von D Shade + Light “Shadowplay”
  • Blush – Chanel “Blush de Horizon”

Lips

  • Lipstain – YSL Pop Water Glossy Stain “203 (Eau de Corail)”

ysl pop water glossy stain 203

The Balm Balmsai Makeup Tutorial

I bought this Balmsai palette back when I was in Jakarta, but I didn’t get a chance to play with it because I thought the palette was too pretty, and I don’t have the heart to touch it! However, all good things must come to an end, and I finally decided it’s time I used this palette. This The Balm Balmsai makeup tutorial is a really fun and summery look. I think a touch of color along the lash line really perk up this whole look. Feel free to omit the falsies, I used it just to make my eyelashes look longer, and open up my eyes a bit more.

Most of the products used for this tutorial are all by The Balm, mostly of the eyes and cheeks. Even though I know The Balm Indonesia’s brand manager, I am in not paid, nor sponsored to do this post.

I actually had a full face picture for this tutorial, but I realized the foundation I was using was too light for my face, and created a white cast, so I decided to remove the portrait. I didn’t realized I’ve gotten darker since I had to work on an outdoor shoot for the past couple days.

the balm balmsai tutorial

Products used

Eyes

  • Primer – Urban Decay Primer Potion “Original”
  • Base – The Balm Meet Matt(e) Nude “Matt Maloy”
  • Transition – The Balm Meet Matt(e) Nude “Matt Singh”
  • Crease – The Balm Balmsai “Woodie”
  • Lid and Inner Corner – The Balm Balmsai “High Tide”
  • Upper and Lower Lashline – The Balm Balmsai “Big Kahuna”
  • Waterline – L’oreal Paris Voluminous Smoldering eyeliner
  • Brows – The Balm Balmsai “Score”+ “Dig It” + “Woodie”
  • Falsies – Ardell “Demi Wispies”


Summer Wedding Guest Makeup

Summer is the season for Wedding, and this Summer Wedding Guest Makeup look would be perfect for those beautiful outdoor wedding parties! It’s flirty and summery! I love coral lips for summer, it’s very youthful and less intimidating than red or orange lips. A fun look to wear! If you want to wear this as a daily makeup, just skip the falsies. This makeup is wearable and will look great on everyone.

The lip color for this look is the YSL Rouge Pur Couture 52, also known as Rosy Coral. This lipstick is popular in Asia, it was sold out everywhere in Indonesia! Apparently it was made popular by a Korean actress. Anyways, I can see why Asian women are obsessing over this lip color. You can wear it as a stain, or full on like me. The one thing with this lipstick I disliked is the fact that it’s quite drying on the lips. I have very dry lips, so I have to apply lip balm before and after I apply the lipstick.

Dior Eye Reviver palette

Also, I just grabbed the Dior Eye Reviver palette, and this is the first time I’m using it. I really like this palette, it has soft wearable shades. It’s so easy to blend and buttery. Not as heavily pigmented as some other brands, but gorgeous shades. It is too pretty to be passed on.

Dior Eye Reviver palette

Products used

Eyes

  • Primer – Urban Decay Primer Potion “Original”.
  • Base – Dior Eye Reviver Palette “1”.
  • Crease/Lower lid – Dior Eye Reviver Palette “4”.
  • Eyelid – Dior Eye Reviver Palette “3”.
  • Tear Duct – Dior Eye Reviver Palette “2”.
  • Outer V – Dior Eye Reviver Palette “5”.
  • Waterline – MAC Chromagraphic pencil liner “NC15/NW20”.
  • Winged liner/lower lash line – Dior Eye Reviver Palette “6”.
  • Brows – Anastasia Beverly Hills Brow Wiz “Taupe” + “Medium Brown”.
  • Mascara – Cover Girl “Lash Blast” mascara.
  • Falsies – Gwiyomi Boutique “no. 3” falsies

Dior Eye Reviver palette

Face

  • Primer – Kat Von D “Lock-it Featherweight Primer”.
  • Foundation – Bare Minerals “bareSkin Pure Brightening Serum”. (PS: don’t expect me to do a review on this foundation because I’ve returned it)
  • Under Eye Concealer – NARS Radiant Creamy concealer “Custard”.
  • Blemish Concealer – MAC Studio Finish concealer “NC30”.
  • Setting Powder – CoverFX translucent setting powder “Light”.

Cheeks

Lips

  • Lipstick – YSL Rouge Pur Couture “52 (Rosy Coral)”.

Summer wedding guest makeup