Introduction to Clozette Indonesia

As most of you should know by now, I’m quite active on Instagram. If you realized, I’ve been hashtagging a lot of my beauty, skincare, fashion posts using #clozetteid and/or #clozette. If you are curious as to why I’ve been doing this, keep reading!

So, a year ago I started seeing Clozette Indonesia advertisement on Facebook, being a curious person, I decided to click on it and found out that Clozette Indonesia is a large beauty- and fashion-related social network in Indonesia. I decided to sign-up for it, connected my Instagram account to it and started hashtagging my works with #clozetteid.

Fast forward to a few months later, a few of my friends, followers and I started to realize that my tutorials have been popping up on Clozette Indonesia facebook ads. You would know if you follow me on Instagram, because I actually took a few screen shots of those ads and posted it there. Curiosity had gotten me, and I decided to email the staff over at Clozette Indonesia to ask why were my pictures were used. To my surprise, they asked me to become a Clozette Ambassador!

So, I’m certainly looking forward to meet the other ambassadors, and hopefully I can continue to inspire more people through Clozette Indonesia! I was quite surprised to see I’ve increased the number of followers over on Instagram, as well as Clozette’s website just from hashtagging my work with #clozetteid. I know the numbers are still low, but hey, baby steps!

Clozette Daily

Anyways! I’ve been talking a lot about Clozette Indonesia, and I’m sure you’re curious by now. So let’s get started on the website itself, and what does it do. Like I’ve mentioned previously, Clozette Indonesia is a fashion- and beauty-related social network. It is an online community, where you can share and discover beauty secrets, fashion must-have items and many more! Not to mention, you can find out what’s the latest videos and pictorials to keep your fashion and makeup wardrobe up-to-date.

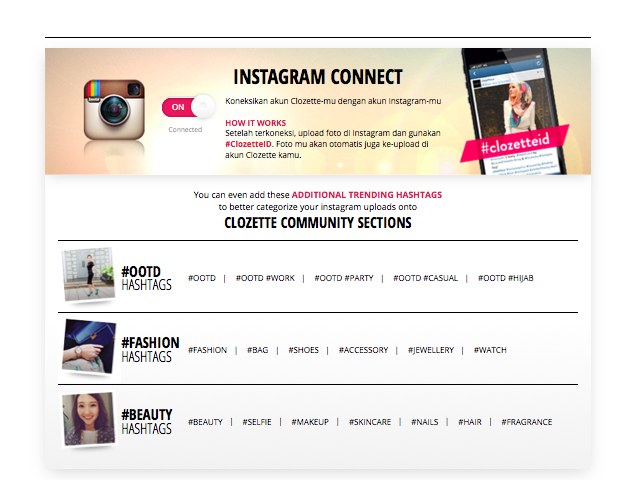
What I love the most about this website is the hashtagging feature; you can add #clozetteid #clozette on your Instagram description (only works on description, not comments), and it’ll automatically get uploaded to your Virtual Closet in Clozette’s website.

Clozette Indonesia

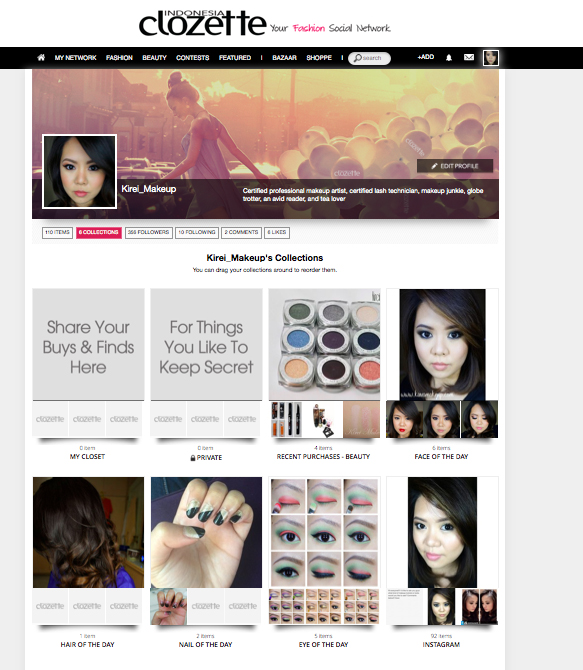
What is Virtual Closet, you ask? See, on Clozette Indonesia’s website, you can categorize your pictures into many “folders” to make everything organized. These “folders” are your Virtual Closet, much like your wardrobe at home. You know how you separate your wardrobes into “dresses”, “pants”, “sweaters”, “shirts” etc? Virtual Closet works like that, except you can make it into anything you want! If you take a look over on Kirei Makeup Virtual Closet (that’s mine), I have several closets such as “Face of the Day”, “Eye of the Day”, “Instagram”, “Recent Purchases – beauty” etc.

So, I’ll try to upload more pictures into my Collection (all of my virtual closets are called Collection), and not just on Instagram. But, as you can see, this is a neat idea, isn’t it? Everything is organized in its own closet! You can add whatever you want – wish list, fashion, look of the day, shoes, etc.

Clozette Indonesia Kirei Makeup

The other feature of Clozette Indonesia that, I think, is pretty cool, is their Store Management So, tell me, do you have a tons of clothes or makeup that you don’t even use anymore, and it’s collecting dust? Or, have you been wanting to start your own fashion/beauty business but don’t know where to start? Well, take a look at their Bazaar! This feature allows you to create your own store, and start selling your own fashion- and/or beauty-related products FOR FREE! All you need to start selling is just 10 items, and you can start making your money!

Clozette Indonesia

The other feature, related to shopping again because let’s face it we do love to shop, is Shoppe. What is shoppe? Shoppe is like an online store, but unlike Bazaar, the brands in Shoppe are affiliated with Clozette. Local and international online stores, like Zalora, Dian Pelangi, ASOS, Neimann Marcus etc can be found in Shoppe. So, if you’re like me, definitely check Shoppe out! You can shop many different international and local brands in just 1 website! How convenient!

See, Clozette Indonesia isn’t just about inspiring, and getting inspired. It also enables you to become an entrepreneur, for free! I think this website has so much more potential, and I’m so happy to be able to become a part of Clozette Indonesia.

clozette daily

Have I piqued your interest? Well then, what are you waiting for? Come, sign up over at Clozette Indonesia, and start following me! Comment, like, and I’ll be waiting for you! I hope my pictures can inspire you, and you inspire me!

Psst, if you are not from Indonesia, you can still join us! Just take a look at Clozette website right now!

Disclaimer: I am a part of Clozette Indonesia Ambassador program, however, I am not being paid to do this post. All links are NOT affiliated links. I do not earn any commission from Clozette Indonesia.


World Cup 2014 Argentina Inspired Makeup

We are almost at the end of the World Cup 2014. Today I’m going to do Argentina inspired makeup, which consists mainly of light blue and white. I find it difficult to combine this shade with the rest of my makeup. I had to change my lip colors a few times before I was satisfied (and I’m still not that satisfied, btw..). I think I should’ve went with a cooler lip color, instead. Oh well…

Anyways, I actually found a little bit of difficulty when doing the tutorial since I kept coughing (yes, my cough returned…-__-lll). As you can see on the second pic (top middle), the blue shadow smudged a little to the center of the lid, even though I wanted to keep it bare. That’s because when I was doing the inner part, I coughed and the brush slide to the center of my eyelid. So, please if you decide to recreate this look, keep the middle part of the eyelid free of any blue shadow.

For the other World Cup 2014 makeup series, please check my Brazilian Inspired Makeup post and Netherlands Inspired Makeup. For the use of Sleek Makeup iDivine Candy palette, please check my Psychedelic and Very Purple tutorials.

world cup argentina makeup

How-to:

1. I applied NYX Jumbo Eyeshadow Pencil in Milk all over the eyelids.

2. Using a flat shader brush, I applied Bubble Gum from Sleek Makeup Candy palette on the outer and inner third of the eyelid, keeping the middle part free of any eyeshadow (see note above)

3. I used whatever was left on the brush on my crease.

4. Using a clean blending brush, I blended my crease so there’s no harsh line.

5. I applied Cream Soda from Sleek Makeup Candy palette in the middle part of my eyelid using a flat eyeshadow brush. I also added Pow from Sleek Makeup Ultra Matte v1 Brights palette on top of Cream Soda.

6. Using a small stiff shader brush, I applied Bubble Gum along the lower lash line.

7. I lined my waterline using Revlon Photoready Kajal eyeliner in Carbon Cleopatra.

8. I created a winged liner along the upper lash line using Kanebo Kate Super Sharp eyeliner.

9. I curled my lashes and applied MUFE Aqua Smoky Lash. I also applied Gwiyomi false eyelashes #3.

10. I filled my brows using Shu Uemura Brow Pencil.

argentina inspired makeup

11. I applied MAC Pro Longwear foundation on my face using MAC Masterclass Brush Oval 6.

12. I contoured and highlight my face using Motives Fire sculpt palette.

13. On my cheeks, I applied Benefit Coralista.

14. On my lips, I applied Revlon Colorstay Ultimate Suede Lipstick in Flashing Lights.

argentina inspired makeup

Products used:

Eyes – NYX Jumbo Eyeshadow Pencil in Milk; Sleek Makeup iDivine Candy palette (outer and inner eyelid/lower lash line: Bubblegum; center of eyelid: Cream Soda); Sleek Makeup iDivine Ultra Matte V1 Brights (center of eyelid: Pow); Kanebo Super Sharp Eyeliner; Revlon Photoready Kajal eyeliner in Carbon Cleopatra; MUFE Aqua Smoky Lash; Gwiyomi False lashes #3

Face – MAC Pro Longwear foundation; Motives Fire sculpt series palette; Benefit Coralista blush.

Lips – Revlon Flashing Lights colorstay ultimate suede lipstick.motives fire sculpt palette

Smoky Eyes with a Neon Eyeliner

Hey ya’ll! I hope everyone is doing great this weekend! I posted this look on Instagram last night, and I almost forgot to upload it today. Anyways, as mentioned on my Instagram account, this smoky eyes with a neon eyeliner look is a recreation from @jenmiamakeup. She’s one of the many great makeup artists who I follow on Instagram. I love how she does hers with a neon yellow. I tried this one with the only neon pigment I owned – MAC Neo-orange loose pigment.

If you are going to recreate this look, I’d suggest using a mixing medium instead of water, like I did. I used water and for some reason the pigment didn’t want to mix smoothly. I ran out of my mixing medium so I have to go get one in the near future. The other issue that I kept having is the fact that my smoky eyes kept creasing. Ugh, I should have used a different eyeshadow base (and probably should have prime my eyelid first). So, I’d suggest for you to use an eyelid primer to avoid creasing.

Anyhow, let’s get the tutorial started!

smoky eyes for asian

How-to:

1. Using a light brown eyeshadow (mine was a sample, and it has no brand nor name), I applied this shade just above my crease using a clean blending brush. I used this shade as a transition color, the shade is just slightly darker than my own skin color.

2. Using a deep chocolate brown (again, this was a sample with no brand and no name), I applied this shade right on the crease using a small crease brush.

3. Using the same blending brush as step no. 1, I blended the chocolate shade.

4. I applied Revlon Photoready Kajal eyeliner in Carbon Cleopatra, I applied the black eyeliner all over my eyelid, and waterline.

5. I lightly blended the eyeliner using a synthetic art brush.

6. I applied Kat Von D Monarch palette Deadhead eyeshadow on top of the black base using a flat eyeshadow brush. I also applied this eyeshadow along the lower lash line using a small shader brush.

7. Using the same brush as step no. 1, I blended out the edge of Deadhead so there’s no harsh line.

8. I mixed water and MAC Neo-Orange loose pigment to create the neon winged eyeliner.

9. On my brows, I used Anastasia Brow Wiz in Medium Ash to fill them.

10. On my lashes, I applied Ardell 105 false lashes.

mac twig lipstick

11. On my face, I applied MARC JACOBS gel foundation using CoverFX foundation brush. I concealed using MUFE HD concealer, and set my face using CoverFX translucent powder.

12. I applied Benefit Moon Beam highlighter on the bridge of my nose, cupid’s bow, chin and cheekbones.

13. I lightly contoured my face (sides of the nose, under my cheeks, jawline, and temples) using NARS ITA kabuki brush and MAC Blunt powder.

14. I applied MAC Dainty on my cheeks.

15. For the lips, I applied MAC Spice lip pencil all over.

Psychedelic w/ Sleek Makeup Candy Palette

Another tutorial using the Sleek Makeup Candy Palette (for the first tutorial check it out here), and if you don’t already know, I have a GIVEAWAY going on! Check out my Sleek Makeup Candy Palette Giveaway page to find out how you can win this beautiful gorgeous palette!

For today’s tutorial, I named in Psychedelic because of the amount of colors and how bold this look is. I, also, wanted to make full use of the palette’s beautiful color selections and this is the result that I came up with. I’ve done a lot of bold, bright colors tutorials, but I’ve never combined them together before. Well, today shall be the day where I combined both looks – colorful eyes and bright lips.

sleek makeup candy palette tutorial

Eyelids were prepped using Urban Decay Primer Potion in Eden. All eyeshadows are from Sleek Makeup iDivine Candy palette.

How-to:

1. I applied Blue Fizzle on my crease using a blending brush.

2. Using a tapered blending brush, I applied Strawberry Sherbet just slightly above Blue Fizzle, and blending it with Blue Fizzle, creating a beautiful hue of purple.

3. Using a flat eyeshadow brush, I applied Apple Sour all over my eyelid.

4. I applied Liquorice  on the outer V.

5. I created a winged eyeliner using L’oreal Super Liner Ultra Sharp Tip along the upper lash line. I lined my waterline using L’oreal Voluminous Smoldering eyeliner.

6. On the lower lash line, I applied Pear Drop on the inner half, and Parma Violet on the outer half. I also applied Cream Soda very lightly on the inner tear duct.

7. I curled my lashes and applied 4 coats of MUFE Smoky Extravagant mascara on the upper lashes, and a coat on the bottom lashes.

8. I applied Ardell 110 falsies.

9. Filled my brows using Anastasia Brow Wiz in Medium Ash and Brunette.

revlon matte balm unapologetic

10. For my face, I applied Cover FX cream foundation as base, highlight and contour (g40, g20, & n110)

11. On my cheeks, I applied NARS Mata Hari blush.

12. On my lips, I applied Revlon Colorburst Matte Balm in Unapologetic.

revlon matte balm unapologetic

Products used

Eyes – Sleek Makeup Candy Palette (lid: Apple Sour, crease: Blue Fizzle, above crease: Strawberry Sherbet, lower lid: Pear Drop/Parma Violet, outer V: liquorice, tear duct: Cream Soda); L’oreal Super Liner Ultra Sharp Tip; L’oreal Voluminous Smoldering Eyeliner; MUFE Smoky Extravagant mascara; Ardell false eyelashes 110; Anastasia Brow Wiz (Medium Ash/Brunette).

Face – Cover FX Cream foundation (base: G40, highlight: G20, Contour: N110)

Cheeks – NARS Mata Hari

Lips – Revlon Colorburst Matte Balm Unapologetic


Very Purple with Sleek Makeup Candy Palette

As mentioned in my previous post, I wanted to share this tutorial with you guys! Today’s look uses Sleek Makeup Candy Palette (Limited Edition) that I bought from Luxola! Don’t worry, the palette that I’m giving away is totally brand new, and unused!

Oh, you didn’t know about the giveaway that’s going on? Check out my Sleek Makeup Candy Palette Giveaway post for details! This giveaway will last until Thursday (June 12, 2014) at 11.59pm.So, hurry up and check out that post for more info!

I also want to mention that since my images were getting used without my permission nor credits, I’m putting a huge watermark in the middle of all my pictures from here onwards. I do apologize if the watermark is bothering the picture, but I have to protect my work. I do want to thank all of you who have been kind enough to let me know whenever someone used my pictures (aka plagiarism). I appreciate all your kindness! A big thank you, hugs, and kisses for you who have been supporting me!

Anyways, let’s get the tutorial started!

sleek makeup idivine candy paletteEyelids are prepped using Urban Decay Primer Potion in Eden. All shades for the eyes are from Sleek Makeup iDivine Candy Palette.

How-to:

1. Using Smashbox bullet crease brush, I applied Flump slightly above my crease.

2. Using a small blending brush, I applied Parma Violet on the outer V and the crease. You can apply this using a small shader brush for a more precise application.

3. Using the same bullet crease brush as step 1, I blended out Parma Violet to remove any harsh edge on the crease. I also slightly winged the outer part.

4. Using a flat eyeshadow brush, I applied Aniseed all over my eyelid.

5. Using a small shader brush, I applied Bon Bon on the inner corner of my eyes, and then I applied Parma Violet along the lower lash line.

6. I used my face powder (MUFE 118 Pro Finish) and a blending brush under my brows, blending it into the purple shades slightly to remove any harsh edge.

7. I lined my upper lash line using Kanebo Kate Super Sharp Eyeliner. On the waterline, I applied black eyeliner pencil.

8. I curled my lashes, applied mascara, and then applied Ardell Demi Wispies lashes. (As you can see, Ardell demi wispies falsies are my current favorite lol).

9. For the brows, I applied Anastasia Brow Wiz in Medium Ash. I lightly set it with Anastasia Brow Powder duo in Brunette.

sleek makeup candy tutorial

10. For my face, I applied Motives Fire highlight/contour palette. I applied the lightest highlight color on the high planes of my face – cheekbones, bridge of the nose, cupid’s bow, forehead, chin, below hollows of the cheeks, and under my eyes. I applied the darkest contour color on the hollows of my cheeks, sides of my nose, and temples. I blended them out using a damped beauty blender sponge and MUFE HD Foundation in 118.

11. For my cheeks, I applied Smashbox Halo blush in In Bloom.

12. For the lips, my new favorite, I applied L’oreal Color Riche Extraordinaire Liquid Lipstick in Rose Symphony

Colorful Carnival Makeup

As Easter is approaching this weekend, and Carnival next weekend, I wanted to do a tutorial that incorporates super bright and really fun colors onto my makeup. This Colorful Carnival Makeup look is inspired by the ladies in Jamaica, who are unafraid to wear bright eyeshadows!

I used Sleek Makeup Ultra Matte Brights V1 for the eyeshadows since I really wanted to use matte eyeshadows for this look. If you do decide to use this palette for your makeup, I suggest that you use a white base (i.e. NYX Jumbo pencil in Milk) so the colors pop even more.

Again, don’t forget to check my Instagram for daily updates since I’ll be away from my laptop this weekend! Remember to TAG your work with #KIREIMAKEUP so I can see and get inspired by YOU! 😉

Scroll all the way down for products list.

sleek makeup matte bright tutorial

All eyeshadows used in this tutorial is from Sleek Makeup Ultra Matte Brights V1. If you are in Asia, and you want to buy this palette, please check Luxola website! Use the code LXBLOG for 15% off!

How-to:

1. I prepped my eyelid using NYX Jumbo Pencil Shadow in Milk on both upper and lower lid.

2. I applied Pucker in the middle of my eyelid using a flat eyeshadow brush.

3. Using the same brush, I applied Pout on the outer part of my eyelid.

4. Using a clean shader brush, I blended out the edge of Pucker and Pout to remove any harsh edge.

5. I applied Bammi on the inner corner of the eyelid using a flat eyeshadow brush.

6. (Optional) I applied Sugarlite on my crease using a small shader brush. Optional step since the purple isn’t dark enough.

7. (Not in picture) I applied Floss on the crease using a blending brush as a transition color.

8. I lined my upper lash line with Kanebo Kate Super Sharp Eyeliner. On my waterline, I applied L’oreal Voluminous Smoldering eyeliner.

9. On the lower lid I used an angled eyebrow brush and  applied Chill on the inner corner, Bolt in the middle, and Dragonfly on the outer part.

10. I curled my lashes and applied Cover Girls Lash blast mascara on both upper and lower lashes.

11. I also applied Gwiyomi “Yuki” False Eyelashes (Indonesian store, check my Instagram if you want to buy).

12. I filled my brows using Anastasia Brow Wiz in Ash Blonde and Brunette.rainbow makeup

13. On my face, I applied Cover FX cream foundation in G40 using MAC Masterclass Brush Oval 6.

14. Very lightly, I applied Cover FX cream foundation in G20 under my eyes. I set my base using CoverFX translucent powder.

15. On my cheeks, I applied MAC Dainty blush.

16. I lined my lips using L’oreal Color Riche Lip Liner in Beyond Pink, and applied MAC Please Me Lipstick using a lip brush.


Products used

Eyes – NYX Jumbo Pencil Shadow in Milk; Sleek Makeup iDivine Ultra Matte V1 Brights; Kanebo Kate Super Sharp eyeliner; L’oreal Voluminous Smoldering eyeliner; Cover Girl Lash Blast mascara; Gwiyomi “Yuki” false eyelashes; Anastasia Brow Wiz in Ash Blonde and Brunette.

Face – CoverFX cream foundation in G40 (base) and G20 (under eyes); CoverFX translucent powder; MAC Dainty blush.

Lips – L’oreal Color Riche Lip Liner in Beyond Pink; MAC Please Me lipstick.

Lavender Grey using NARSissist Palette

For this week’s tutorial, I decided to use my NARSissist Palette again! I fell in love with this palette all over again. I feel like it’s such a great palette with a more mature color option. For today’s tutorial, I picked out my favorite shades which were in the range of grey, lavender, and violet. I know the picture doesn’t show much of the lavender/violet on the lid, but I assure you it’s such a pretty grey with very subtle hint of lavender/violet in it. If you’re one not to wear color, and prefer a much neutral option, this would be a great addition to your makeup wardrobe.

Oh, just to let you guys know, I have been trying to update my Instagram daily. I’m going to try to do a weekly “Monday Makeup Inspiration”, and regram/repost-ing every look that YOU guys do if you FOLLOW me (@kireimakeup) and add #kireimakeup to your Instagram pictures! I’d love to see your makeup and/or your re-creation of any of my looks!

narsissist smoky eyes

How-to:

1. I’ve prepped my eyelid using Urban Decay Primer Potion in original. Using a blending brush (from UD Naked 3 palette), I applied NARS Brousse II on my crease.

2. Using a small shader brush, I applied NARS Pandora II on the outer V of my eyelid.

3. I blended my crease by applying NARS Madrague I using a clean blending brush. I used this shade as a transition color.

4. I applied NARS Ashes to Ashes on my entire eyelid using a flat eyeshadow brush. I also added a little bit of NARS Lhasa on top of it.

5. I created a winged liner along my upper lash line using L’oreal Infallible Gel Lacquer 24hr in Blackest Black and an angled eyeliner brush. Using whatever was left on the brush, I ran it along the lower lash line, and waterline.

6. I also used a small shader brush and applied NARS Ashes to Ashes along my lower lid.

7. I filled my brows using Anastasia Brow Wiz in Ash Blonde and Brunette. I cleaned up the edges of my brows using Cover FX G20 cream foundation. If you want to know how I fill my brows, please check my brow tutorial.

8. I curled my lashes and applied Cover Girl Lash Blast mascara. I also applied falsies (Korean’s falsies, not sure what it’s called since the brand is not in English).

NARSissist Lavender Grey smoky eyes

9. On my face, I applied Cover FX Cream Foundation in G40 using MAC Masterclass Brush Oval 6.

10. I lightly applied highlight and contour using CoverFX cream foundations in G20 & N110. Check out my BACON post to find out how I used CoverFX to do my highlight and contour.

11. On my cheeks, I applied Revlon cream blush in Pinched.

12. On my lips, I applied Revlon Mauve it Over matte lipstick.

Summer Makeup using MAC Sweet and Punchy

Last night, I put up a sneak preview on today’s tutorial on my Instagram account! I was super pumped to do this tutorial since I can show you guys how you can use the previous tutorial technique and incorporate other color into the look. Don’t you just love that bright green-yellow eyeshadow?! It’s actually MAC Sweet and Punchy eyeshadow, which was from the old MAC collection. If you can’t find this eyeshadow, you can substitute it for MAC Rated R which is exactly the same color.

Anyways, I also want to mention that I’ll start doing “repost” or “regram” on my Instagram account if you follow me and tag your beautiful makeup works with #kireimakeup. I’d love to see your works, especially if you re-create one of my looks! So, please do follow and tag me on Instagram!

As always, scroll all the way down if you want to skip the how-to, and get on the list of products used for this look.

bright green makeup tutorial

How-to:

1. My eyelids were prepped using Urban Decay Primer Potion in Sin. Next, I applied Smashbox Full Exposure eyeshadow in M1 using a blending brush on my crease.

2. Using a Sephora bullet crease brush, I applied Smashbox Full Exposure eyeshadow in M7 on the outer V.

3. Using a clean blending brush, I blended out my crease so there’s no harsh line.

4. I applied MAC Sweet and Punchy using a flat eyeshadow brush on my eyelid area.

5. Using a small shader brush, I applied MAC Sweet and Punchy on the inner part of my lower lid, and then I applied Smashbox Full Exposure M7 eyeshadow on the outer corner.

6. I created a thick winged eyeliner using a small angled eyeliner brush and L’oreal Infallible Gel Lacquer Liner 24H in Blackest Black.

7. Using whatever was left on the brush on step 6, I applied the gel liner on my waterline as well as the outer half of my lower lid.

8. I curled my lashes, applied Cover Girl Lash Blast mascara, and then I added Gwiyomi “Putri” false eyelashes.

9. I filled my brows using Anastasia Brow Wiz in Ash Blonde and Brunette (I filled my brows slightly differently this time, might do a tutorial on how I filled it in next time).mac sweet and punchy tutorial

10. On my face, I applied CoverFX cream foundation in G40 using a Sigma Tapered Kabuki brush.

11. I added a little bit of CoverFX N110 cream foundation along my jawline, underneath my cheeks and sides of my nose using a damped sponge.

12. I set my face using CoverFX translucent powder.

13. On my cheeks, I applied Benefit Hervana. I also added Benefit Coralista just on the apples of my cheeks.

14. On my lips, I applied L’oreal Color Riche lip liner in Beyond Pink.

Products used

Eyes – Urban Decay Primer Potion in Sin; MAC Sweet and Punchy eyeshadow; Smashbox Full Exposure palette (M1 on the crease; M7 on outer V); Cover Girl Lash Blast mascara; L’oreal Infallible Gel Lacquer 24Hr in Blackest Black; Gwiyomi “Putri” false eyelashes; Anastasia Brow Wiz in Ash Blonde and Brunette.

Face – CoverFX cream foundation (G40 as base, N110 as contour); CoverFX translucent powder; Benefit Hervana blush; Benefit Coralista blush.

Lips – L’oreal Color Riche lip liner in Beyond Pink.

Disclaimer: Please note that links to Sigma Beauty will land you to my affiliate page. However, I strive to recommend only the best products for you, and ones that I love myself, so you know you are in good hands. Your support in purchasing through these links will go towards the maintenance of this website, and to keep the blog updated and running. Thank you for your support!

Simple Makeup using Smashbox Full Exposure Palette

Today I wanted to share this oh-so simple makeup look. This is the look that I wore last night for a friend’s birthday dinner (check my instagram), and seemed to be wearing it almost quite often lately. The makeup itself is very easy, perfect for beginners if you want to do something different with your look. I think the only tricky part of this look is the eyeliner, but you can skip the winged eyeliner if you prefer. This is a very basic eyeshadow application technique, and you can obviously change the colors of the eyeshadow to whatever you like.

I’ve done something very similar to this look in my other Smashbox Full Exposure tutorial, but that one is more dramatic (with falsies and more liner, and slightly more smoky). If you prefer a smokier look, I’ve done 2 tutorials using this palette right here and here. I’ve also done swatches and a Smashbox Full Exposure palette review.

Scroll all the way down for complete product list.

natural eyes for asian

How-to:

1. I prepped my lid using Urban Decay Primer Potion in Sin.

2. Using a Sephora bullet crease brush, I applied M1 on the outer V of my eyelid, blending the color to my crease.

3. Using a clean bullet crease brush, I applied M7 on just the outer part of the eye.

4. Using a clean Smashbox fluffy blending brush (from the palette itself), I applied a mixture of M2 and M3 on the crease (the picture doesn’t seem to catch those colors since it’s very close to my skin color).

5. Using the flat-end of the Smashbox brush, I applied S3 on my eyelid.

6. Using a small shader brush, I applied M7 on the outer half of my lower lid.

7. I created a winged eyeliner using Kanebo Kate Super Sharp eyeliner.

8. I curled my lashes and applied Cover Girl Lash Blast mascara.

9. I filled my brows using Anastasia Duo Brow Powder in Brunette.makeup for brown eyes

10. For my face, I applied Urban Decay Naked Skin foundation using a damped sponge.

11. I applied Smashbox contour powder (from the contour/highlight trio kit) under my cheeks.

12. I applied MAC Dainty on my cheeks.

13. For the lips, I applied MAC Please Me lipstick and a little bit of lip balm.

Product used

Eyes – Urban Decay Primer Potion Sin; Smashbox Full Exposure palette; Kanebo Kate Super Sharp eyeliner; Cover Girl lash blast mascara; Anastasia Duo Brow Powder

Face – Urban Decay Naked Skin foundation; Smashbox trio contour kit; MAC Dainty blush

Lips – MAC Please Me lipstick; L’occitane lip balm

Soft Rose Smokey Eyes tutorial using UD Naked 3

Here I am with a new Soft Rose Smoky Eyes tutorial using UD Naked 3 (again)! I do apologize for missing for almost a week without any tutorials. I’ve been having some difficulties with the internet at home. However, if you do follow me on Twitter or Instagram, you’d have gotten a little bit of update here and there every day.

In another news, I was very excited to find out that Urban Decay has used one of my pictures that I did on their email newsletter! I’m not sure if you guys subscribe to their mailing list, but I was so surprised to see my face on it. It’s small, but I’m so happy! If you want to recreate that look, please take a look at my Rose Smoky III tutorial.

Don’t forget to check out my other UD Naked 3 tutorials (pictorials and video)!

Urban Decay

So, for today’s tutorial, I wanted to use my Urban Decay Naked 3 again to create a much softer rosy smoky eyes, something that most people can recreate and do it on themselves. This look would be great for those with medium to darker skin tone as well. If you like a very light eyelid, you can apply Burnout or Dust instead of Buzz.

Scrolls all the way down if you want to skip the how-to, and go straight to the product list.

urban decay naked 3 rose smoky

How-to:

  1. I prepped my eyelids using Urban Decay Primer Potion in Sin.
  2. I applied Buzz on the inner half of my upper eyelid, and Liar on the outer half, using a flat eyeshadow brush.
  3. On the crease, I lightly applied Limit using a blending brush.
  4. Using a bullet crease brush, I applied Blackheart on the outer V.
  5. I blended out the outer V using the same blending brush I used on Step 3.
  6. On the lower lid, I applied Blackheart using an angled brow brush.
  7. I also applied Buzz on the inner corner of the lower lid.
  8. I lined my waterline using L’oreal Voluminous Smoldering eyeliner.
  9. I applied a winged eyeliner along the upper lash line using Kanebo Kate Super Sharp eyeliner.
  10. I curled my lashes, and applied Clinique High Impact mascara. Then, I added false lashes.
  11. I outlined my brows using Anastasia Brow Wiz in Ash Blonde, and filled it with Anastasia Brow Powder in Brunette.

urban decay naked 3 makeup tutorial

  1. I applied Cover FX cream foundation in G20 under my eyes, on the bridge of my nose, chin, and forehead using a clean foundation brush.
  2. I then applied Cover FX cream foundation in N110 on my temples, sides of my nose, on the hollows of my cheeks and on my jawline using a clean foundation brush.
  3. I blended the 2 foundation using a damped sponge.
  4. I set my face using Cover FX translucent powder.
  5. I applied Chanel Blush de Horizon on my cheeks.
  6. On my lips, I applied Tarte Lipsurgence in Lively.


Products used

Eyes – Urban Decay Naked 3 (eyelid: Buzz & Liar, crease: Limit, outer V: Blackheart); L’oreal Voluminous Smoldering eyeliner; Kanebo Kate Super Sharp eyeliner; Ardell false lashes no. 109; Anastasia Brow Wiz in Ash Blonde; Anastasia Duo Brow Powder in Brunette.

Face – Cover FX cream foundation in G20 & N110; Cover FX translucent powder; Chanel Blush de Horizon.

Lips – Tarte lipsurgence in Lively.