ABH Shadow Couture World Traveler Tutorial #1

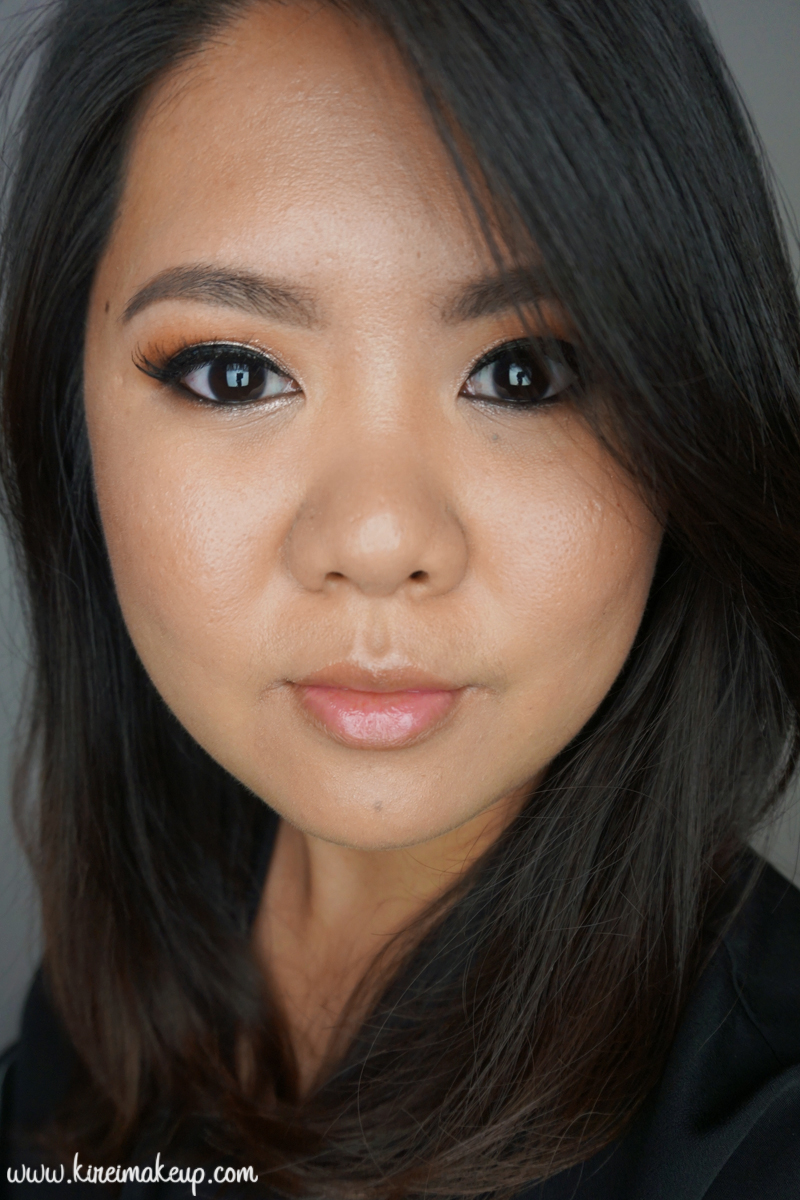
Today ABH Shadow Couture World Traveler tutorial is a great look for party makeup. It’s very shimmery and warm, perfect for Fall. Anyways, I finally have the chance to get my hands on one of the Anastasia Beverly Hills (ABH) eyeshadow palettes. I wanted to know if it lives up to its hype, and it does! So smooth and pigmented, now I understand why lots of youtube and insta-beauty gurus love ABH shadows.

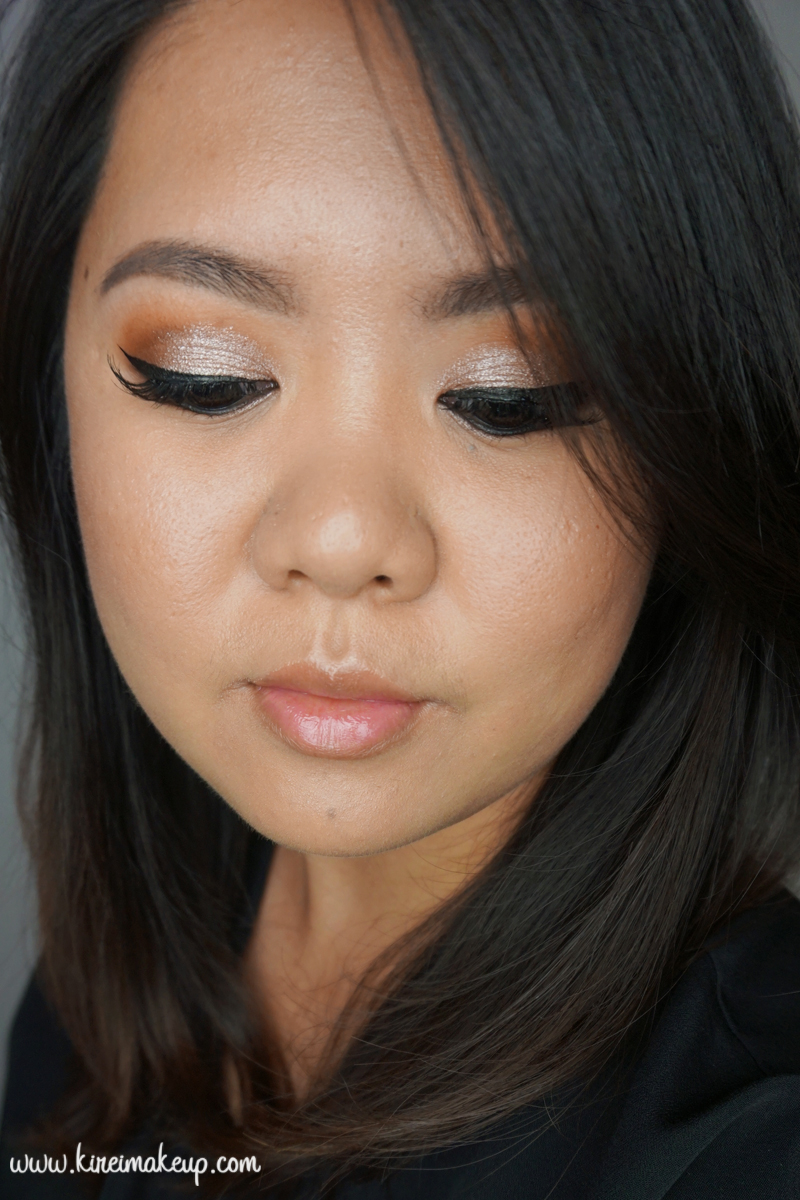
For this look, the focus is all in the eyes. Even though the eyes aren’t too dark, I still prefer to keep everything else on the down low since the eyelids are very shimmery. Nevertheless, feel free to add a different lip colour if you prefer, a nice classic red (e.g. MAC Russian Red), or a berry-red (e.g. MAC D for Danger), or a deep dark red (e.g. MAC Diva).

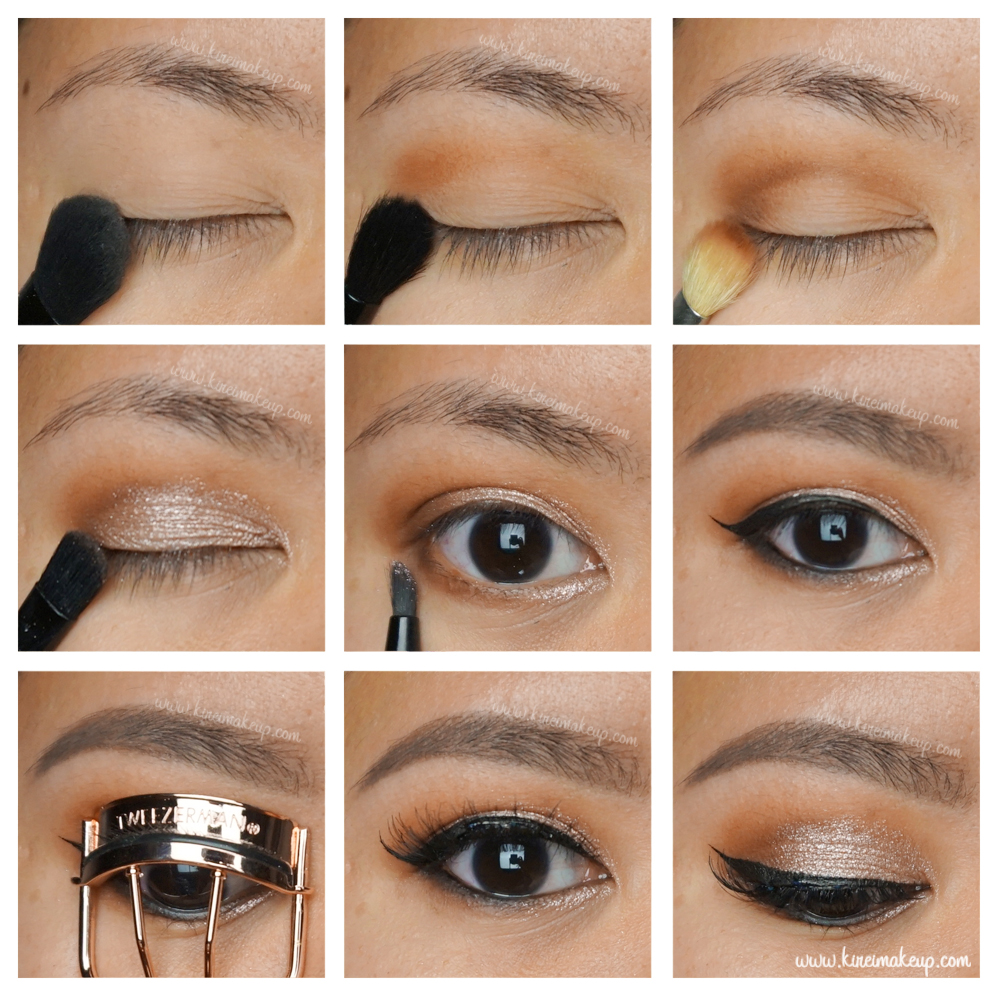
For this tutorial, I’m using several brushes and tools from Tweezerman, sent to me by Preen.me as part of their PreenMeVIP program. The brushes and tools featured are – blender brush, shader brush, line glider brush, ProCurl eyelash curler.

ABH Shadow Couture World Traveler palette

Products used

Eyes

  • Primer – Urban Decay Primer Potion “Original”
  • Base – ABH Shadow Couture World Traveler “Soft Peach”
  • Transition – ABH Shadow Couture World Traveler “Morocco”
  • Outer V/Crease/lower lid – ABH Shadow Couture World Traveler “Fudge”
  • Eyelid/inner corner of lower lid – ABH Shadow Couture World Traveler “Pink Champagne”
  • Outer half of lower lash line – ABH Shadow Couture World Traveler “Noir”
  • Winged liner – Kanebo “Kate Super Sharp liner”
  • Waterline – MAC “Smolder” kohl pencil
  • Brows – ABH Brow Pomade “Taupe” + “Medium Brown”
  • Falsies – Ardell “Demi Wispies


ABH Shadow Couture World Traveler palette

Face

Cheeks

Lips

  • Lip color – Sephora Oil Infusion Color & Care “Pink Granita”

ABH Shadow Couture World Traveler palette


Highlights for Brunette

Howdy, everyone?! As you all know, I’ve recently went to the salon to get a trim, and a little bit of highlights on my hair. A lot of people have messaged me requesting for a post on these highlights for Brunette. So, here goes the full detail on how I get these highlights!

First of all, I get my hair done by a professional. I think highlights, color and trim should be left to the professionals whenever possible. I do not recommend you doing this at home with a DIY kit. I went to The Hairem Salon at Locke Street, Hamilton, Canada. My hairstylist is Vera, and I recommend her for anyone who is interested in getting their hair done.

I went to Vera and showed her a few pics from Pinterest showing I wanted to put in some highlights. Now, if you have been following me for a while, you’d have known that I’ve had very subtle caramel brown highlights back in 2011 (e.g. Fresh Look post), which was also done by Vera. I was very happy with the result back then, and I’m pretty comfortable with her handling my hair. I’ve been going to her since 2011, so she knows what I like.

Anyways, I told her this time I was willing to go lighter and bolder than before. She loved the ideas, and told me that she’d have to bleach a few pieces of my hair, and for the bottom layers she was going to put in my fav. caramel highlights. I said no problem, go ahead! In addition, she also mentioned she was going to give me the ombre look.


Blonde highlight on Asian

As far as I know, Vera added caramel highlights on the bottom layers, and she bleached some part of my hair, esp. the front and top layers. Then, after a quick wash, she added 3 different toners on my hair – dark (for the top section), medium and light (for the bottom section).

After about 3-hour on the chair, my hair was colored, trimmed and blow-dried! The damage was pretty intense on my wallet (ard $200), but it was all worth it! I was worried that the bleach might turned my hair brassy and dry, but not at all! It was soft, and to my surprise, very blonde! I can never imagine my hair that light, since I’ve had bad experience in the past with bleach. Usually my hair just turned orange if bleached, you would know if your hair is as dark as mine. Usually, us Asians don’t get that lucky with bleach. However, I’m so glad it turns up blonde! Vera said she had to use the 40% (developer) on my hair.

I was quite surprised when a lot of my followers on Instagram, friends, and fellow bloggers mentioned how good my hair looks! Yay! Feel free to use my pictures and be brought to your hairstylist if you want similar highlights.

I simply love how different my hair look when I’m out in the sun! It’s super gorgeous, and golden! I do miss my old dark hair, but I’m ecstatic to have these highlights in! I love how the blonde pieces are peeking through everywhere. Since there aren’t too many blonde streaks, the whole look isn’t tacky, you know what I mean? It’s still different, and chic at the same time. I love my caramel highlights and the ombre effect it gives.

It has been 3 weeks since I had it done, and it still looks amazing! If you want to see more pictures of my hair straight with the highlights, go over to my Instagram! I’ve posted several pics of my hair there, as well as a picture with Vera.

ombre hair

If you want to go to Vera, below is her contact info:

The Hairem Salon

144 Locke Street South
Hamilton, ON
Canada

Phone no: (905) 296-7493


Disclaimer: I am not affiliated nor endorsed by The Hairem Salon. All services are paid by me using my own money. All review on this blog is based on my honest opinion.

Brows 101

I’m sure we all have done things to our brows that we might end up hating. One of my pet peeves as a makeup artist is over-plucked brows. You know, the ones where the brows look like a hook – thick and round near the bridge of the nose and very thin on the tail. Brows play such an important role in makeup since they create a frame for our eyes. If our eyes are the windows to our soul, then the brows are the frames around the window.

So, usually, I get my brows done at Trade Secret. I get them waxed there for only a mere $5, it’s quick and painless and I like that they don’t over do it. I like my brows to look a bit natural and not too thin. Since I’m quite low-maintenance in terms of daily makeup, I don’t usually fill my brows. Thus, I prefer a more natural thicker looking brows so that I don’t have to fill them out every time I leave the house.

Now, $5 is not that expensive, but sometimes I just get so busy that I don’t have time to go to the malls to get my brows done! I know some other places probably charged more, so I like to have an alternative where I can do my own brows.

Fellow makeup junkies, please meet Anastasia of Beverly Hills Beauty Express For Brows and Eyes. This is my go-to products whenever I have to do my own brows or to create a different brow shapes for photoshoots. This product was send to me by Steven from The Confluence (Thanks, Steve!). I actually already have a pack of stencil and my all-time favorite: Anastasia Brow Wiz.

Anyhow, this Beauty Express kit is GENIUS! Everything works as long as you follow the instruction properly. The brow powders are the perfect colour! Even though I have dark hair, it doesn’t mean that I have to use a black shadow. Only those of African descent gets away with using black shadow as brow powder.

So, inside the kit, you receive:

  • A brush
  • 5 brow stencils – Petite, Medium, High, Slim High and Full Arch
  • A wax
  • 2 brow powders
  • A highlighter-shadow duo
  • A mirror and instruction
Anastasia Express Brow Kit
Anastasia Brow Powder


Anastasia Express Brow Kit
Anastasia Angled Brush


Anastasia Brow Stencils

All you have to do is follow the instruction and you’re good to go!

  1. Pick the stencil of your choice. I picked Petite Arch since it fits my brows nicely. I suggest you do the same so that you can find your match! 🙂
  2. Before I do anything, I used a spooly and brush my brow hair upwards and trimmed excess. This is because my brow hair naturally falls downwards and it changes the shape of my brows. So, I always trimmed them first.
  3. Once I trimmed my brows, I applied the wax from the kit using the brush (also from the kit). The wax will help to adhere the brow powders better. I cleaned my brush after I applied the wax.
  4. Next, I placed the stencil according to the instruction. This can be a challenged if it is your first time since the stencil might slide all over the place. Just give it a good grip!
  5. Using the darkest powder, I applied it to my brows following the stencil’s outline. When you remove the stencil, you should be able to see the shape of your new brows!
  6. Now, it’s time to tweeze some brows! I used a pointy tweezer from Tweezerman. The pointy tweezer allows me to pluck individual hair.
  7. I tweezed hairs that are not covered by the brow powder.
    • I plucked the hair slowly – anything above or below the outline gotta go!
    • One mirror right in front of you for detailed work and one mirror (about a meter) away from you. This way you can always check whether you’ve plucked enough hair or you’ve over-plucked
  8. Repeat step 2-7 on the other brows.
Anastasia Express Brow Kit
How-to use Anastasia Brow Stencil

The highlighter-shadow duo from the kit can be used when you applied makeup to highlight your brow bones.

What if you over-plucked?

Don’t worry! Once you realized you’ve over-plucked STOP TWEEZING! No, tweezing some more will not save it, so put down the tweezer down. Do your other brow and be careful not to over-pluck the other brow. Whenever you’re ready to do your brow makeup, take the stencil out again. This time, use a mix of the 2 powders to fill in your overplucked brow(s). Gently fill in your brows, don’t put too much. Use a spooly to brush any excess powder on your brows. Now, if you have big gaps due to the overplucking, take Anastasia Brow Wiz and lightly draw in individual hair. If you completely has very little hair left, you might want to get the Anastasia Brow Pen to draw a more natural individual hair.

This will also work if you have very little or sparse hair due to medical or genetic reasons.

You’ll be surprised at how much your brows’ shape change the way you look! Done correctly and you’ll look a lot more polished! 🙂