Tweezerman Brush IQ Tutorial

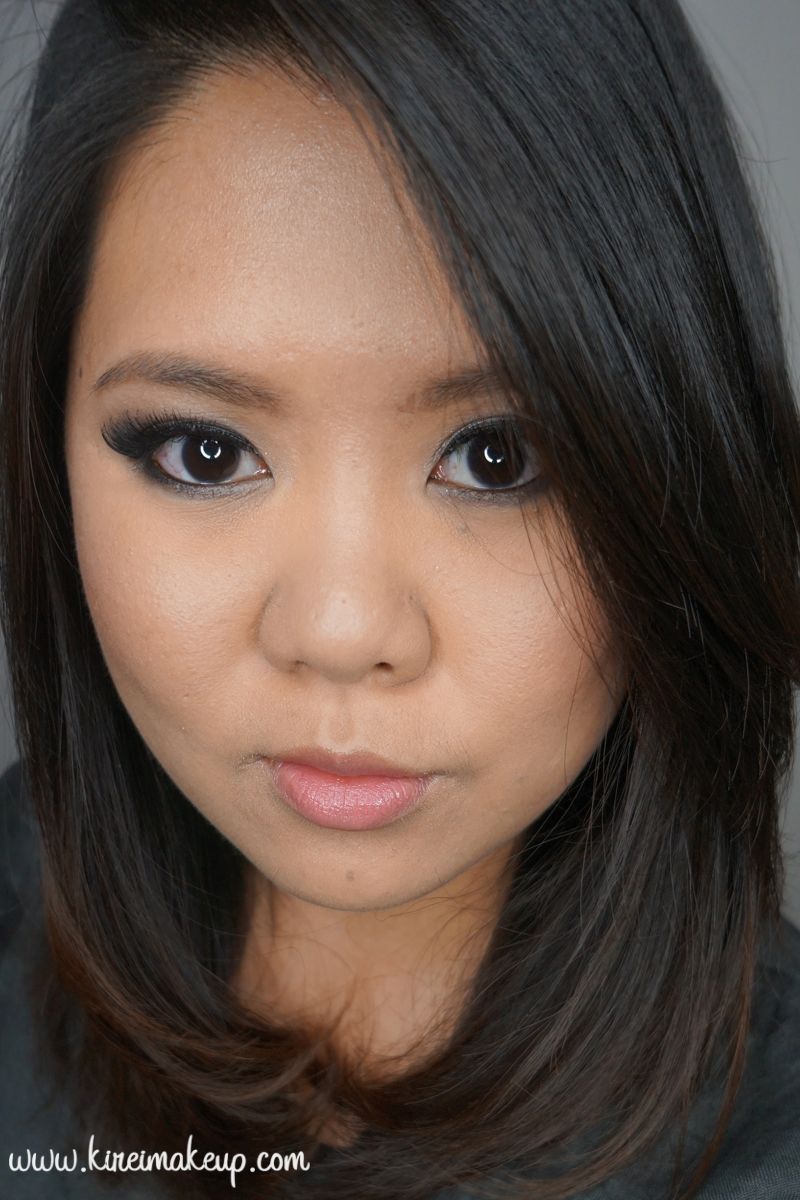
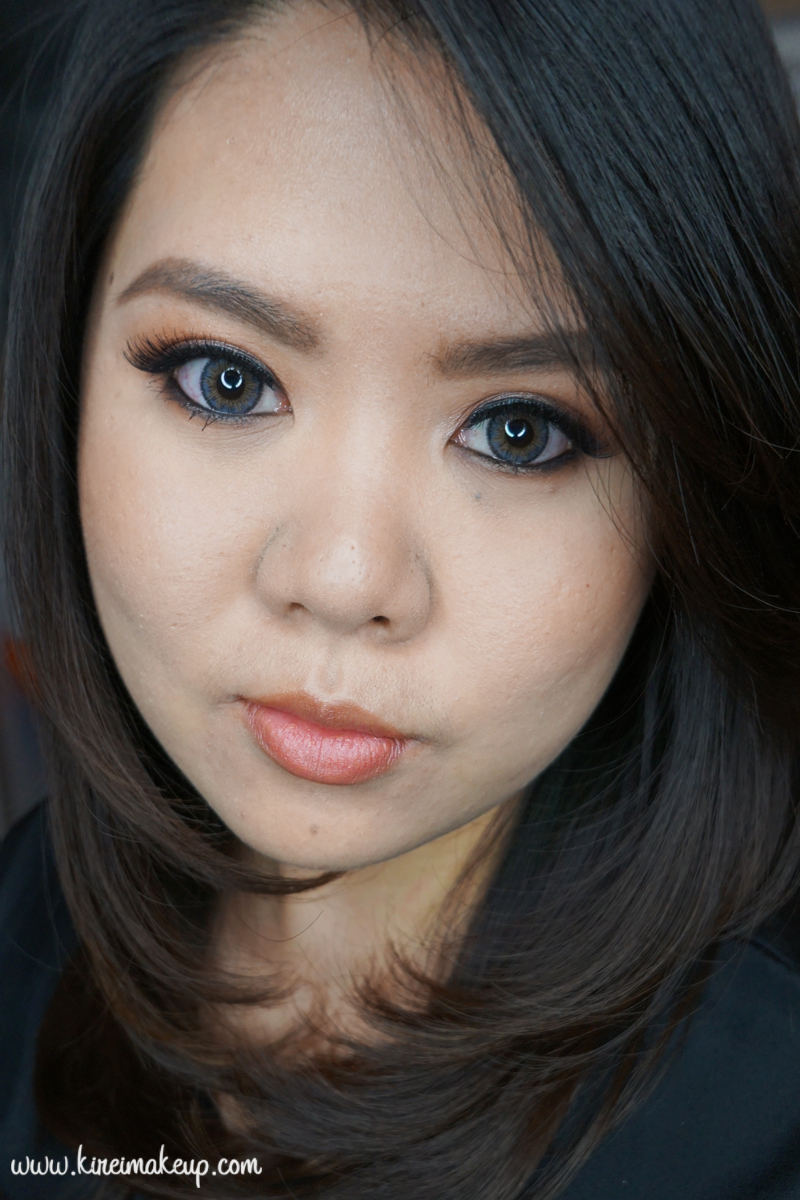
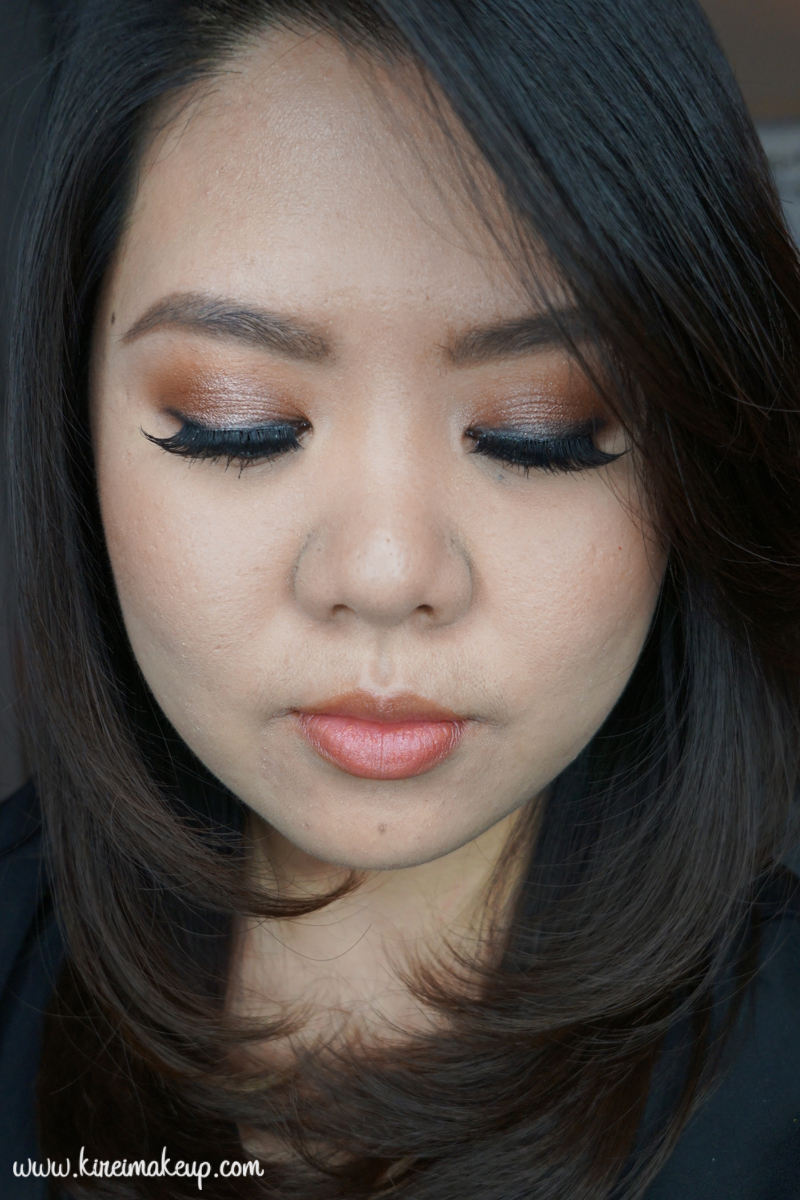
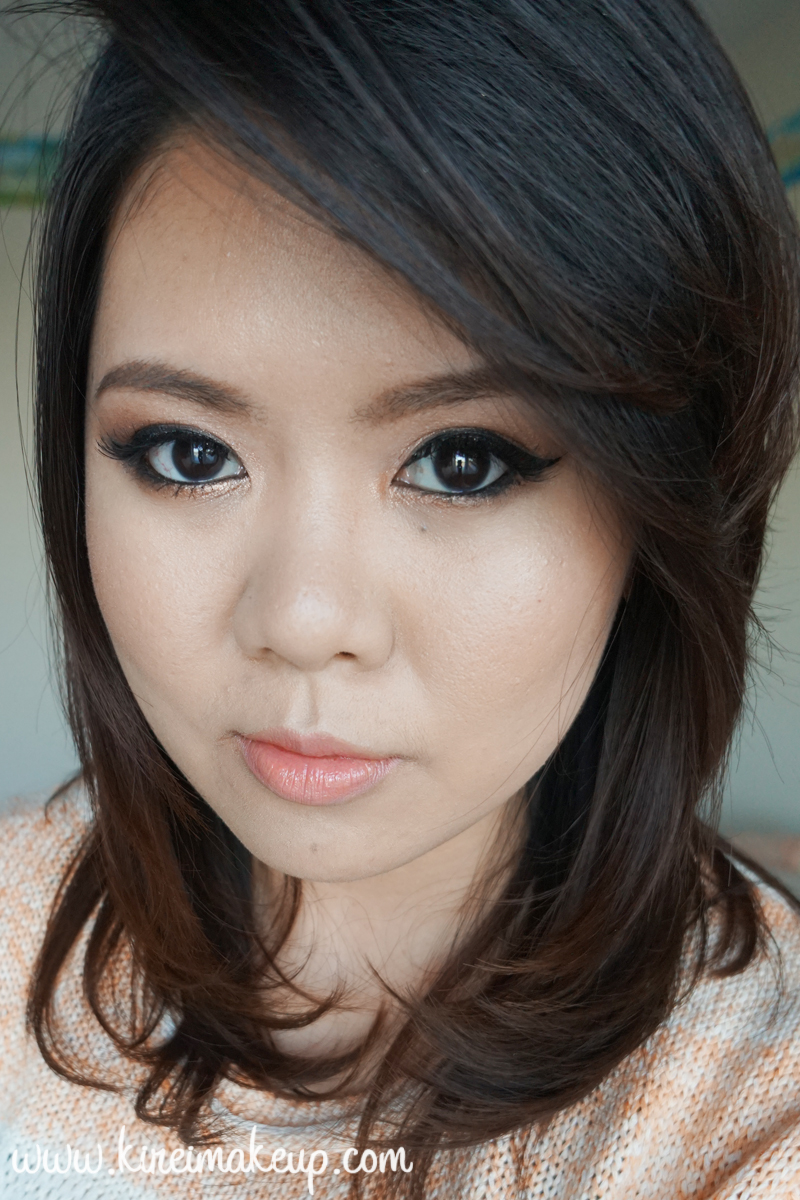
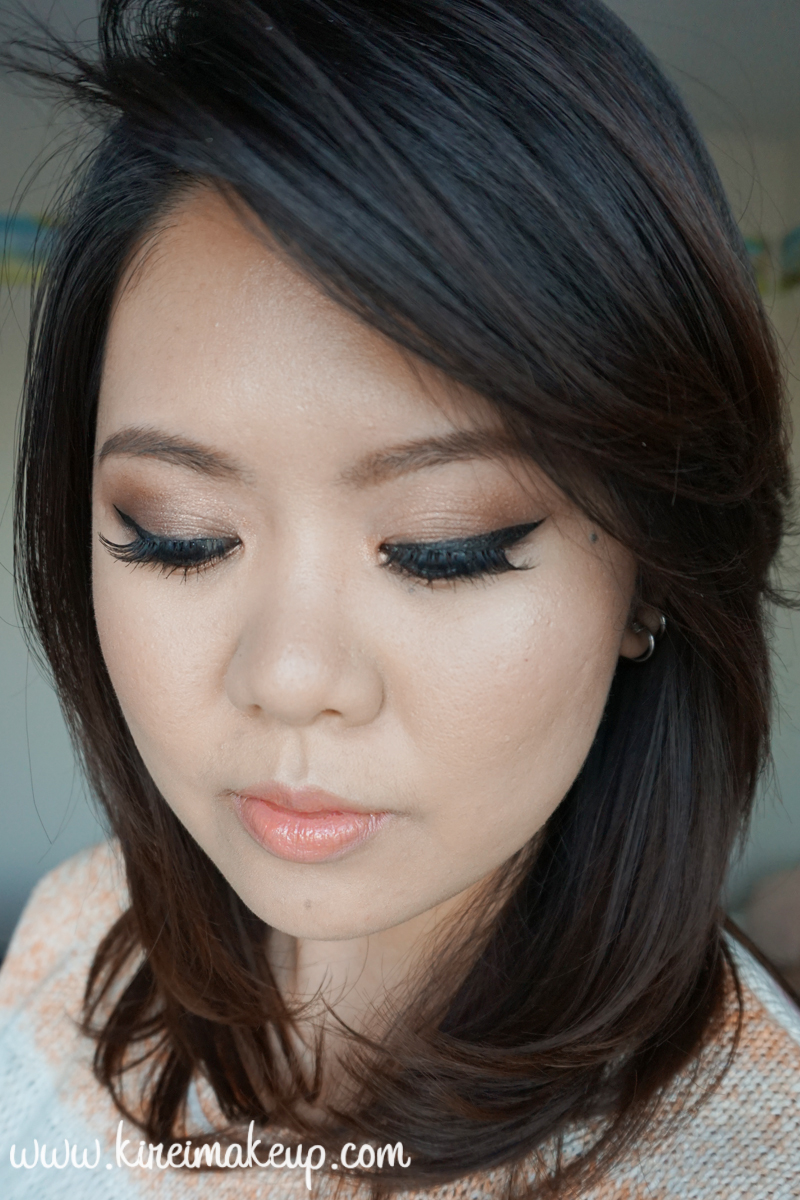
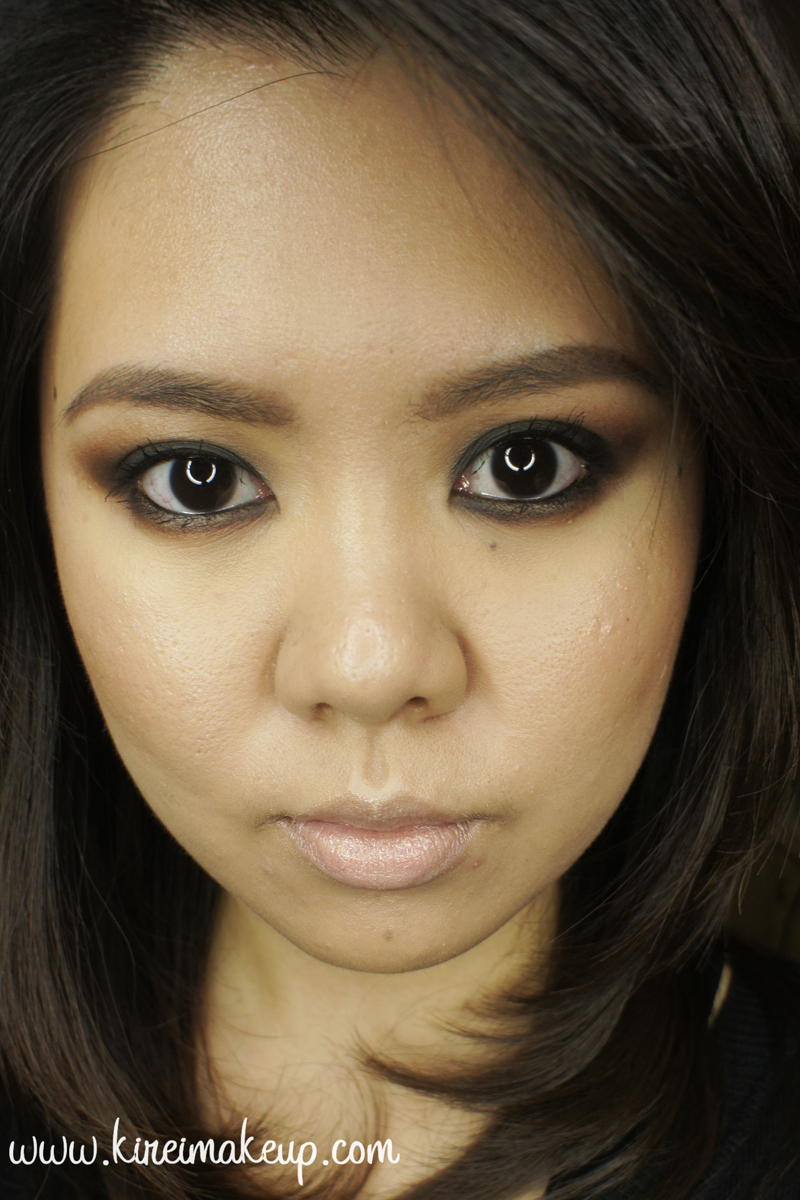
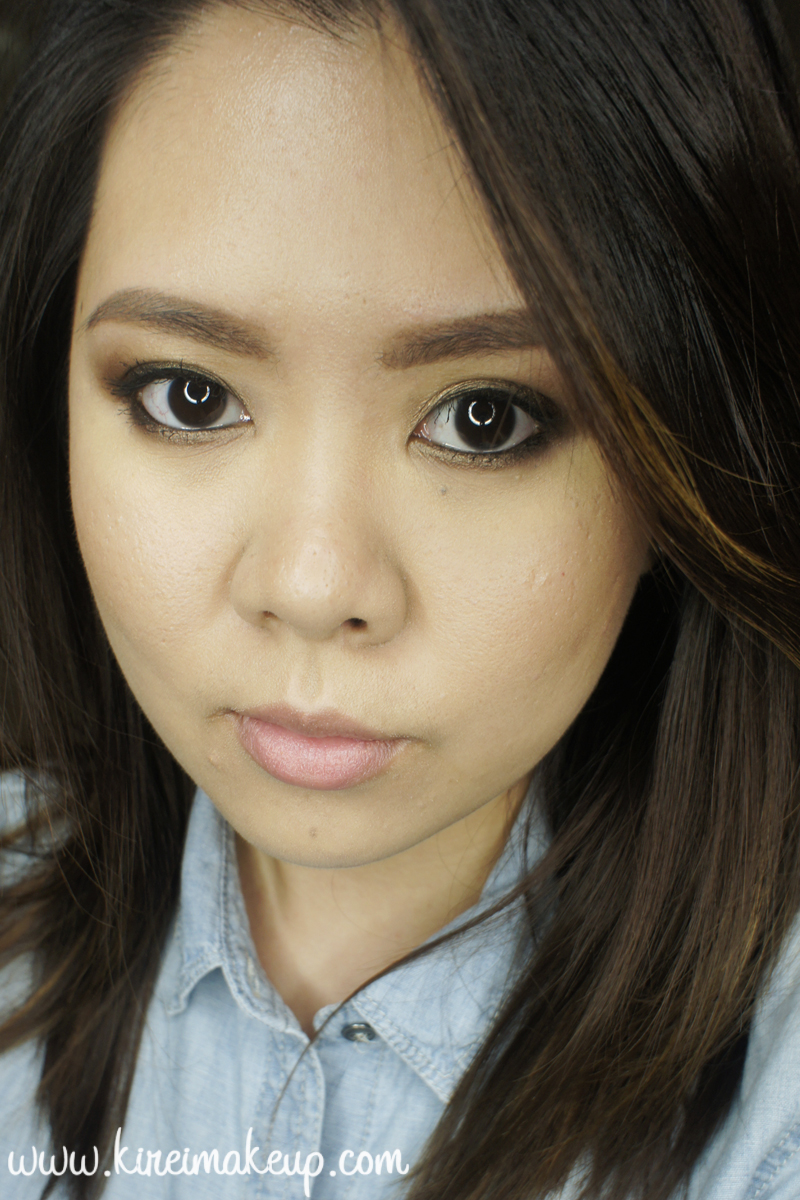
Today’s Tweezerman Brush IQ tutorial feature the makeup brushes that were given to me as part of the PreenMe VIP program. Earlier this week I received the Tweezerman goodies (picture on Instagram), and today I’ve decided to do an easy Bronze smoky eyes look using mostly those brushes. A big THANK YOU to Preen.me for sending me the Tweezerman products!

The Tweezerman brushes that are featured on today’s tutorial are “blender brush”, “shader brush”. “liner glider”, and “brow brush“. I’ve also used the “Pro-Curl lash curler ” and “no-mess mascara guard“, but it was used off camera. I’ll try to post a short Instagram video on how-to use the curler and mascara guard next time! So, don’t forget to follow me on Instagram!

Just a quick note on these brushes, they are amazing! I’m saying it not because I received it for free, but truly these brushes are on the best synthetic brushes I’ve ever used. The shader brush is very sturdy and really great for packing on the color on the eyelid. The liner glider brush is awesome in creating a soft diffused liner look. I’ll talk more about the brushes when I have the chance to review them. Until then, you’ll see these brushes popping on my tutorials!

tweezerman brush IQ

Scroll all the way to the bottom to skip the how-to, and jump to the Product List.
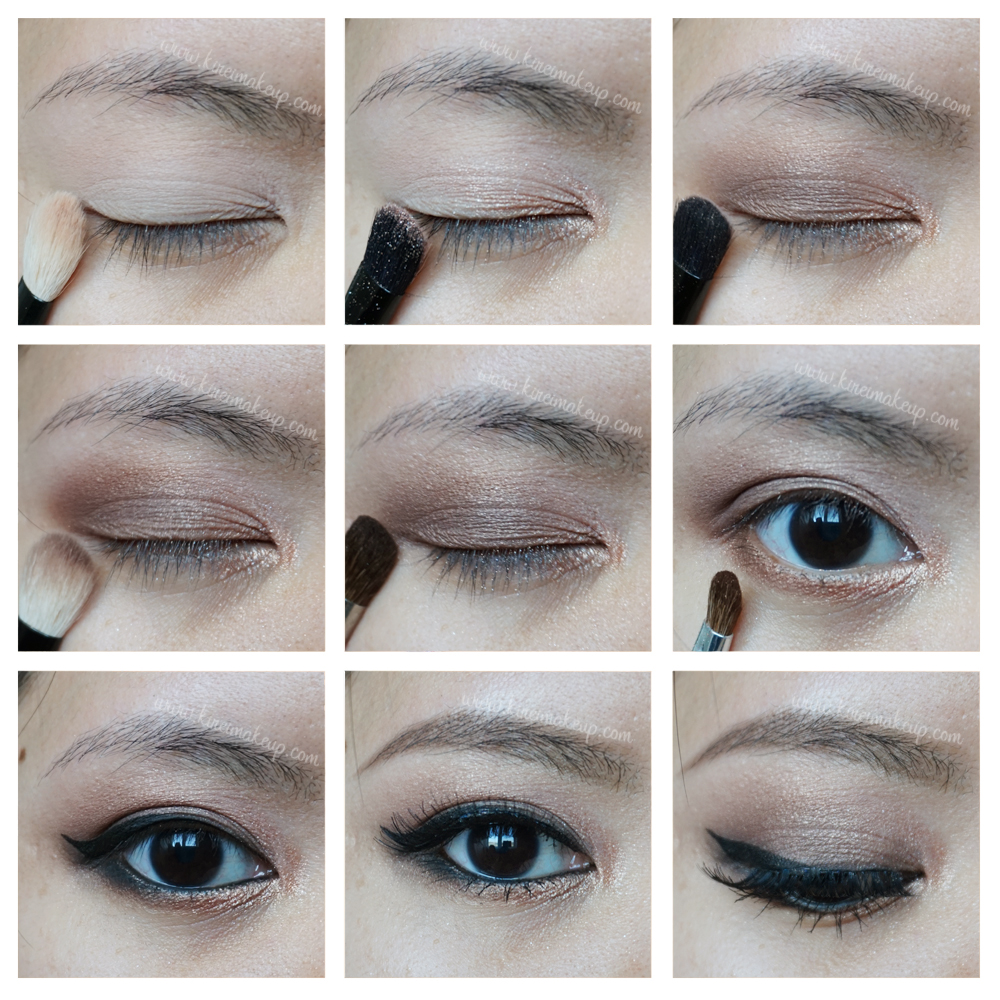
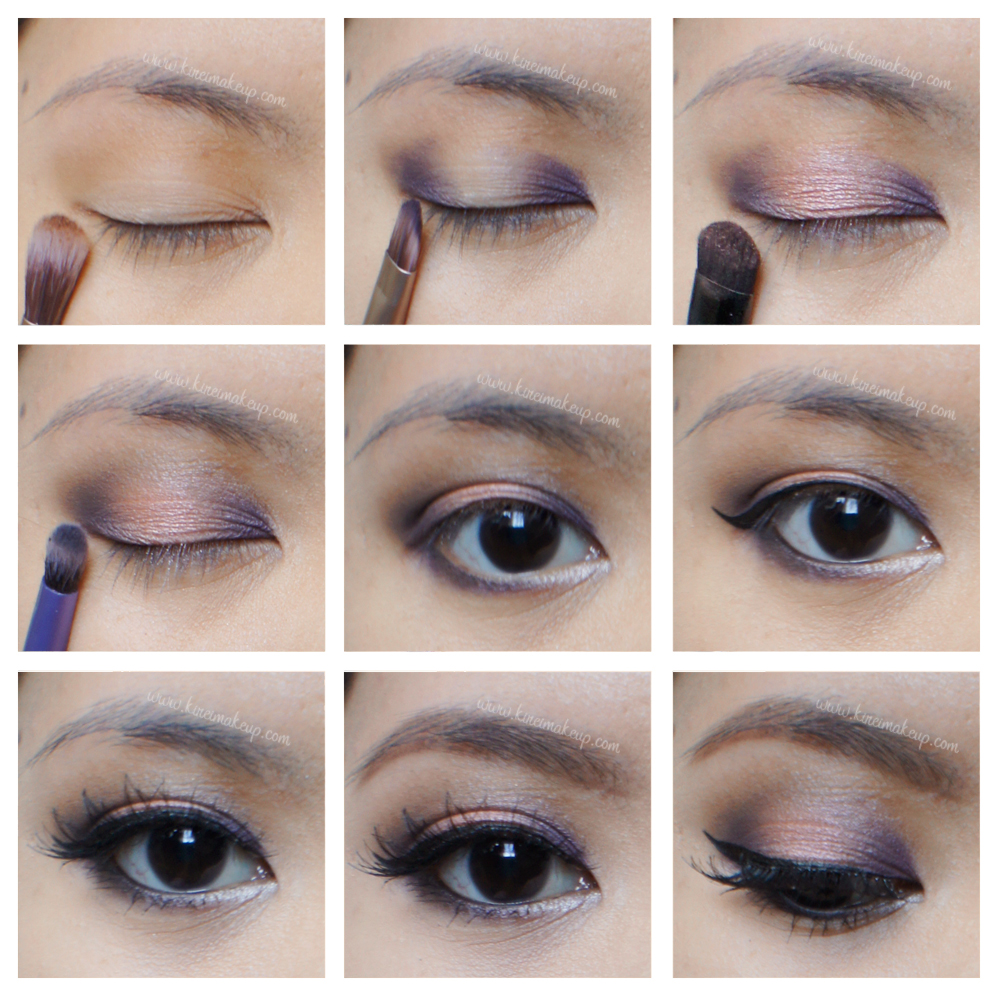
How-to:

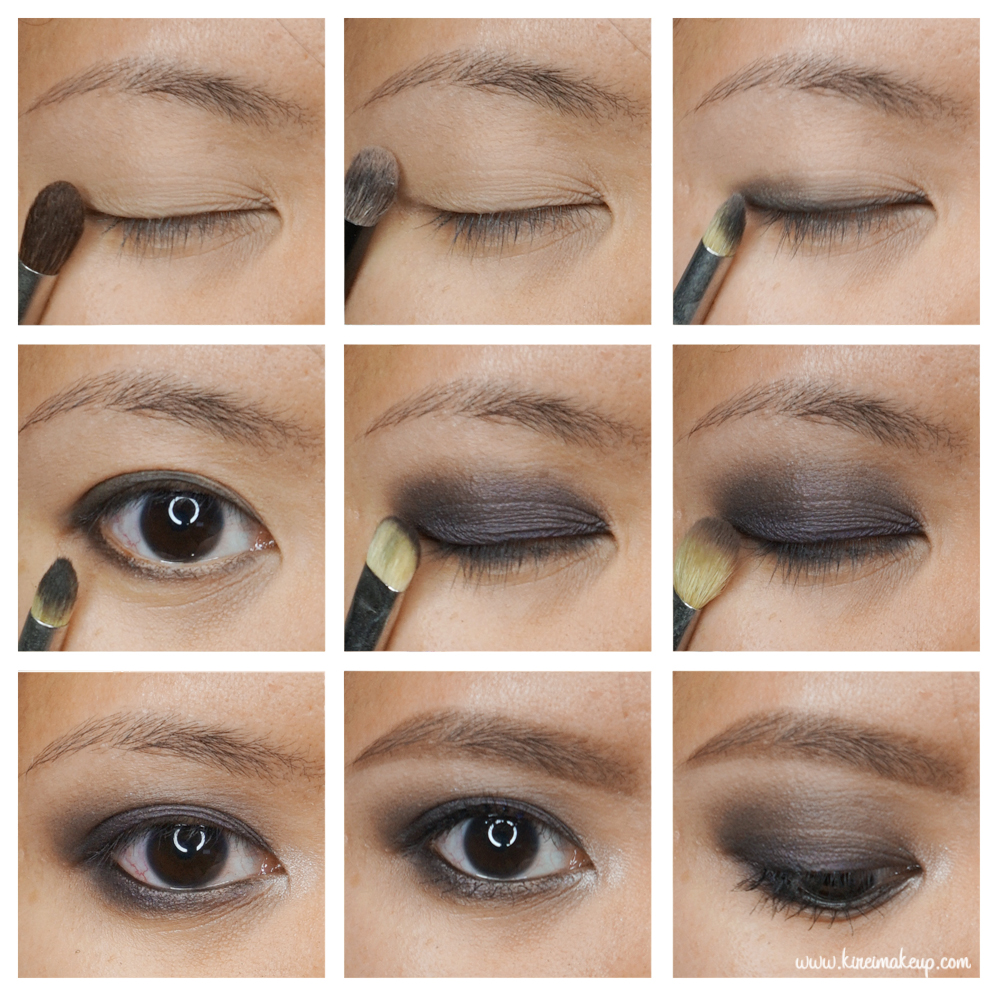
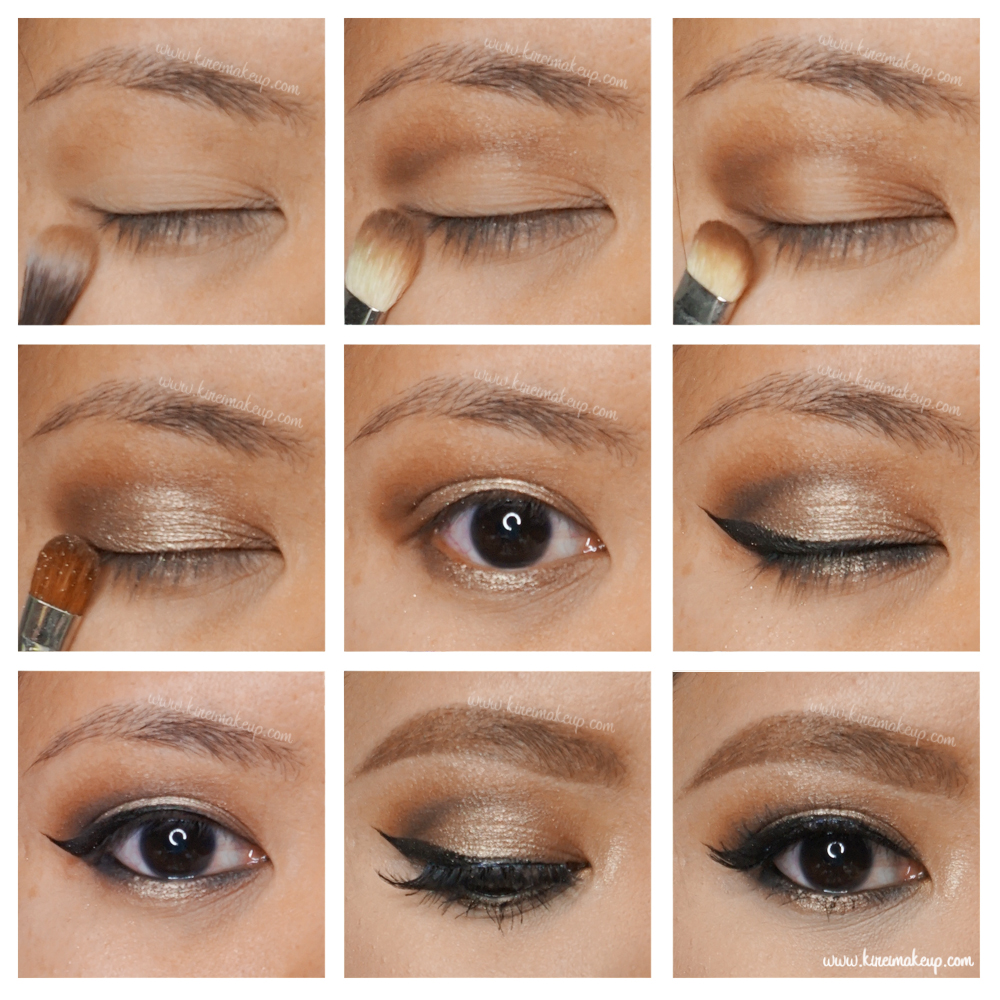
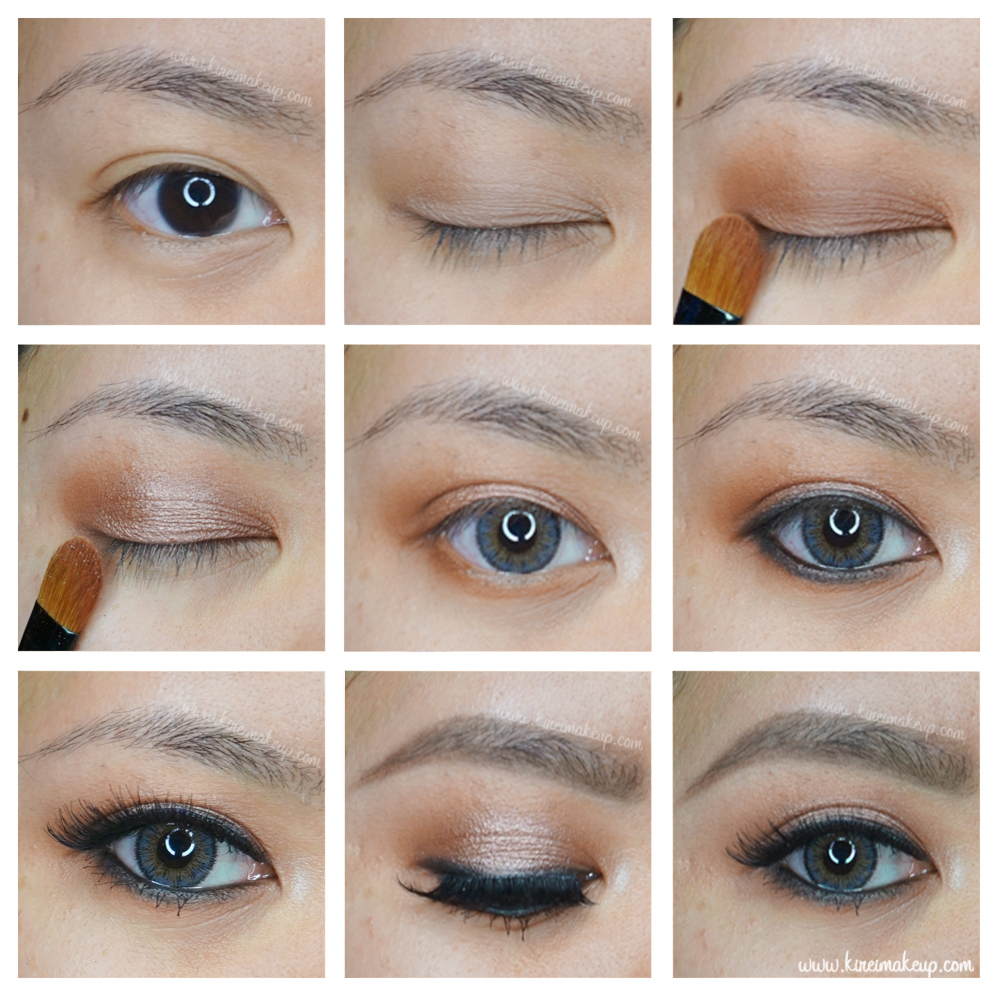
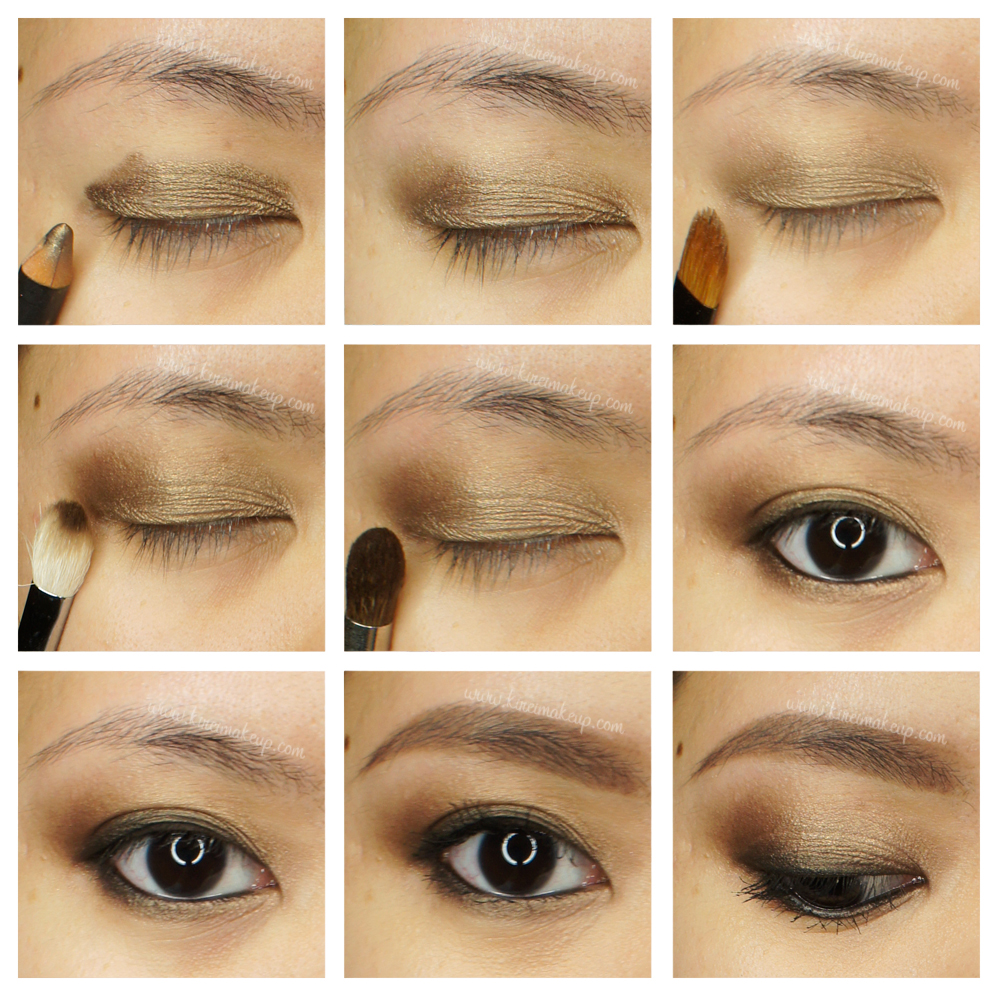
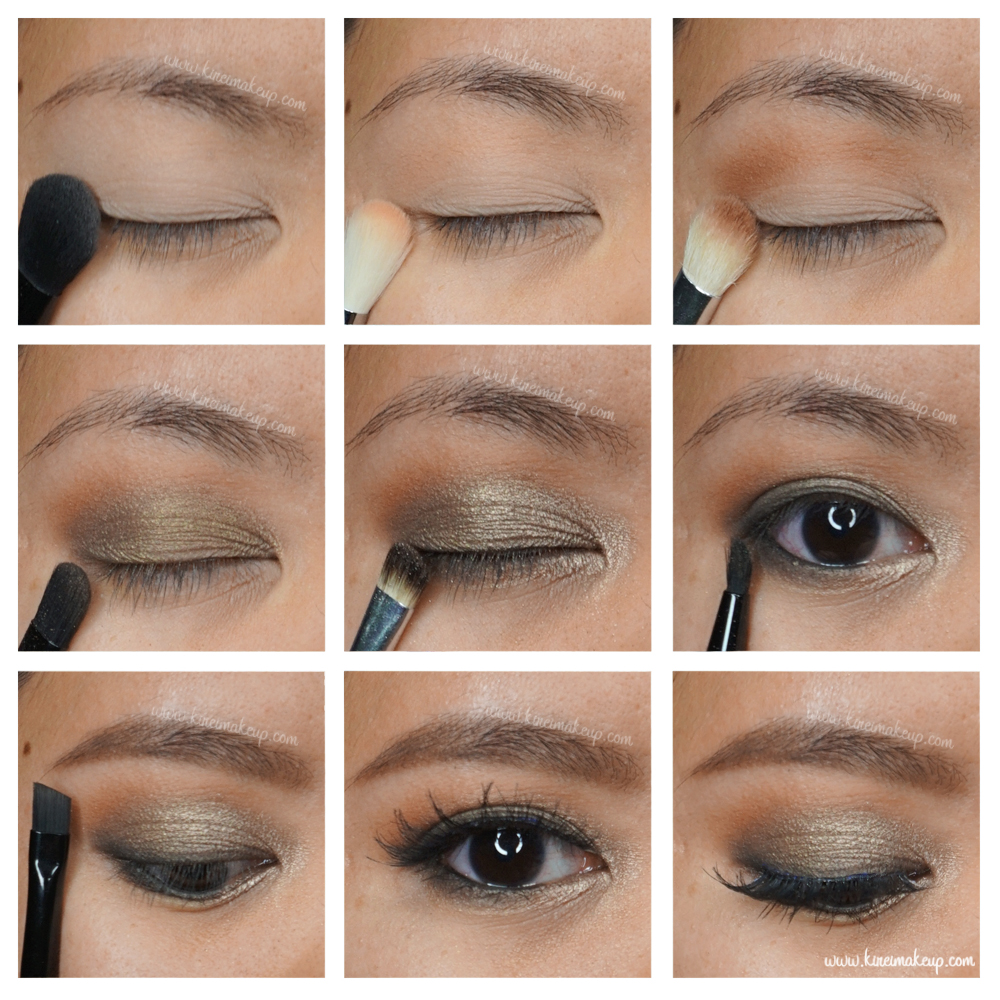
1. I primed my eyelids using Urban Decay Primer Potion “Original”. Using Tweezerman Blender Brush, I applied MAC Skinfinish “Medium Plus” powder all over my eyelid.

2. Using a blending brush, I applied KVD Shade + Light Eye palette in “Ludwin” as a transition shade.

3. Using another blending brush, I applied KVD Shade + Light eye palette  in “Succubus” on my crease.

4. I applied L’oreal Infallible eyeshadow “Bronze Divine” on my eyelid using Tweezerman Shader brush. I also applied this eyeshadow along my lower lash line using Tweezerman Liner Glider brush.

5.  Using a small shader brush, I applied L’oreal Infallible eyeshadow “Sahara Treasure” on the inner corner of my eyes.

6. Using Tweezerman Liner Glider brush, KVD Shade + Light Eye palette in “Shax” along my upper and lower lash line. I lined my waterline using L’oreal Voluminous Smoldering eyeliner.

7. I filled my brows using Tweezerman Brow brush and Anastasia Beverly Hills Brow Pomade “Medium Brown”.

8. I curled my lashes using Tweezerman Pro Lash Curler, and applied Dior Backstage mascara on both upper and lower lashes.

9. I applied Gwiyomi Boutique False lashes #3 on my upper lashes.

bronze smoky eyes

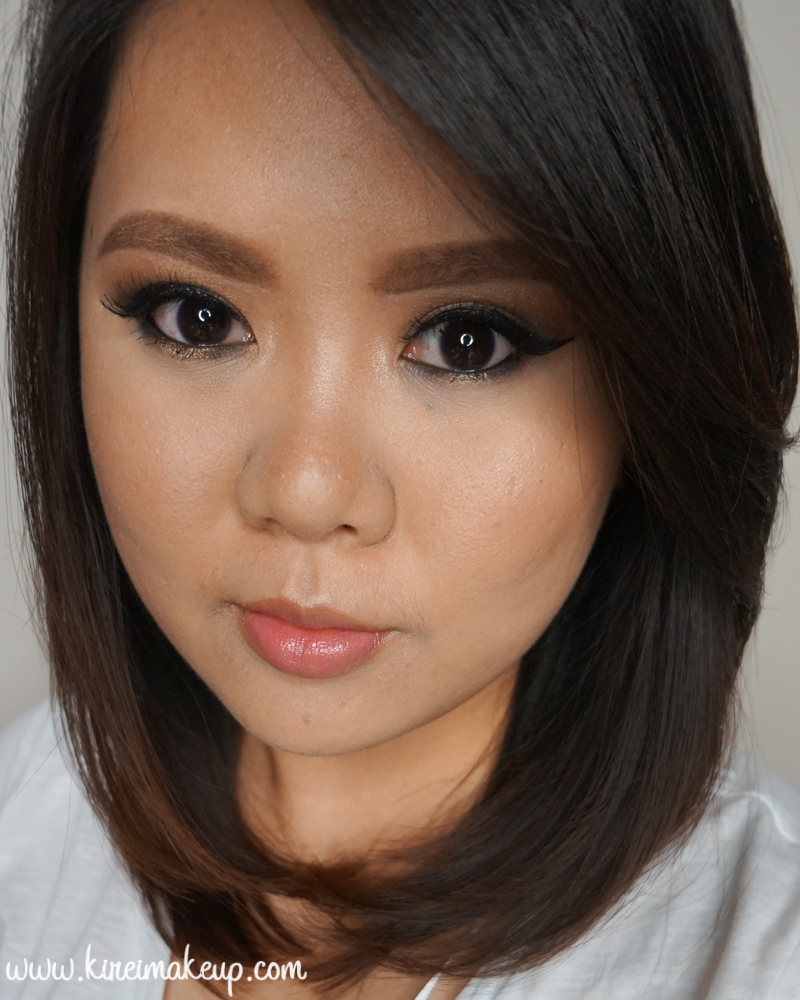
10. For my face, I applied NARS Luminous Weightless Foundation in “Punjab”.

11. I applied NARS Radiant concealer in “Custard” under my eyes and on my blemishes.

12. I set my face using CoverFX translucent powder.

13. I lightly contoured my face using Smashbox contour kit.

14. I applied Smashbox Halo Powder blush “In Bloom” on my cheeks.

15. I added a little bit of The Balm “Mary-Lou Manizer” highlighter on top of my cheekbones, on the bridge of my nose and on my cupid’s bow.

16. For my lips, I lined and filled it using L’oreal Color Riche lip liner “Beyond Pink”. Then, I applied  YSL Pop Water Glossy Stain “Eau de Coral (203)”

l'oreal bronze divine

Products used

Eyes

Face

Cheeks

Lips

  • Lip liner – L’oreal Color Riche lip liner “Beyond Pink”
  • Lip stain – YSL Pop Water Glossy Stain “Eau de Coral (203)”


UD Naked Smoky Tutorial “Grey”

Hi ya’ll! Hope everyone is enjoying their Friday! Today, I’m back with an UD Naked Smoky tutorial. This time, I used mostly the greys in the palette to create this glamorous smoky eyes. I apologize for missing for almost a week, I’ve mentioned on my Instagram account that I was having an issue with my left eye. Anyways, now I’m back, and you can expect couple posts from me this upcoming week. I have a few products I’ll be featuring, and don’t forget to follow me on Instagram for my daily updates!

I’m still loving my Urban Decay Naked Smoky palette, and I’m planning to create more looks using this palette. I’ve done a review and swatches on my previous post, so don’t forget to check my UD Naked Smoky review out!  So far, I’ve used 11 out of the 12 shades in the palette (hehehe). I’ll try to create more looks with this palette. This post is my 3rd look, if you want to check out my other posts using this palette, please check out my Iconic UD Smoky Eyes post, and MAC D for Danger post.

ud naked smoky makeup tutorial

A quick note  on step 3 (top right corner), I applied Combust using a blending brush to blend out the edge of my crease color. This is an easy way to blend out your smoky eyes to make a smooth transition from the eyeshadow to your skin.

Products used

Eyes

  • Primer – Urban Decay Primer Potion “Original”
  • Base/blending color – UD Naked Smoky “Combust”
  • Brow bone highlight – UD Naked Smoky “Thirteen”
  • Transition – UD Naked Smoky “Password”
  • Crease/lower lid – UD Naked Smoky “Dagger”
  • Eyelid – UD Naked Smoky “Armor”
  • Winged liner – Shu Uemura Calligraphy Ink eyeliner
  • Outer corner of lower lash line  – UD Naked Smoky “Black Market”
  • Waterline – L’oreal Voluminous Smoldering eyeliner
  • Brows – Anastasia Beverly Hills Brow Wiz “Taupe” & “Medium Brown”
  • Lashes – Gwiyomi Boutique lashes “no. 3” & “Gillian”


ud naked smoky tutorial

Face

  • Foundation – Diorskin Star foundation “31”
  • Concealer – Diorskin Star concealer “3”
  • Powder – Diorskin Nude Air Healthy Glow Invisible Loose Powder “#30″

Cheeks

  • Contour – MAC powder blush “Blunt”
  • Blush – Smashbox Halo Powder blush “In Bloom”

Lips

  • Lipstain – L’oreal Color Riche Extraordinaire “Blushing Harmony”

ud naked smoky makeup tutorial

UD Naked Smoky Tutorial “Iconic Smoky Eye”

As you know from my Instagram, I recently purchased and received my UD Naked Smoky Palette. I was so excited when I got it yesterday, and couldn’t wait to play around with it, so I created this UD Naked Smoky Tutorial! I bought mine online from Sephora since the palette was an online exclusive. It arrived within 3 days of my order, pretty fast and I’m one happy gal!

Anyways, I’ll try to do a review of the palette pretty soon. For now, I just wanted to share with you this look that I re-create from their leaflet. The palette came with a leaflet that contained several different looks you can achieve, and I chose to do the Iconic UD Smoky Eye look. I replaced some of the products, like the eyeliner, blush, lipstick etc since I don’t own those. Nevertheless, I used all the shades mentioned in the leaflet accordingly.

Personally, for me, this kind of smoky eye look is supposed to be messy and worn in, I skipped wearing false lashes. False lashes tend to make everything look more glamorous. If you prefer, though, feel free to add the falsies.

UD Naked Smoky makeup look

The transition shade, Combust, doesn’t really show up on pictures below because it’s very similar to my skin color. However, this step is very important whether the color shows up or not because this transition shade will allow for a smooth edge on your smoky eyes. It will diffuse the grey eyeshadow on the crease into your skin seamlessly.

The brow bone shade, Thirteen, is a vanilla shade. It might look like there’s nothing on the brow bone at first (top middle row) in the pictorial, but as you add those darker colors on the lid, the highlight becomes more prominent. If you like a highlight on the brow bone, feel free to add more at the end of the look. If you have a hooded lid, I recommend not to add too much or any since it might create a hooded effect even more.

UD Naked Smoky makeup look

Products used

Eyes

  • Primer – Urban Decay Primer Potion “Original”
  • Base – MAC Mineralized SkinFinish “Medium Plus”
  • Transition – UD Naked Smoky “Combust”
  • Brow bone – UD Naked Smoky “Thirteen”
  • Eyeliner/waterline – L’oreal “Voluminous Smoldering” Eyeliner
  • Eyelid/lower lash line – UD Naked Smoky “Smolder”
  • Crease/lower lid – UD Naked Smoky “Password”
  • Inner Corner – UD Naked Smoky “High”
  • Lashes – Dior “Diorshow” Mascara
  • Brows – Anastasia Beverly Hills Brow Wiz “Medium Brown”


Urban Decay Naked Smoky tutorial

Face

Cheeks

Lips

  • Lip pencil – UD lip pencil “Naked 2”
  • Lip Balm – vaseline

Navy Blue Smoky Eyes

I’ve been going pretty neutrals with my tutorials lately, and I wanted to do colors. I don’t have my bright palettes with me since I left it back in Jakarta, so I decided to utilize what I have here in Canada. I decided to do a very rich Navy Blue smoky eyes tutorial, since I think it’s a really pretty color to do.

I used layers of eyeshadows to make sure everything is blended well. 2 blue eyeshadows are used on this tutorial to allow for the blue to pop even more. This look would look great on brown eyes, green eyes, and gray eyes.

You can skip the winged liner, I just added it as an extra. It’s just something I’m used to do. You can definitely opt out the winged liner.

blue smoky eyes

Products used

Eyes

  • Primer – Urban Decay Primer Potion “Original”.
  • Base – Urban Decay Vice 3 “Undone”.
  • Transition – Urban Decay Vice 3 “Downfall”.
  • Crease – Urban Decay Vice 3 “Revolver”.
  • Eyelid – Urban Decay Vice 3 “Heroine”; L’oreal Infallible eyeshadow “All Night Blue”.
  • Lower lid – Urban Decay Vice 3 “Heroine”.
  • Lower lash line – MAC “Black Tied”.
  • Waterline – L’oreal Paris “Voluminous Smoldering eyeliner in Black”
  • Winged liner – Kat Von D Tattoo Liner “Trooper”.
  • Brows – Anastasia Beverly Hills Brow Wiz “Taupe” + “Medium Brown”.
  • Falsies – Ardell falsies “Demi 120”.

royal blue smoky eyes

Face

  • Primer – The Bodyshop Drops of Youth “Wonderblur”.
  • Foundation – NARS Luminous Weightless Foundation “Punjab”.
  • Under eye  concealer – NARS Radiant Creamy concealer “Custard”.
  • Blemish concealer – MAC Studio Finish concealer “NC30”.
  • Setting powder – CoverFX translucent setting powder “Light”.

Cheeks

Lips

  • Lipstick – Sonia Kashuk Velvety Matte Crayon in “Pink Nude”.
  • Lip stain – L’oreal Paris Color Riche Extraordinaire “Blushing Harmony”.

navy blue smoky eyes


L’oreal Sahara Treasure

When I went to buy the L’oreal La Palette Nude 1, my eyes caught the attention of the L’oreal Sahara Treasure infallible eyeshadow. I’ve quite a collection of the La Couleur Infallible eyeshadows, so this was a great addition to my collection! Absolutely love the color, it’s a beautiful old gold shade with a creamy texture. So easy to blend, and what a great pigment pay-off!

Anyways, I decided to do a warm “halo” smokey eyes with this look. It wasn’t a great day for me to do a tutorial, I made so many mistakes at first. I also, should have used my Anastasia Brow Wiz on the brows, but no, instead I tried to be all “experimental-y” and used the brow pomade. I’m still having difficulties using the brow pomade, thus brows not on fleek for this post. So upset!

Oh, how do you guys like my new hair cut? I posted it last week on Instagram! I went to get it cut at Studio136 in Locke St, Hamilton. My stylist is Amanda, and I think she did an amazing job! All I told her was to get rid of the bulky layers at the top, and chop it off to my collar bone. I’m still contemplating if I should color my hair this year or not. What do you think?

Loreal La Palette Nude

Products used

Eyes

  • Primer – Urban Decay Primer Potion “Original”
  • Base – MUFE Pro Finish “118”
  • Transition – L’oreal La Palette Nude 1 “#5”
  • Crease – L’oreal La Palette Nude 1 “#9”
  • Outer/Inner third (upper + lower) – L’oreal La Palette Nude “6”
  • Center lid (upper + lower) – L’oreal “Sahara Treasure” infallible eyeshadow
  • Outer crease/Lower lashline – Kat Von D Eye Contour Palette “Shax”
  • Winged liner – Kat Von D Tattoo Liner “Trooper”
  • Waterline – L’oreal Voluminous Smoldering eyeliner
  • Brows – Anastasia Beverly Hills Brow Pomade “Medium Brown”
  • Lashes – Gwiyomi Boutique falsies #3
  • Inner corner – The Balm Mary-Lou Manizer highlighter


smokey eyes for asian

Face

  • Primer – The Body Shop Drops of Youth “Wonderblur” Face primer
  • Foundation – MAC Pro Longwear foundation “NC25”
  • Concealer – MAC Pro Longwear concealer “NC25”
  • Under eyes Setting Powder – CoverFX translucent powder
  • Face setting powder – MUFE Pro Finish “118”

Cheeks

  • Contour powder – Smashbox “Contour” shade from the contour kit
  • Highlighter – The Balm “Mary-Lou Manizer”
  • Blush – Smashbox Halo Powder blush “In Bloom”

Lips

  • Lip color – L’oreal Color Riche Extraordinaire “Blushing Harmony”

loreal sahara treasure

Brown Smokey Eye Makeup Tutorial

Hello everyone! Sorry for not posting anything much last week here and on my social media sites. I’ve just recently moved to a new house, so I’ve been busy with the move. Anyways, I wanted to continue with a prom look, so I created this Brown Smokey Eye makeup tutorial for those who prefer a smokier look.

This look will be great for everyone, but especially for those with blue eyes. The warm undertone in the eyeshadows I used will bring out the blue in the eyes even more. I try to keep the “smokiness” within the rims of my eyes (waterline, and tightline). If you prefer it much more darker, feel free to add black eyeshadow on the crease. I prefer it this way – black on the lashline and smoked out to brown.

If you prefer a more understated low-key eye makeup, please check my previous tutorial “2015 Prom Makeup Look”

If you are looking for a makeup artist in Toronto (GTA), as well as Hamilton and surrounding area, please feel free to contact me! I’m taking bookings for Prom Makeup 2015.

makeup geek cocoa bear

Products used

Eyes


smoky eyes for asian

Face/Cheeks

  • Foundation – Giorgio Armani Maestro foundation
  • Cheeks – MAC blush powder “Peaches”

Lips

  • Lipstick – Revlon Colorstay Ultimate Suede Lipstick “Flashing Light”
  • Lip Balm – Kiehl’s Scented Lip Balm “Mango”

prom smokey eyes


Asian Smokey Eyes

I’ve been going to this Korean restaurant in Hamilton, and in the restaurant they kept playing some sort of K-pop singers/bands performing on TV. Anyways, I was inspired by the singers from the various girl band to do this Asian smokey eyes look. I love how their skin looks absolutely flawless, with barely any contouring, and just a bit of blush.

Their smokey eyes are slightly winged, and the darker colors are mostly concentrated on the outer corner, since most of these girls don’t have a defined crease, like mine! Their eyeshadows are mostly on the lid, and on the outer half of the eyes, to elongate the eyes even more, creating a bigger eyes illusion.

For this look, I chose to pair it with a peachy lip, most of the girls in K-pop opt for a more pink or ombre pink lips. However, I prefer the peach lips especially with the warm bronze colors on the eyes. Warm tones on the eyes matched the warm tone on the lips to pull the look together.

I also wore a new foundation I recently bought (actually, exchanged for the Diorskin Nude Air). The new NARS weightless luminous foundation is pretty lovely, and I think I’ll do a review about it soon, hopefully next week! I think I might have found a new favorite foundation, guys!

Anyways, I apologize if the colors on my step-by-step pictures are a bit off (slightly cooler than real life) since I was trying out a new zoom lens. The full face pictures show the real colors, especially on the eyes. Pictures for the full face were taken using my usual lens, and with day light.

bronze smoky eyes

Products used

Eyes

  • Primer – Urban Decay Primer Potion
  • Base – MAC Brule
  • Crease – MAC Soft Brown
  • Inner corner (upper and lower lid) – MAC Honey Lust
  • Lid – MAC Mulch
  • Outer corner/Lower Lid – MAC Bronze
  • Outer lower lid – The Balm Balmsai in Righteous
  • Eyeliner – Shu Uemura Calligraphy Ink
  • Waterline – MAC Feline kohl pencil liner
  • EyebrowsAnastasia Beverly Hills Brow Pomade in Medium Brown
  • Mascara – Urban Decay Perversion mascara
  • Falsies – Gwiyomi false lashes #3


asian makeup

Face

  • Foundation – NARS weightless luminous foundation
  • Concealer/Highlighter – YSL Touche Eclat
  • Powder – MAC Magically Cool Liquid Powder

Cheeks

Lips

  • Liner – Urban Decay Naked lip pencil
  • Gloss – YSL Glossy Stain in Pêche Cerra-Cola

asian smoky eyes


Smashbox Double Exposure Tutorial #2

Happy Lunar New Year, everyone! May this year of Goat brings you lots of luck, prosperity, and great health! I’m sorry I’ve been missing this week, has been quite a busy week with personal life. Things are settling down soon hopefully. Anyways, today’s Smashbox Double Exposure tutorial is a little bit smoky and with some colors! This is my second look (check out my first one) with this palette, and I have to say, I’m loving it!

I’ll try to do a review for this palette soon, hopefully by the end of the week or beginning of next week. Since I have yet to do the review, I just want to let you guys know a little spoiler – the eyeshadows in this palette can be applied dry or wet! For this look, I only used the lid color wet, while the rest was applied dry. I’ll do swatches of the eyeshadows applied dry and wet to see if there’s any difference for my review, so keep checking back or subscribe to my blog so I can notify you when the post is up!

halo smoky eyes

Eyes

  • Base – Urban Decay Primer Potion
  • Eyeshadows – Smashbox Double Exposure palette
    • Transition (or above crease) – Espresso
    • Inner/Outer V/lower lash line – Temper
    • Middle lid – Flushed (applied wet)
    • Crease/outer lower lid – Noir
    • Inner lower lid – Blanc
  • Eyeliner
    • Winged liner – Kat Von D Trooper Tattoo Liner
    • Waterline – L’oreal Voluminous Smoldering eyeliner
  • Eyebrow – Anastasia Brow Wiz in Taupe and Brunette
  • Mascara – Smashbox Full Exposure Mascara
  • False lashes – Gwiyomi False lashes #3

(continue below)

asian soft smoky eyes

Face

  • Foundation – Kat Von D Lock-it Tattoo Foundation
  • Powder – Hourglass Ambient Lighting Powder

Cheeks

  • Contour – Smashbox contour kit
  • Blush – Smashbox In Bloom Halo blush

Lips

  • Lipstain – Clinique Chubby Lip Stick in Bountiful Blush

smashbox double exposure tutorial


Kat Von D Monarch Palette Tutorial – Smokey

I am back! Sorry for missing for a week, guys! I’m actually in Canada right now, so I had to deal with jet lag and weather change, actually I got sick for a while due to the change in weather. Anyways, I did a tutorial before I left, but didn’t have the chance to post it. Here’s another Kat Von D Monarch Palette tutorial! If you don’t already know, this palette is like my favorite! I have done other tutorials using the same palette, but this is like the smokiest of them all! I think I might go grab some more Kat Von D products, any recommendation?

Also, I received a few products from L’oreal Paris Indonesia, which I’ll share with you guys on the next post. Out of all the products, I was only able to bring the lipsticks with me. One of the lipsticks was the JLo signature lip color, which I used on this tutorial. I don’t love how it ends up, I think it’s too pale, I prefer a bit more color on my lips. Nevertheless, I thought I wanted to share with you guys how it looks. I’m not a big fan of super pale nude lips, so this is definitely not my favorite lipstick.

Anyways, let’s get on the pictorials. All products listed below! Don’t forget to check out my other Kat Von D Monarch palette looks!

Kat Von D smoky eyes monarch palette

Eyes

Face

  • Foundation – Make Up For Ever HD Foundation
  • Corrector – Bobbi Brown Peach corrector
  • Concealer – MAC Pro Longwear concealer
  • Powder – NARS Setting powder

Cheeks

  • Bronzer – Chanel Universal bronzer
  • Cheeks – Benefit Hervana
  • Highlighter – The Balm Mary Lou Manizer

Lips

  • Lipstick – L’oreal Collection Star JLo Barely Greige


Jlo nude lipstick

Tarnished Gold Smokey Eyes

I wanted to share with you guys my favorite way of wearing a warm smokey eyes, without having to use too many products. My Tarnished Gold Smokey eyes tutorial is warm, it’s earthy, and it doesn’t look too dark. You can add more intensity by adding black eyeshadow on the outer V, but this is how I wear my smoky eyes.

So, I’ve written a lengthy explanation regarding this tutorial, but something went wrong and everything I’ve done went down the drain. It’s missing and I can’t find it. To waste no time, I’m just going to list all the products used and I’m sure the pictorials are pretty self-explanatory. I apologize for any inconvenience and should you have any questions regarding this tutorial please feel free to leave comments below or on my social network account (preferably Instagram).

tarnished gold smoky eyes

Eyes

Face

  • Make Up For Ever HD Foundation 120 (base)
  • Bobbi Brown Peach corrector (under eyes corrector)
  • MAC Pro Longwear Concealer (under eyes concealer)
  • MAC Pro Conceal/Correct palette in Medium (blemish concealer)
  • NARS Setting powder (setting powder)

Cheeks

Lips

  • NARS Multiple Riviera

tarnished gold smokey eyes