Classic Red Lips Makeup

Hello, everyone! How are you guys doing? I am back! Super busy at work, haven’t have the time to take a breather yet. Anyways, I’ve been trying to post 2 tutorials/review up every week, so since this Classic Red Lips makeup would be the first one for this week, hopefully I can squeeze another tutorial (perhaps a Halloween tutorial), or a product review by Sunday. I do have a few products lined up to be reviewed, and also a few more Halloween looks before the 31st.

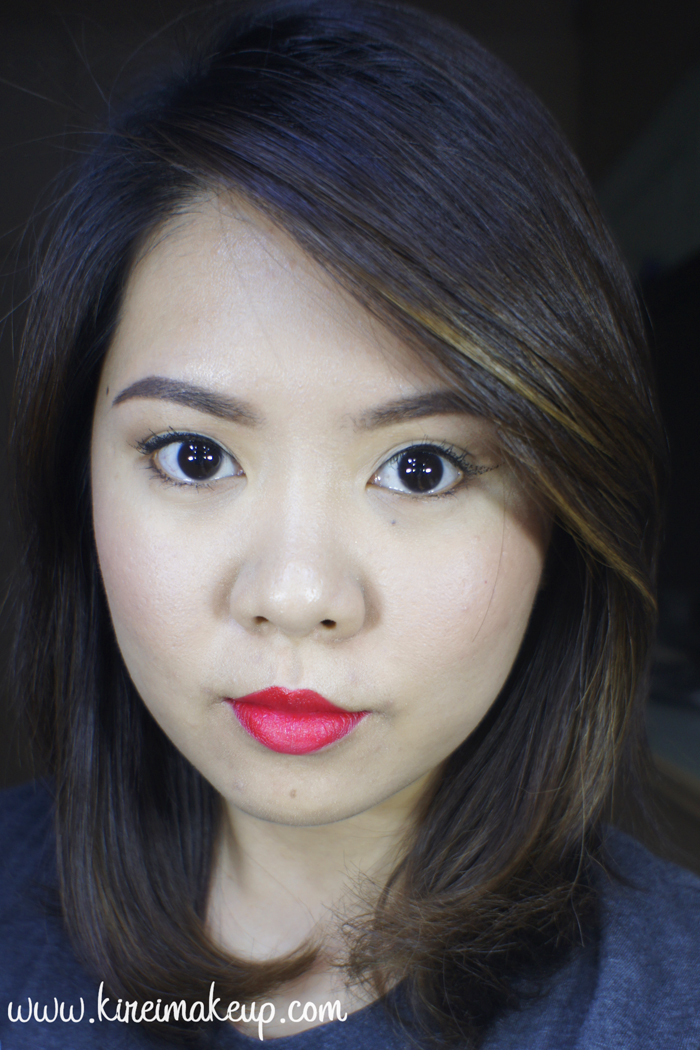
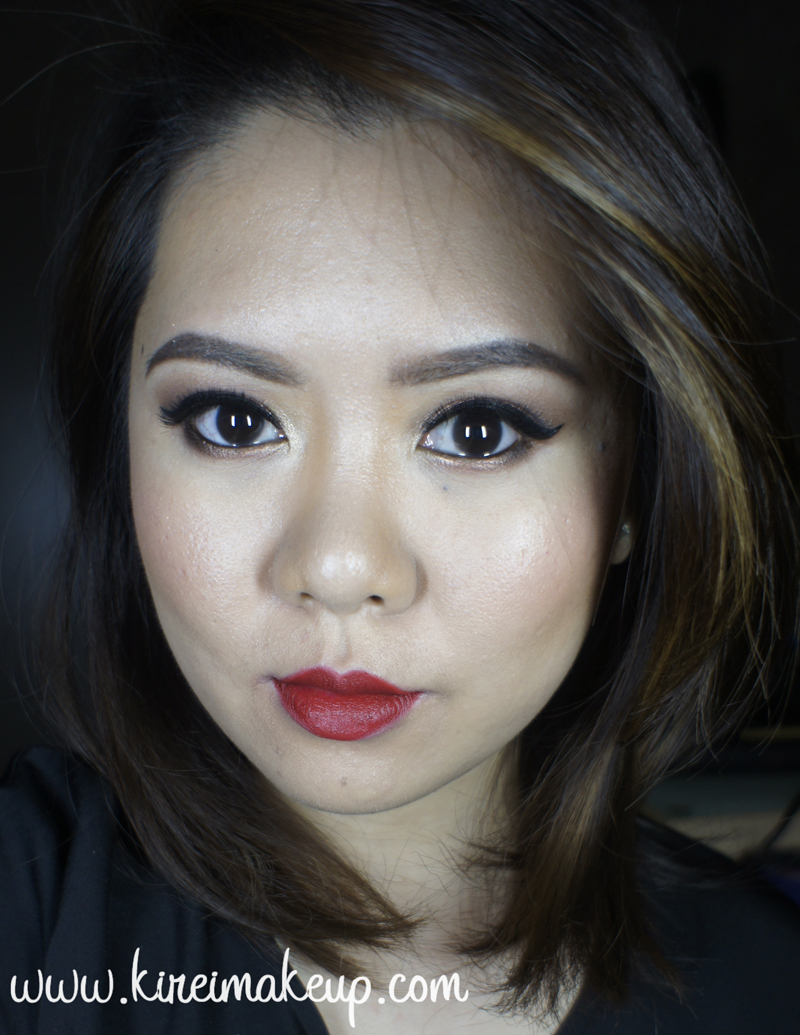
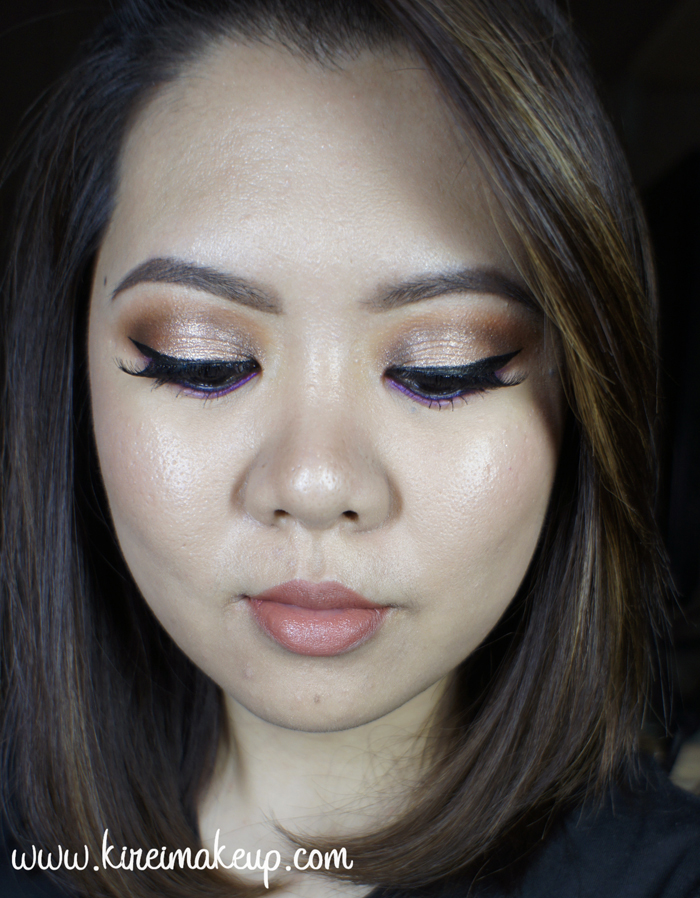
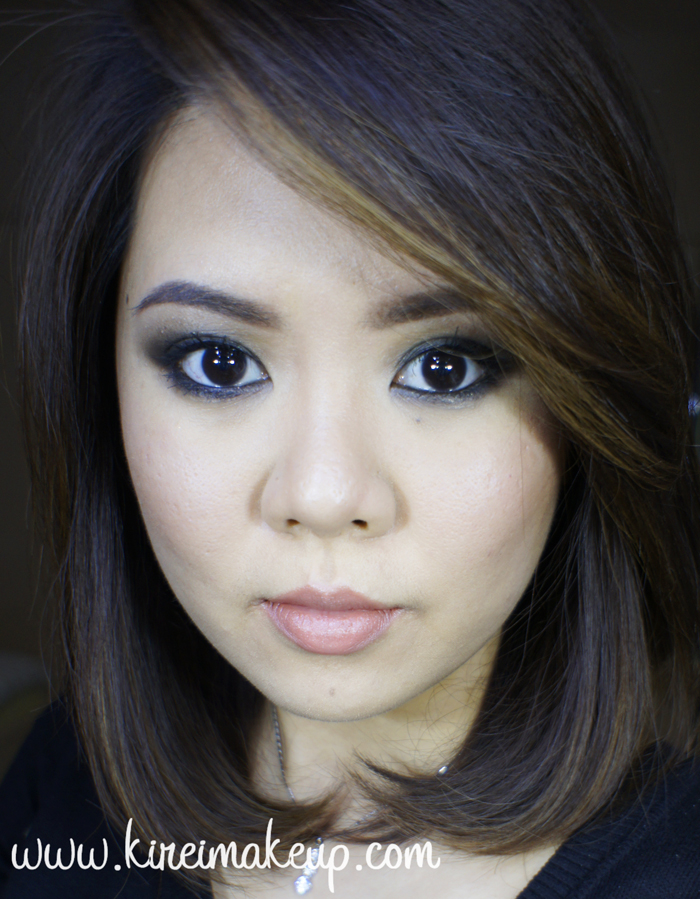
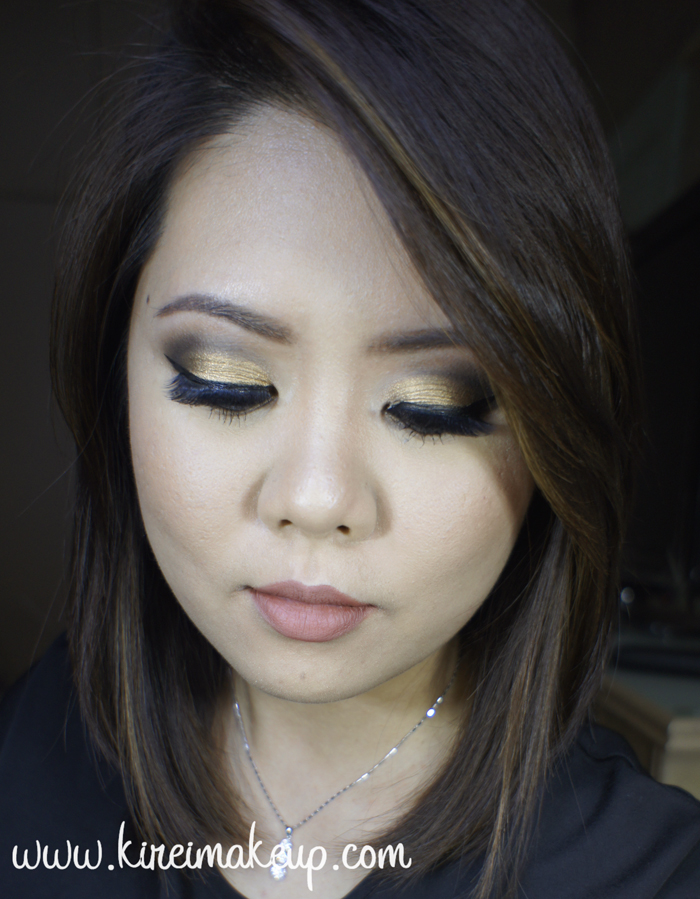
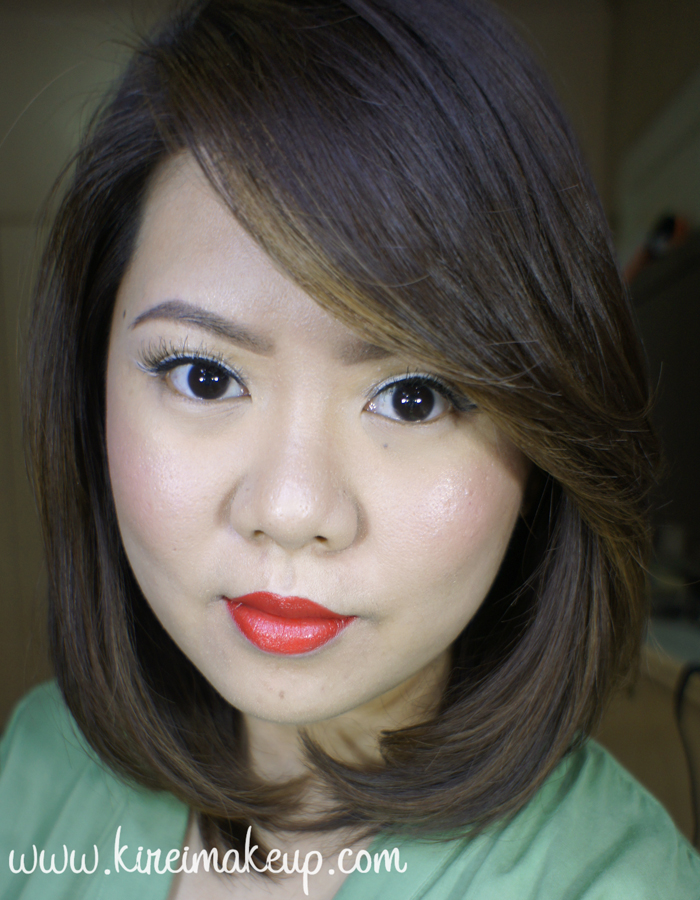
Anyways, for this tutorial, I actually wore this look out for my friend’s wedding on Sunday. I’m sure you’ve seen what I wore with this makeup over on Instagram! Anyways, I used mostly newly bought products – The Balm Meet Matt(e) Nudes & Mary-Lou highlighter, Too Faced Chocolate Bar palette (smells heavenly), along with Shu Uemura Calligraphy Ink eyeliner & Shu Uemura Dear Matte Rouge Unlimited Diva Red lipstick.

If you are of an Asian descent and looking for the perfect red lipstick, you might want to check out Shu Uemura Dear Matte Rouge Unlimited lipstick in Diva Red. It’s a really pretty red lipstick with a warm (orange) undertone, which will compliments nicely the yellow undertone in our skin. If you prefer a cooler (blue) undertone red lipstick, check out MAC Russian Red.

Anyways, let’s get on the tutorial!

How-to:

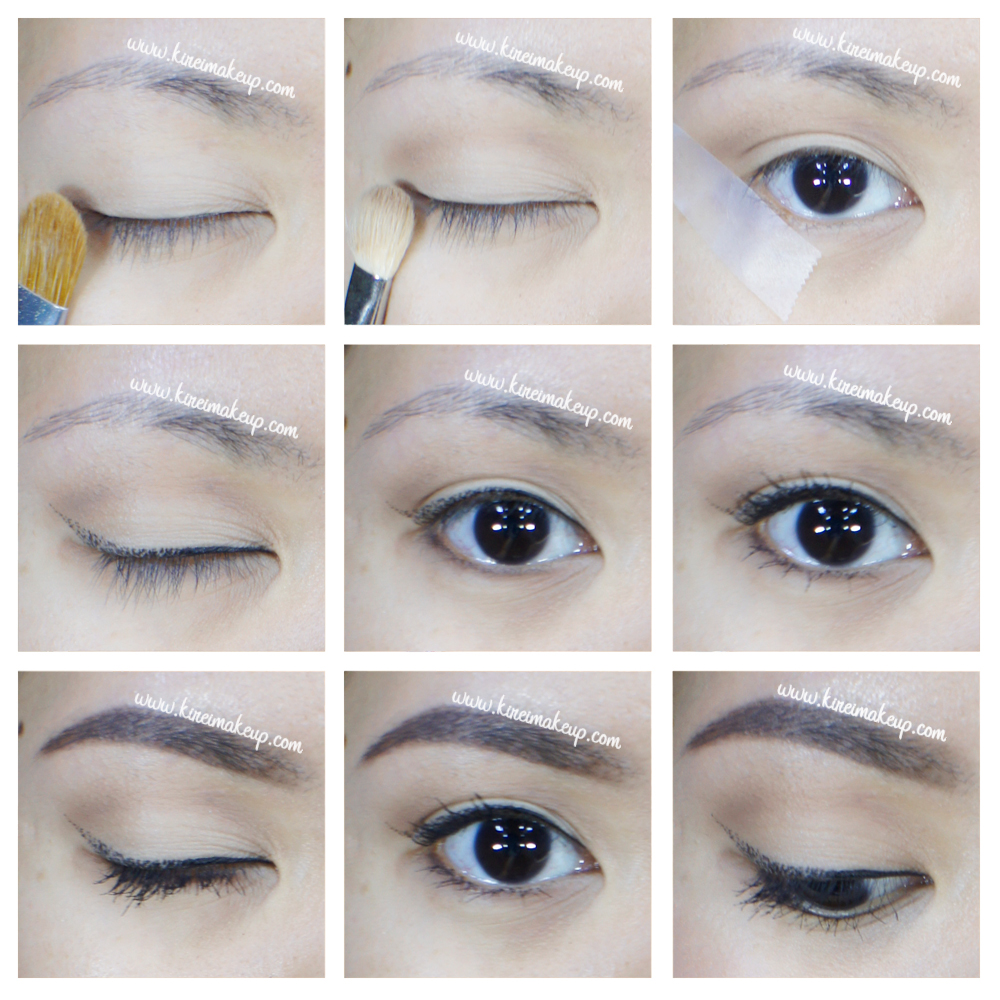
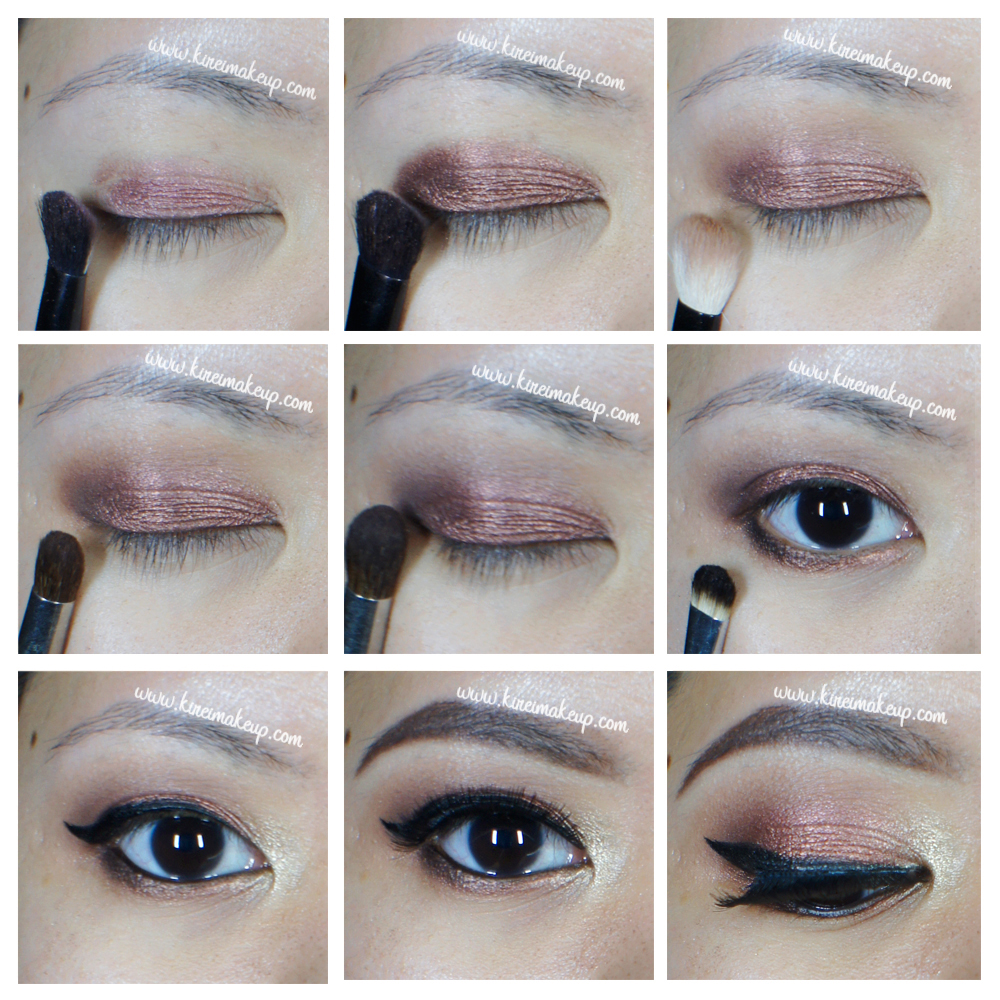
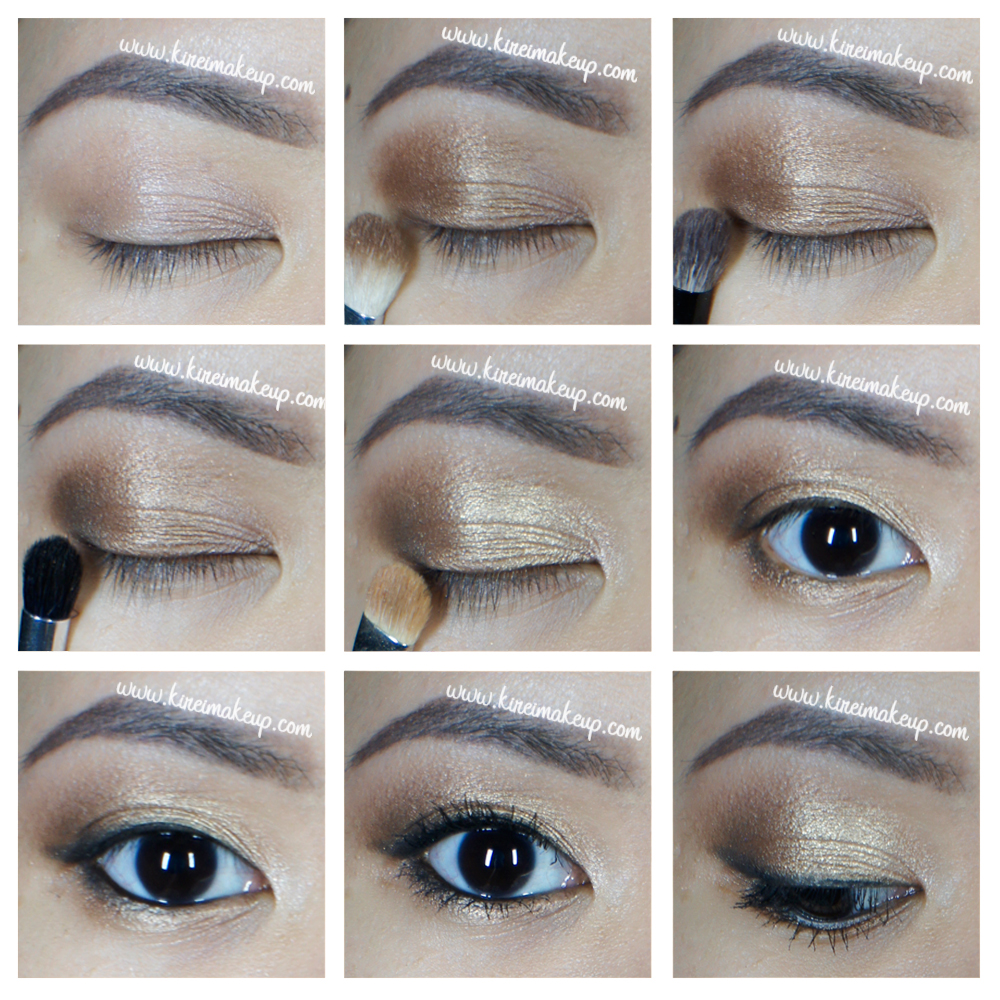
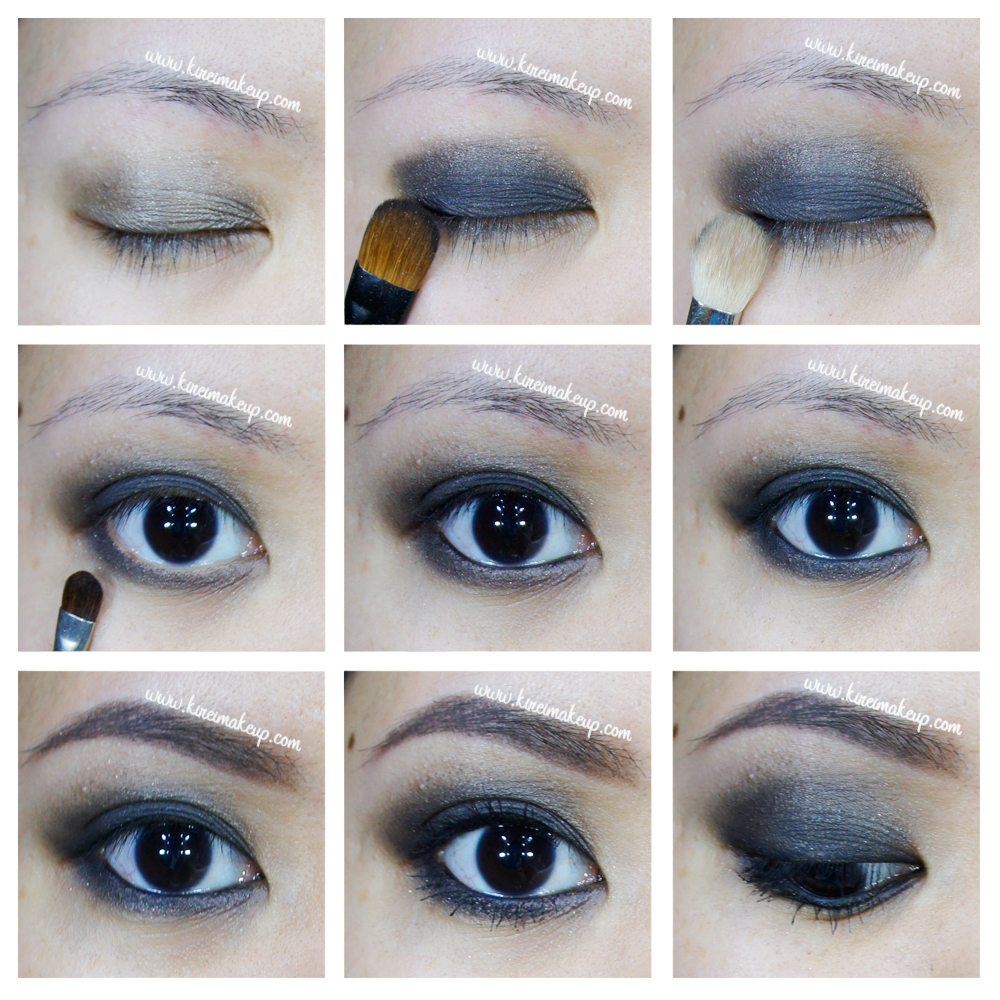
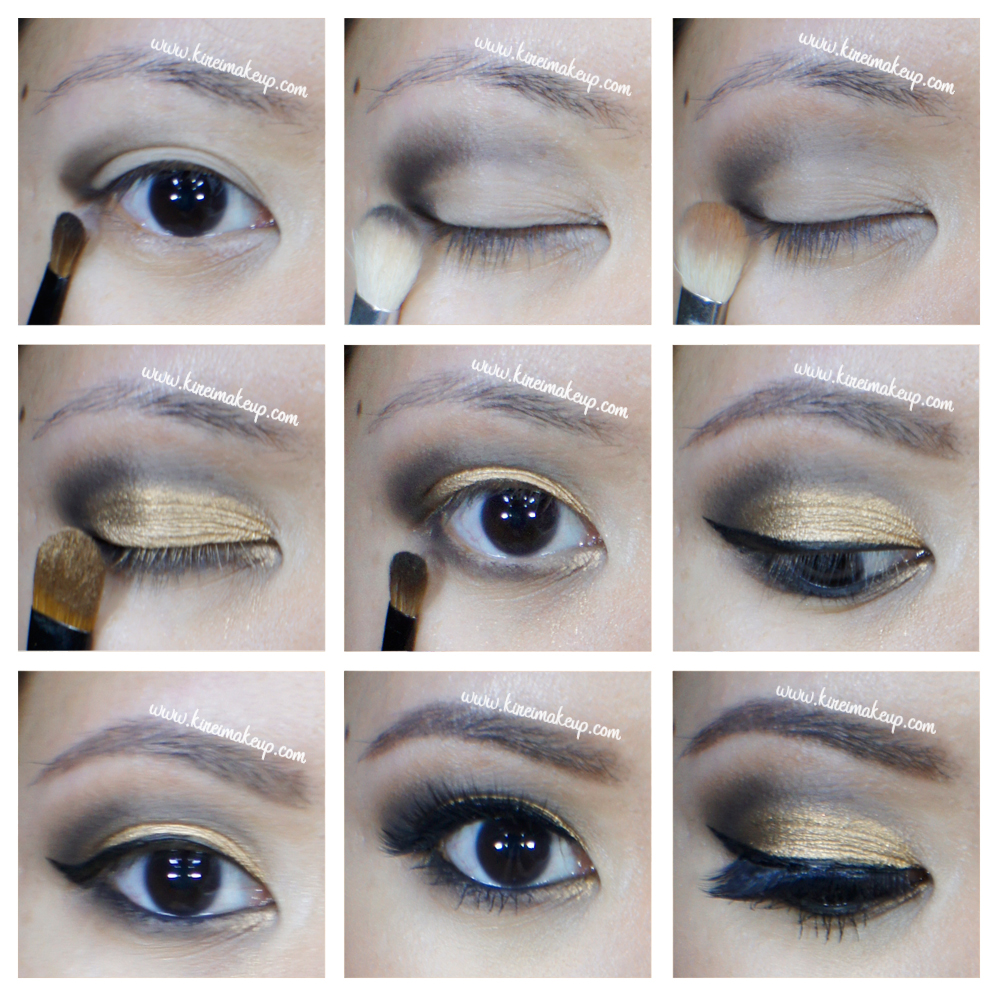
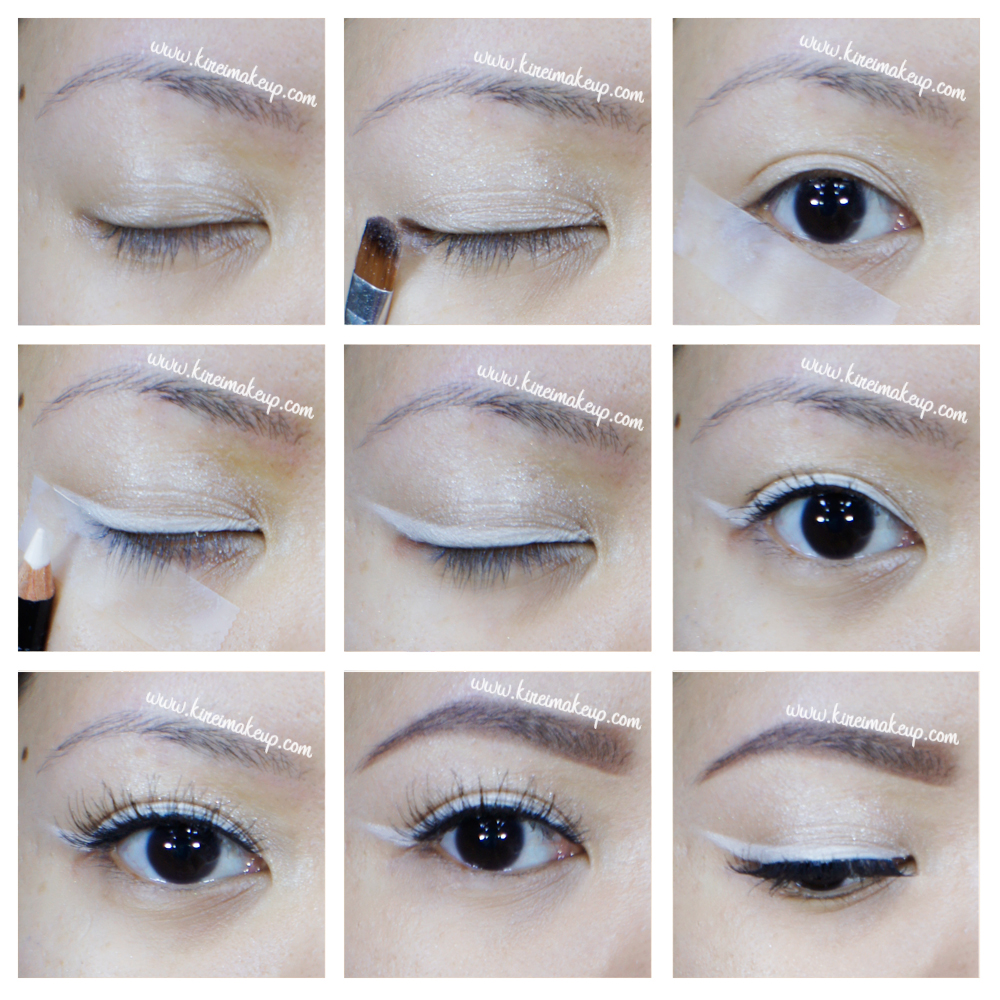
1. I prepped my eyelid using Urban Decay Primer Potion. Then, I applied Matt Singh from The Balm Meet Matt(e) Nude palette on my crease blending it upwards towards the brow bone.

2. I layered in Matt Rossen, again from The Balm Meet Matt(e) Nude palette, on top of Matt Singh. This time, I focused most of the color on the outer part of the crease, blending the color inwards.

3. To add an extra depth, I applied Matt Wood right on the crease. The color was concentrated on the outer part of the crease, and blended inwards.

4. I applied MAC Carbon just on the outer V of the eyelid.

5. Using a flat eyeshadow brush, I applied Marzipan from Too Faced Chocolate Bar Eye palette on my eyelid.

6. I lightly applied MAC Carbon on my lower lash line and blended it out using a pencil brush.

7. I lined my waterline using L’oreal Voluminous Smoldering eyeliner, and applied a thick winged liner using Shu Uemura Calligraphy Ink eyeliner.

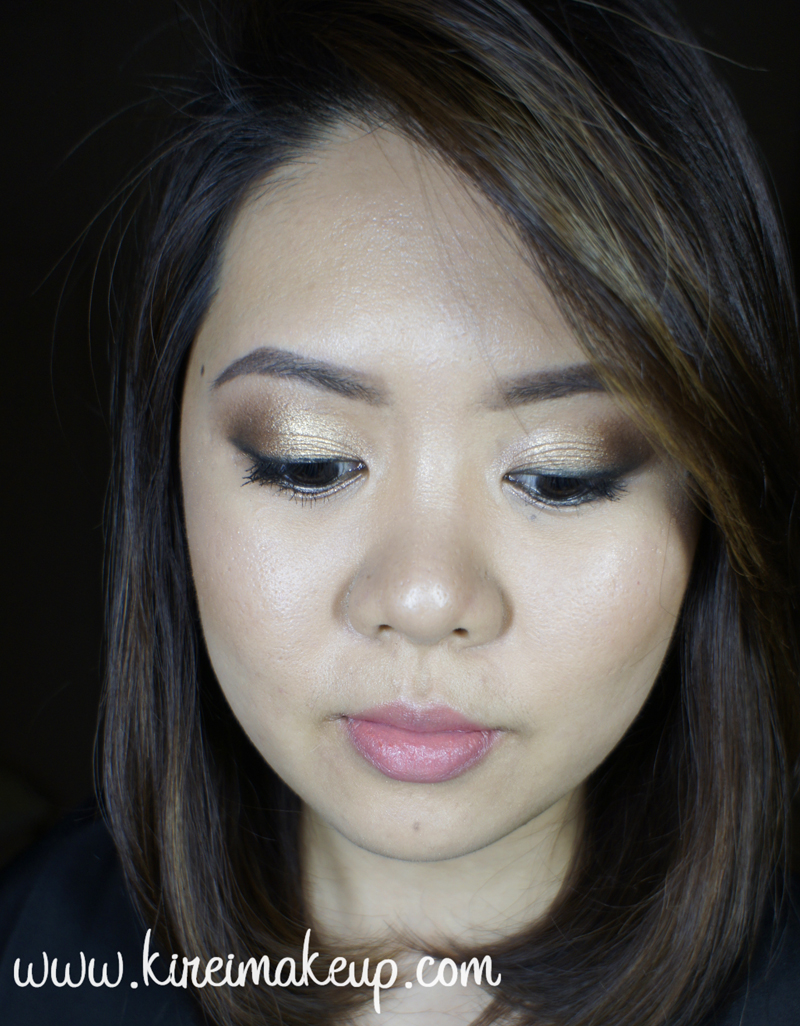
8. I filled my brows using Anastasia Brow Wiz in Taupe.

9. I applied Lavie Lash false eyelashes in Bluebell.

Thick winged eyeliner

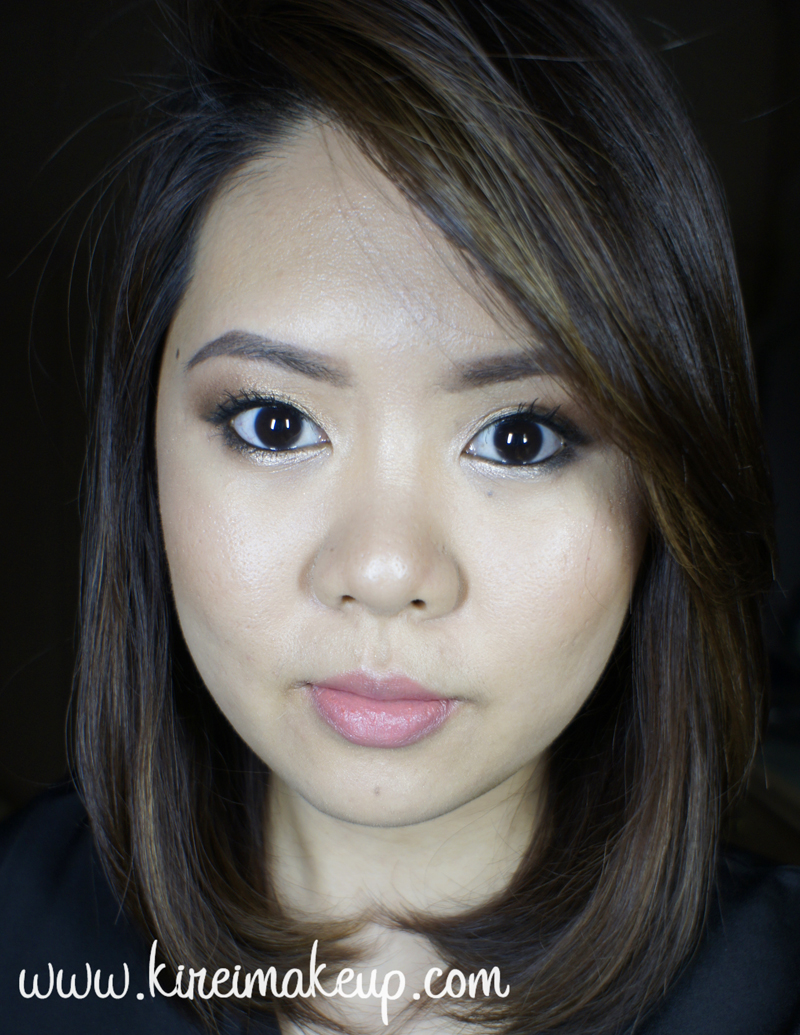
10. On my face, I applied MUFE HD Foundation.

11. I also applied MUFE HD concealer under my eyes.

12. I set my base using Cover FX translucent powder.

13. I very lightly applied The Balm Mary Lou highlighter on the bridge of my nose, cupid’s bow and cheek bones.

14. I lightly contoured my face using Smashbox Contour Kit – sides of my nose, temples, jawline and hollows of the cheeks.

15. For the cheeks, I applied Smashbox Halo blush in In Bloom.

16. On my lips, I applied Shu Uemura Dear Matte Rouge Unlimited lipstick in Diva Red straight from the tube. I did this because I was pressed for time, and I have the lipstick on my clutch for the night, so I can easily touch it up. However, if you want a long lasting lipstick with very little need to touch up, please check out my How-to apply Red lipstick tutorial!

Classic hollywood glam makeup

Products used:

Eyes – Urban Decay Primer Potion (original); The Balm Meet Matt(e) Nude (crease: Matt Singh, Matt Rosen, Matte Wood); MAC Carbon (outer v); Too Faced Chocolate Bar Eye palette (eyelid: Marzipan); Shu Uemura Calligraphy Ink eyeliner; L’oreal Voluminous Smoldering eyeliner; Anastasia Brow Wiz (Taupe); Lavie Lash (Bluebell).

Face – MUFE HD foundation; MUFE HD concealer; The Balm Mary-Lou highlighter; Smashbox contour kit; Smashbox In Bloom blush; Cover FX translucent powder.

Lips – Shu Uemura Dear Matte Rouge Unlimited lipstick in Diva Red.

L’oreal Colour Riche Moist Matte in Lincoln Rose

I was watching Kat Von D video tutorial on Sephora’s youtube channel, and I absolutely love how she created the ombre dotted eyeliner, similar to pointilism. I think it’s a pretty cool way to get creative with your eyeliner while keeping it simple. You can pair this dotted eyeliner with a rich-colored lips, like the L‘oreal Colour Riche Moist Matte in Lincoln Rose to brighten up your look.

As promised on my L’oreal Colour Riche Moist Matte swatches, I wanted to show you guys how the lipsticks look on my skin. This time I played around with Lincoln Rose, but I’ll try to work on the other shade next time. I’m quite surprise at how bright the lipstick shade is on my lips. I did not line my lips at all for this tutorial since I want to see how the real color is against my skintone. I think if you have a medium or dark complexion, this would work really well on you. I personally find this shade to be a little bit overpowering.

The shade itself is a very interesting red. It does have quite a warm undertone to it. I think it’s a very pretty shade for summer, or for us in the Tropics where everyday is pretty much summer. Very warm, bright, and tropical. I applies very smoothly on the lips. Although it is a “matte” line, it doesn’t dry out your lips like some other brands “matte” lipsticks are. It is still creamy, while the finish is matte. Overall, I think the L’oreal Colour Riche Matte line is worth a try. I definitely am going to look for another one or two the next time I go to the mall!

how-to dotted winged liner

How-to:

1. I applied a nude eyeshadow on my eyelid, all the way to the brow bone using a flat eyeshadow brush. For this look, I used Entomology from Kat Von D Monarch palette.

2. On the crease, I applied Vanish from Kat Von D monarch palette, using a clean fluffy blending brush.

3. I placed a tape on where I want my “wings” to be as my eyeliner. You can skip this step if you have steady hand.

4. Using Kat Von D Trooper tattoo ink eyeliner, I started drawing a solid line from the inner corner to the middle of my lash line.

5. Then, using the tip of the eyeliner, I started drawing dots from the middle to the end-tip of the eyeliner. I placed more dots on the middle, and it gets more spaced out as it approaches the end of the wing.

6. I ran Vanish slightly on the lower lash line using an angled eyeliner brush.

7. I curled my lashes and applied MUFE Aqua Smoky Lash mascara on both upper and lower lashes.

8. On my brows, I filled it in using Anastasia Brow Wiz in Medium Ash.

L'oreal Colour Riche Matte Rose Bud

9. On my face, I applied Giorgio Armani Maestro foundation.

10. I applied Smashbox Halo blush in In Bloom.

11. On my lips, I applied L’oreal Colour Riche Matte in Lincoln Rose.

Halloween #1- Monster Teeth

Alright! I finally decided to start my Halloween tutorials early this year! I’m super pumped since my parents are setting up a haunted house at work for everyone to enjoy! Anyways, you can be sure I’m going to be there with full makeup on! For my first tutorial, I decided to do a Monster Teeth or monster smile, since I always find difficulty creating these teeth. I’m not that happy with the result, but oh well, I think it worked pretty well.

One tip that I should keep in mind for myself, is to use water-based white paint for the teeth instead of cream face paint. I think the cream is hard to work with since it moves around so easily, but that’s just my preference. Also, funny story (not so funny when it happened), I was so close to finishing the whole look, and I decided to “fix” the two teeth on the bottom lip, then my hand slip and smudged everything. I had to remove the 2 teeth and just created 1 since it was getting late, and I had to go to bed.

*For Killer Clown tutorial please check out my latest post*

*Please check out my other Halloween post*

Ok, let’s get this whole thing started!

How-t0:

1. I started out by drawing an outline of the smile using a black eyeliner pencil.

halloween makeup tutorial

2. Using the same eyeliner pencil, I started drawing the outline of the teeth. It doesn’t have to be pretty, it can be as sharp or as big as you want. I drew the teeth at the back of the mouth a little bit curved in to create an eerier smile.

3. Using a small synthetic artist brush, I applied black cream face paint outside the teeth area.

halloween makeup tutorial

4. Using a clean synthetic artist brush, I applied white cream face paint inside the teeth.halloween makeup tutorial

5. To create some depth, I created some smile lines at the end of the monster mouth, above and below the monster lips.

6. Using an angled eyeliner brush, I blended the lines down for the lines on below the lips, and upwards for the lines above the lips. This will create an illusion of depth.

halloween makeup tutorial

7. For the rest of the face, I applied foundation and smoky eyes just for fun.

8. I also set the cream face paint using eyeshadow of similar colors – black for the black areas, and white mixed with beige for the teeth.

halloween makeup tutorial

It looks really good in black and white!

halloween makeup tutorial

Ta-daaaah! So, let me know if you have any request for Halloween, ‘kay?!


xoxo

MAC Viva Glam 1 Look #1

My friend, Elfa, and I went to Tex Saverio Trunk Show last week (photos on instagram). I did Elfa’s makeup, she wanted smoky eyes with red lips, and I actually loved how she looked. So, today I decided to recreate the makeup she wore, but twist it to suit me. I also wanted to use my the Original Viva Glam lipstick (MAC Viva Glam 1), so that look was perfect!

For the eyes, I decided to use my Sleek Makeup iDivine Storm palette since I wanted to do a warmer, coppery smoky eyes. I really seem to like a warmer, redder shades lately. Anyways, if you’re in Southeast Asia and want to purchase Sleek Makeup, you can do so with Luxola. Since this palette doesn’t have the names of each eyeshadow, I decided to number them for this post.

Sleek Makeup iDivine Storm tutorial

image courtesy of Sleek Makeup

Eyes are prepped using Urban Decay Primer Potion.

How-to:

1. I applied no. 1 on the center of my eyelid using a flat eyeshadow brush.

2. Using the same flat eyeshadow brush, I applied no. 2 all over the eyelid.

3. Using a fluffy blending brush, I blended out the edge all the way to above the crease using shade no. 3

4. I applied  no. 4 just on the outer V using a small crease brush.

5. Using a clean blending brush, I applied shade no. 5 under the brows.

6. I applied shade no. 2 along the lower lash line, and no. 6 just on the outer half using a small shader brush.

7. I lined my upper lash line using Kanebo Kate Super Sharp eyeliner, and on the waterline I used L’oreal Voluminous Smoldering eyeliner.

8. I applied a golden eyeshadow (above shade no. 3 – I forgot to add it) just on the inner corner of the eyes.

9. I filled my brows using Anastasia Brow Wiz in Medium Ash and Brunette. Also added Gwiyomi false eyelashes no. 18.

Copper smoky eyes

10. I applied Dior Star foundation on my face using CoverFX cream foundation brush.

11. I highlight and contour my face using Motives Fire sculpting palette. (Will do a highlight/contour tutorial using this palette soon).

12. I set my face using Cover FX translucent setting powder.

13. I added extra highlight using MAC Soft and Gentle highlighter powder. Then, I applied Smashbox Halo Blush in In Bloom.

14. On my lips, I applied MAC Viva Glam 1 straight from the tube.

Ru Paul MAC lipstick

Kat Von D Monarch Palette Tutorial #2

I kept forgetting how amazing this palette is, so I decided to remind myself and created this Monarch palette tutorial. Like I said on my first tutorial using this palette, the eyeshadows are unbelievably smooth and so easily blended. Love it! I promise I’ll do swatches and review for this palette. If you have the chance to grab it, you should really consider it.

Anyways, I’m quite busy this week, as well as the whole September due to work. I think I’ll try to post twice a week, hopefully more. If you do follow me on Instagram, I’ll do micro-blogging from there. Also, don’t forget to comment here or on my twitter/instagram on what you’d like to see more. I know I still have to do a few requests, and I’ll try to get on it ASAP. What a busy month!

Ok, let’s get the tutorial started! I just want to mention that for some reason my camera picks up Wrath really orange this time round. Not sure why, I did reverted back to my glamcor lights, so that might be the cause. Trust me, it doesn’t look that orange in real life. It’s a very pretty warm reddish-brown, almost like a brick color.

warm brown smoky eyes

I prepped my eyelids using Urban Decay Primer Potion.

How-to:

1. Using a fluffy blending brush, I applied Wrath on the outer V and just above the crease.

2. Using a clean blending brush, I blended out the crease.

3. I applied Shadow Box on the outer V, inner V, and crease of my eyelid using a bullet crease brush.

4. Using a flat eyeshadow brush, I applied MAC Tan loose pigment on the center of my eyelid.

5. I applied Urban Decay Jilted eyeshadow (from the electric palette) along my lower lash line using an angled eyeliner brush, then I applied Urban on top of it using a pencil brush.

6. I lined my waterline using L’oreal Voluminous Smoldering eyeliner.

7. I also created a winged liner using Kanebo Kate Super Sharp eyeliner.

8. I filled my brows using Anastasia Brow Wiz in Medium Ash.

9. I applied MUFE Aqua Smoky lash mascara on top and bottom lashes. Also applied Lavie Lash falsies in Snowdrop.

kat von d monarch palette makeup look

10. On my face, I applied Diorskin Star foundation using a foundation brush.

11. I also applied MUFE HD concealer under my eyes.

12. I wanted an extra glow on my skin, so I applied Smashbox Halo Highlighting wand. I applied this highlighter on the high points of my face – cheekbones, bridge of the nose, cupid’s bow, chin, forehead.

13. I lightly dust Cover FX translucent powder to set everything.

14. I applied contour very lightly on my face using Smashbox Contour Kit (they’re selling it again for a limited quantity on their website!).

15. On my lips, I applied MAC Spice lip liner all over, and then applied Clinique Heaping Hazelnut chubby lip stick.

mac tan makeup tutorial

Daytime Bronze Smokey Eyes

Today’s post, Daytime Bronze smokey eyes, was actually a pending post from last week. I actually did this look after I did my brows video. Since I was uber busy last week (Shu Uemura competition, work and stuff), I didn’t have the chance to post this tutorial up. I also want to mention that I will not be posting any tutorial until end of this week, so I apologize for missing again. However, do follow me on Instagram to find out what I’m up to! Instagram has been a place for me to micro-blog almost daily.

Anyways, for this look was a request over on Instagram by Sammie. She wanted me to do an easy golden smoky eyes that she can wear during daytime. The key to this look is to keep the black to a minimum if you are going to wear it out for a day makeup. The usual smoky eyes are quite strong and dark, meawhile for this look I kept it quite light and not as intense. I smudged a lot of the black out, and skipped my usual black winged liner. Instead, I opted for a smudged eyeliner using powder. I kept the black on the waterline & tightline, but if you’re afraid that this will close your eyes up you can skip it. I just love black eyeliner on waterline & tightline for smoky eyes.

bronze makeup tutorial

I used Urban Decay Naked 1 palette for the eyeshadows. You can also find these shades in single pot from Urban Decay.

Brows are filled using Anastasia Brow Wiz in Medium Ash and Brunette.

How-to:

1. I applied Urban Decay Primer Potion in Sin all over my lid using my ring finger.

2. Using a fluffy blending brush, I applied Urban Decay Smog on the outer half of the lid, all the way to the crease.

3. I used Smashbox bullet crease brush to blend out the edges.

4. Using Sephora crease brush, I applied Urban Decay Darkhorse just to deepen the outer corner.

5. Using a shader brush, I applied Urban Decay Half-Baked on the eyelid.

6. I applied Smog on the outer half of the lower lash line, and Half-Baked on the inner half using an angled eyebrow brush.

7. I applied Urban Decay Creep along the upper lash line and outer third of lower lash line using an angled eyeliner brush.

8. I lined my waterline and tightline using L’oreal Voluminous Smoldering eyeliner.

9. I curled my lashes and applied Make Up For Ever Aqua Smoky Lash mascara on both upper and lower lashes.

daytime makeup

10. For my face, I applied Smashbox Halo Liquid foundation and Cover FX cream foundation brush.

11. I lightly contoured my face using Benefit Hoola bronzer, and added highlight using MAC soft and gentle highlighter.

12. I applied Benefit Coralista blush on my cheeks.

13. On my lips, I applied Shu Uemura Lip Tint Gelato in 01.

golden bronze smoky eyes

[Updated] Brow Tutorial Video

I actually wanted to post this Brow Tutorial video tomorrow, since I do have another post lining up to be published. However, I got excited since this is my first video ever using my own face. It took me a lot of years to actually pluck the courage to do a video. Anyways, the quality might not be as good as other great youtube gurus, but please take it easy with me. I’ll try to improve slowly, and I look forward to read comments from you. I did not talk or do a voice-over since I’m not comfortable doing that just yet. However, again, in the future when I get more comfortable in front of a camera, I’ll start talking or doing voice-over.

So, I asked on Instagram, what kind of tutorials would you guys like to see me do. The majority of the comments said to do a brow tutorial. I have done a brow pictorial before on my How-to Fill in Brows post, but I guess seeing picture and seeing me doing it is quite different. Just keep in mind that this is how I DO my brows.

I cannot emphasize enough how each person has different shape and this might not work for you. However, what you can take from this tutorial is how I draw each hair individually. This is the most important part of filling in your brows. Light feathery stroke is the key! Try not to press too hard on your eyebrows to avoid making it look too thick.

For this tutorial, I assumed you already know or have gotten your brows shaped (waxed/tweezed/threaded). If you have not gotten your eyebrows shaped before, take a look at my Brows 101 post. If you are not allowed to shape your eyebrows, the best thing I can suggest is to trim your eyebrows using a clean spooly and a cuticle scissors. This way, you can see the brows’ shape, and fill it in lightly using brow powder, emphasize on LIGHTLY.

For a day makeup, I usually do something similar to my Shu Uemura Brow Pencil post.

Enjoy the video, and comments are welcome!


NARS Mekong Smoky Eyes (NARSissist palette)

Who doesn’t love a good smoky eyes? I sure do! I’m sure my friend, Finency, loves it too! She showed me this picture on Instagram, and it showed a smoky eyes using NARS Mekong eyeshadow. I love how simple, easy, and definitely I’ll wear this for a night out.

I skipped the whole false lashes so this look is more grungy, and more me. I don’t usually wear falsies, so this really stay true to how I’d wear my smoky eyes. I also filled my brows without shaping it using any concealer. Again, just want to stay true to how I usually do my makeup. As I said, it’s very simple and quick. No fuss, sexy, and sultry. I like my makeup to be as simple as possible. This is just how I prefer to do my makeup, but if you like more of a glam look you can take a look at my other tutorials under smoky eyes.

For this tutorial, I used NARS eyeshadows from the NARSississt palette. I’ve done tutorials, and review of this palette. Please feel free to check them out.

NARS Mekong tutorial

How-to:

1. I prepped my eyelids by applying a cream-base eyeshadow. I used Smashbox limitless 15-hour cream shadow in Stone.

2. Using a flat eyeshadow brush, I applied NARS Mekong eyeshadow all over my eyelid. The camera didn’t pick it up, but there’s lots of gorgeous golden flecks on my lids.

3. Using a fluffy blending brush, I applied NARS Madrague I on the crease to diffuse the color out.

4. I applied NARS Mekong on the lower lash line using a small shader brush.

5. I lined my waterline, tightline, and upper lash line using L’oreal Voluminous Smoldering eyeliner.

6. Using an angled eyebrow brush, I applied NARS Pandora II along the upper lash line. I kind of winged mine a little, but you don’t have to.

7. I filled my brows using Anastasia Brow Wiz in Medium Ash.

8. I curled my lashes and applied MUFE Aqua Smoky Lash mascara on both upper and bottom lashes.

NARS Mekong smoky eyes

9. On my face, I applied Smashbox Liquid Halo Foundation using CoverFX cream foundation brush.

10. I highlighted (under my eyes, bridge of my nose, cupid’s bow, chin, & forehead) my face using YSL Touche Eclat.

11. I set my face using Cover FX translucent powder.

12. I lightly contoured my face using Smashbox contour palette.

13. On my cheeks, I applied Chanel Blush de Horizon.

14. I filled my lips using MAC Spice lip liner, and Clinique Heaping Hazelnut Chubby Stick lip balm.


Products used

Eyes – Smashbox limitless 15-hour cream shadow in Stone; NARSissist eyeshadow palette (Lid: Mekong, crease: Madrague I, liner: Pandora II); Anastasia Brow Wiz in Medium Ash; MUFE Aqua Smoky Lash mascara

Face – Smashbox Liquid Halo foundation; YSL Touche Eclat; Cover FX Translucent Powder; Smashbox contour powder; Chanel Blush de Horizon

Lips – MAC Spice lip pencil; Clinique Heaping Hazelnut chubby stick

Smoky Eyes using MAC Rose Gold Pigment

At one point some time last year, I was crazy about anything Rose Gold. In fact, I am still obsessed with anything Rose Gold. Anyhow, I was browsing  around and saw this MAC Rose Gold pigment on their website. I bought it, and played with it. To be honest, when it first came, I was quite disappointed how it does not look anything rose-colored. I should’ve paid more attention to the description. On the MAC website it was described as “smooth, tarnished gold with a touch of rose”. Not sure where the “touch of rose” comes from, I think this pigment is a lot more “tarnished gold”.

Anyways, I actually love this pigment. It has amazing pigment pay-off, and it’s super smooth! I have used this pigment before on my New Year makeup post. I think the hardest part of using this pigment is actually finding a combination of color that will match it. I’m not that crazy on the result for this tutorial, I feel like the pigment should’ve been paired with a warmer shade. May be I’ll re-do this look in the future.

bronze smoky eyes

How-to:

1. I prepped my eyelids using Urban Decay Primer Potion.

2. Using a small fluffy blending brush, I applied Ultra Mattes V2 from Sleek Makeup iDivine Showstopper on my outer V. If you have a monolid, or droppy/hooded eyelids, apply this eyeshadow with your eyes open.

3. I blended out the crease using a clean fluffy blending brush. I added a little bit of the same black eyeshadow to create more depth.

4. I wanted to add a bit more warmth, so I ran a little bit of bronzer, from the Smashbox contour palette, just above the crease.

5. I applied MAC Rose Gold pigment on my eyelid using a flat eyeshadow brush.

6. Using the same brush as no. 2, I applied Ultra Mattes v2 on my lower lid. I applied a little bit of the pigment just on the inner corner of the lower lid.

7. I created a winged liner using Kanebo Super Sharp eyeliner. I also applied a little bit on my waterline.

8. I filled my brows using Anastasia Brow Wiz in Medium Ash. Then, I feathered in Brunette a bit more.

9. I curled my lashes, and applied Gwiyomi Boutique false eyelashes in Annabelle.

mac rose gold pigment

10. On my face, I applied MAC Pro Longwear foundation using MAC Masterclass Oval 6 brush.

11. I applied the concealer from MAC Pro conceal/correct palette under my eyes.

12. I set my face using Cover FX translucent powder.

13. I lightly contoured and highlight my face using Smashbox contour palette.

14. I applied MAC Cubic blush on my cheeks.

15. For my lips, I lined and filled it in using MAC Spice lip liner.

smoky eyes for asian

White Eyeliner Makeup Tutorial

Ok, so this White Eyeliner makeup tutorial is actually my World Cup 2014 England Inspired Makeup, as requested by Nurina over on facebook. However, since World Cup is over, I didn’t want to title it as England inspired makeup. Not to mention, I feel like this look can be worn during Indonesia’s Independence Day which is coming up next month, or any country with a red/white flag.

Anyways, I think ever since I tried out the white eyeliner look in my Netherlands inspired makeup, I’ve been quite a fan of white winged eyeliner. It’s a fresh outtake on my usual black winged eyeliner, not to mention it does brighten up the eyes quite a bit. For my World Cup 2014 makeup series, please check my Brazil, Netherlands, Argentina, and Germany inspired makeup posts.

For this white eyeliner makeup tutorial, I wanted to show you how you can use tape to create your winged liner. I’ve done this before in my other tutorial, but just going to show it again. That tape will create a very clean edge for your eyeliner. All you have to do is run a diagonal line from the outer tip towards the inner corner of your eye. For a detailed tutorial on how to create winged eyeliner, please check my how-to post.

The only word of caution I’m going to mention again, is to be very careful when applying mascara. If you’re not careful you might end up with black spots from the mascara all over your eyeliner. The easiest way to fix this is to let the mascara dry first, run a clean cotton bud over the mascara spots, and then run the white eyeliner on top of it again.

white eyeliner makeup

How-to:

1. I applied MAC Pearl cream base all over the eyelid for some shine.

2. Then, I realized it started on crease on my eyelid, so I set it with Revlon Sand eyeshadow.

3. I placed a tape on my skin to create an angle for my eyeliner.

4. Using Revlon Photoready Kajal eyeliner in Carbon Cleopatra, I created a diagonal line from the outer corner of my eye towards the inner corner. I just dragged the pencil eyeliner on my lid, and filled in any gaps.

5. I set the eyeliner using Sleek Makeup iDivine Ultra Matte v1 Brights in Pow using an angled eyebrow brush.

6. I removed the tape, curled my lashes and applied MUFE Aqua Smoky Lash.

7. I applied Gwiyomi false eyelashes no. 3 for added drama.

8. I filled my brows using Anastasia Brow Wiz in Medium Ash.

white eyeliner makeup tutorial

9. I applied Giorgio Armani Maestro foundation using my fingertips all over my face. (Such an amazing foundation, btw!)

10. I applied Bobby Brown under eye brightener in Peach, and blended it out using my finger.

11. I set my face using NARS setting powder.

12. On my cheeks, I applied Smashbox Halo Powder blush in In Bloom.

13. For added shine, I applied MAC Soft and Gentle on top of my cheekbones, and the bridge of my nose.

14. I very lightly contoured my face using Smashbox contouring palette.

15. I lined and filled my lips using MAC Redd lip liner, then added L’oreal Super Lustrous lipstick in Ravish Me Red.

red lips makeup tutorial