The newest Shu Uemura Pastel Fantasy Collection for Spring/Summer 2016 is to die for! These pastel colors are so pretty!!!! To be honest I thought when I bought the products I was going to end up with chalky eyeshadows, but nooope I was totally wrong. Anyways, I hope you guys will enjoy this Shu Uemura Pastel Fantasy makeup tutorial, and if you haven’t please do subscribe to my Youtube Channel! I upload 2 videos every week for you guys! If you have any request just leave me a comment.
Category: Spring
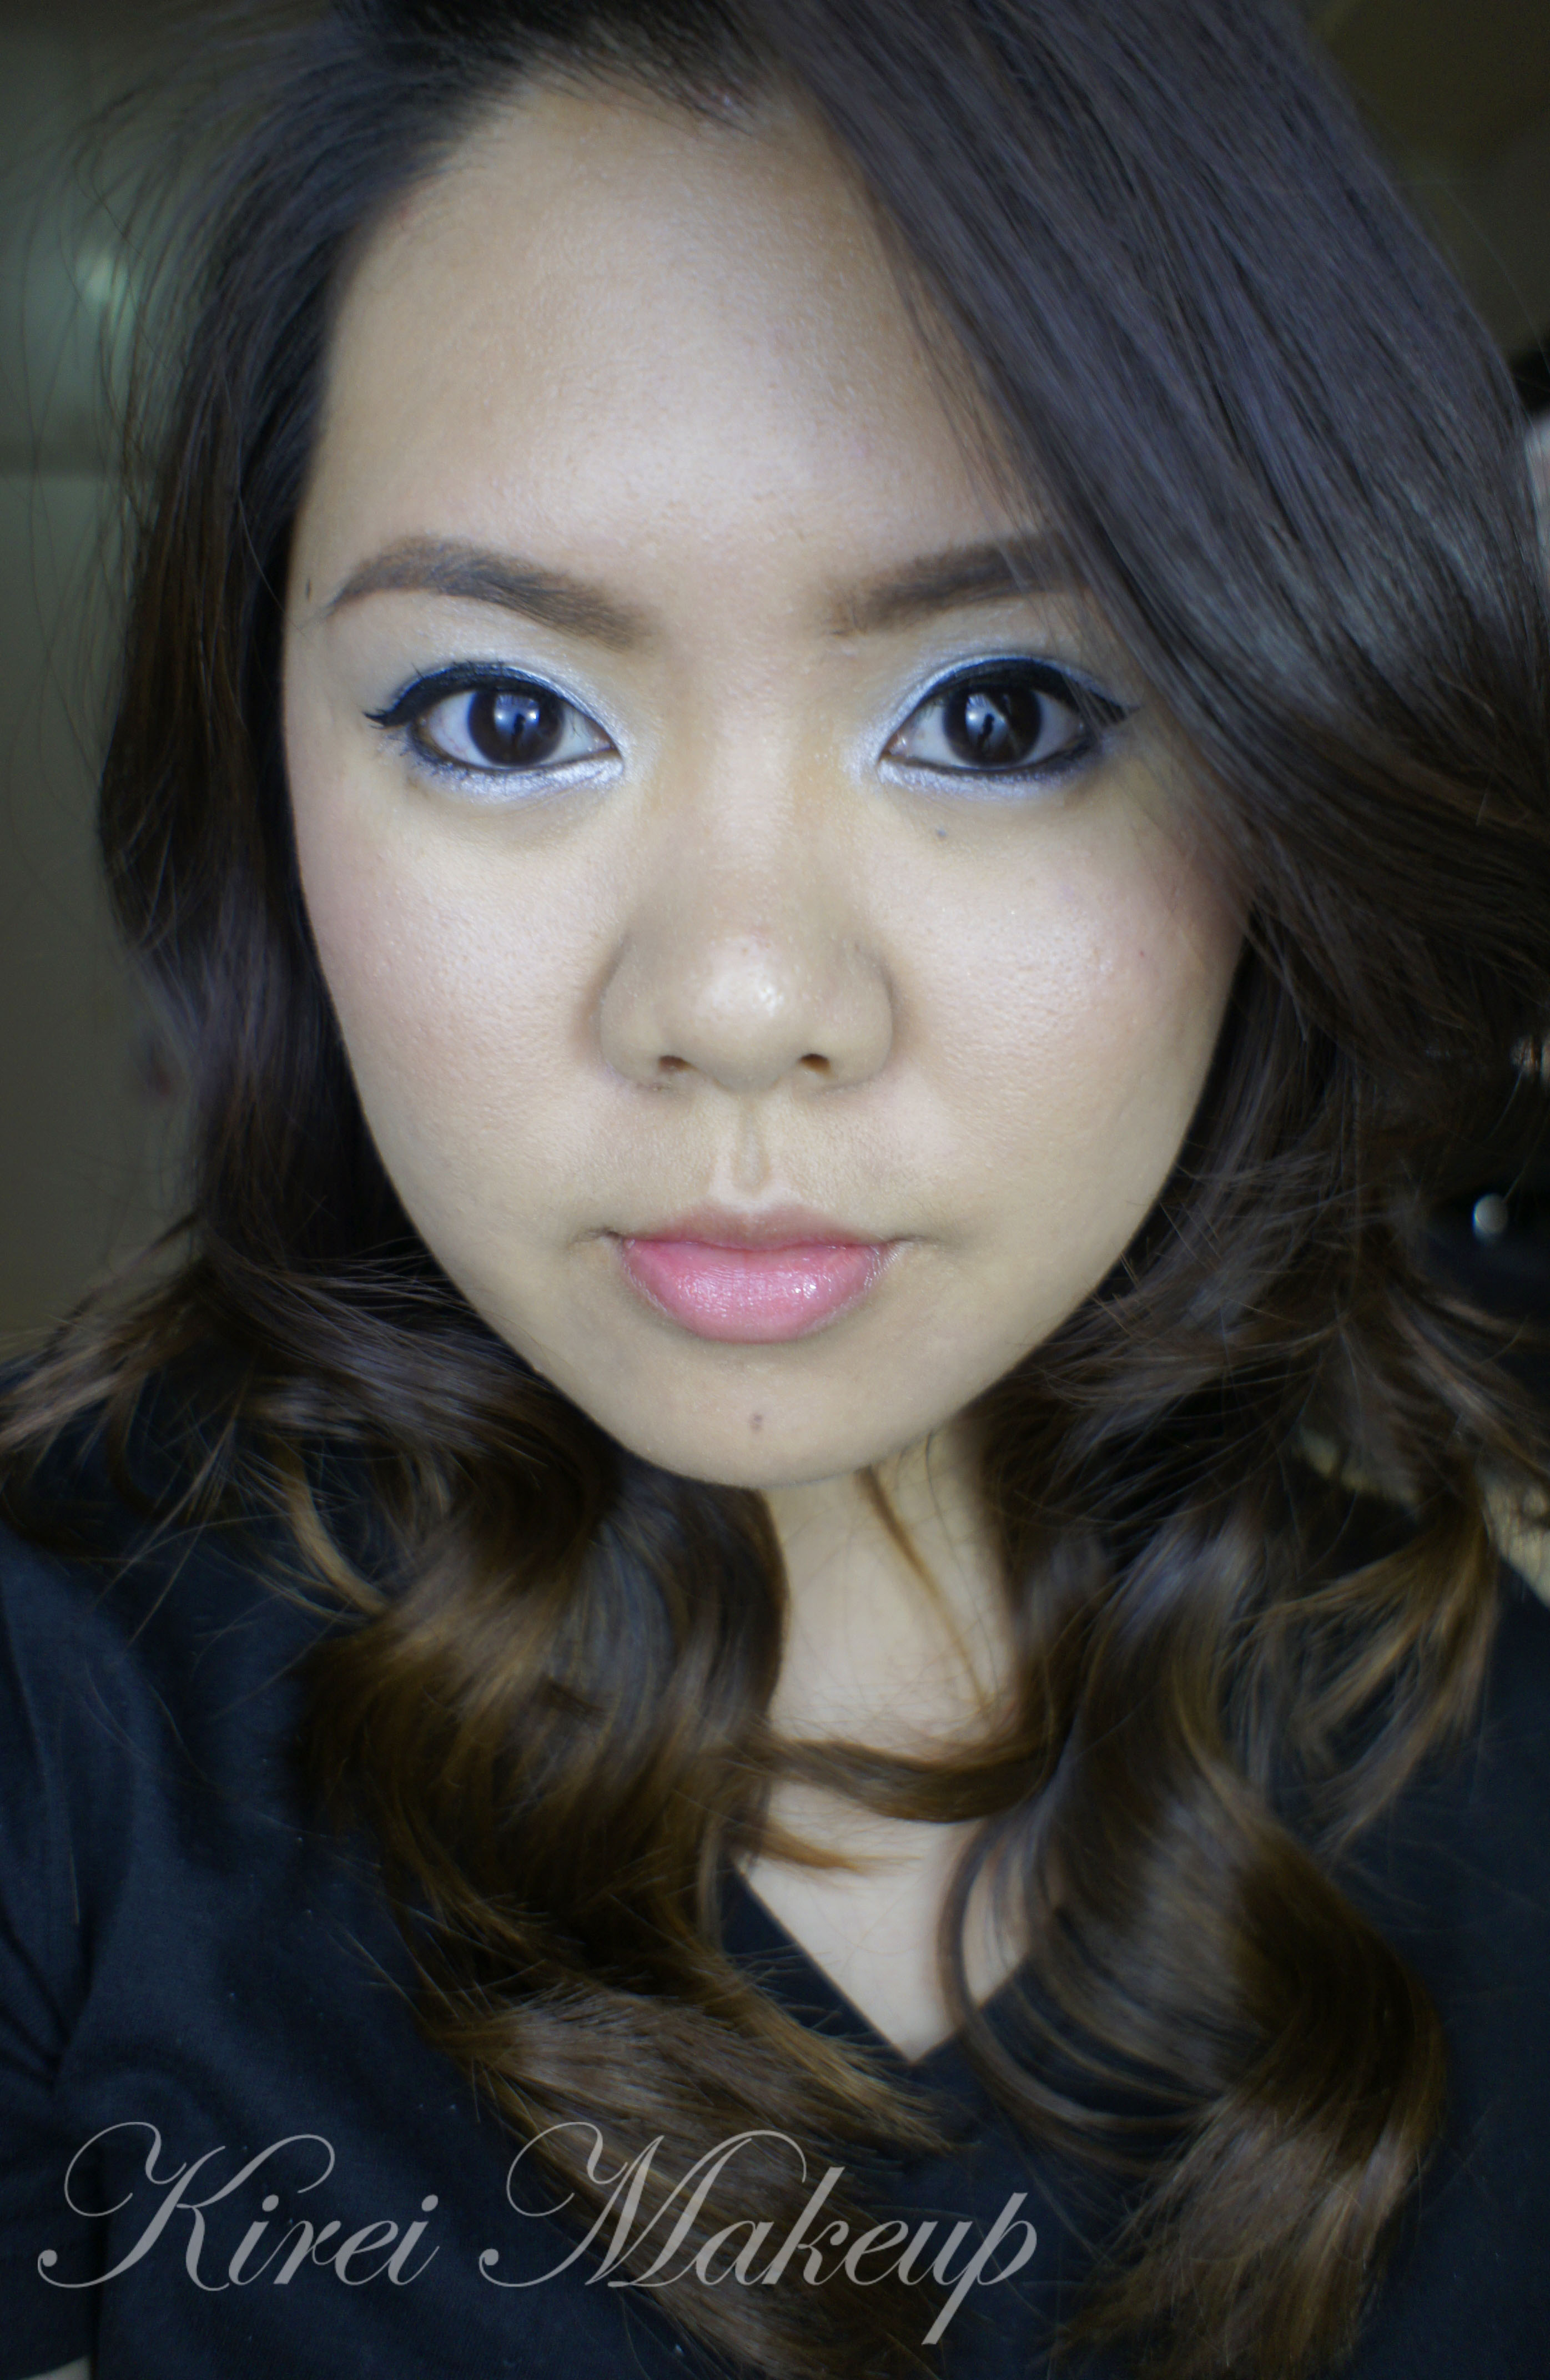
Silver Fox
I was mesmerized by Chanel’s Spring 2013 RTW runway makeup, that I’ve decided to do an inspired look based on it. I usually prefer warm-toned colors, like gold and bronze over silver, so it was definitely interesting to do this look.
I used Tinsel eyeshadow from the Sleek Makeup iDivine Sparkle 2 palette in this tutorial. I believed the makeup artist for Chanel used a silver cream eyeshadow (illusion d’ombre) to create the look. Since I don’t own any silver cream eyeshadow, I decided to use a powder eyeshadow. Tinsel eyeshadow is very creamy and can be easily blended.
It’s a very simple and wearable look. Since the focus is on the eyes, everything else is downplayed. In the runway, models were seen with bare face, but I decided to add a blush just so that I don’t look too washed out.
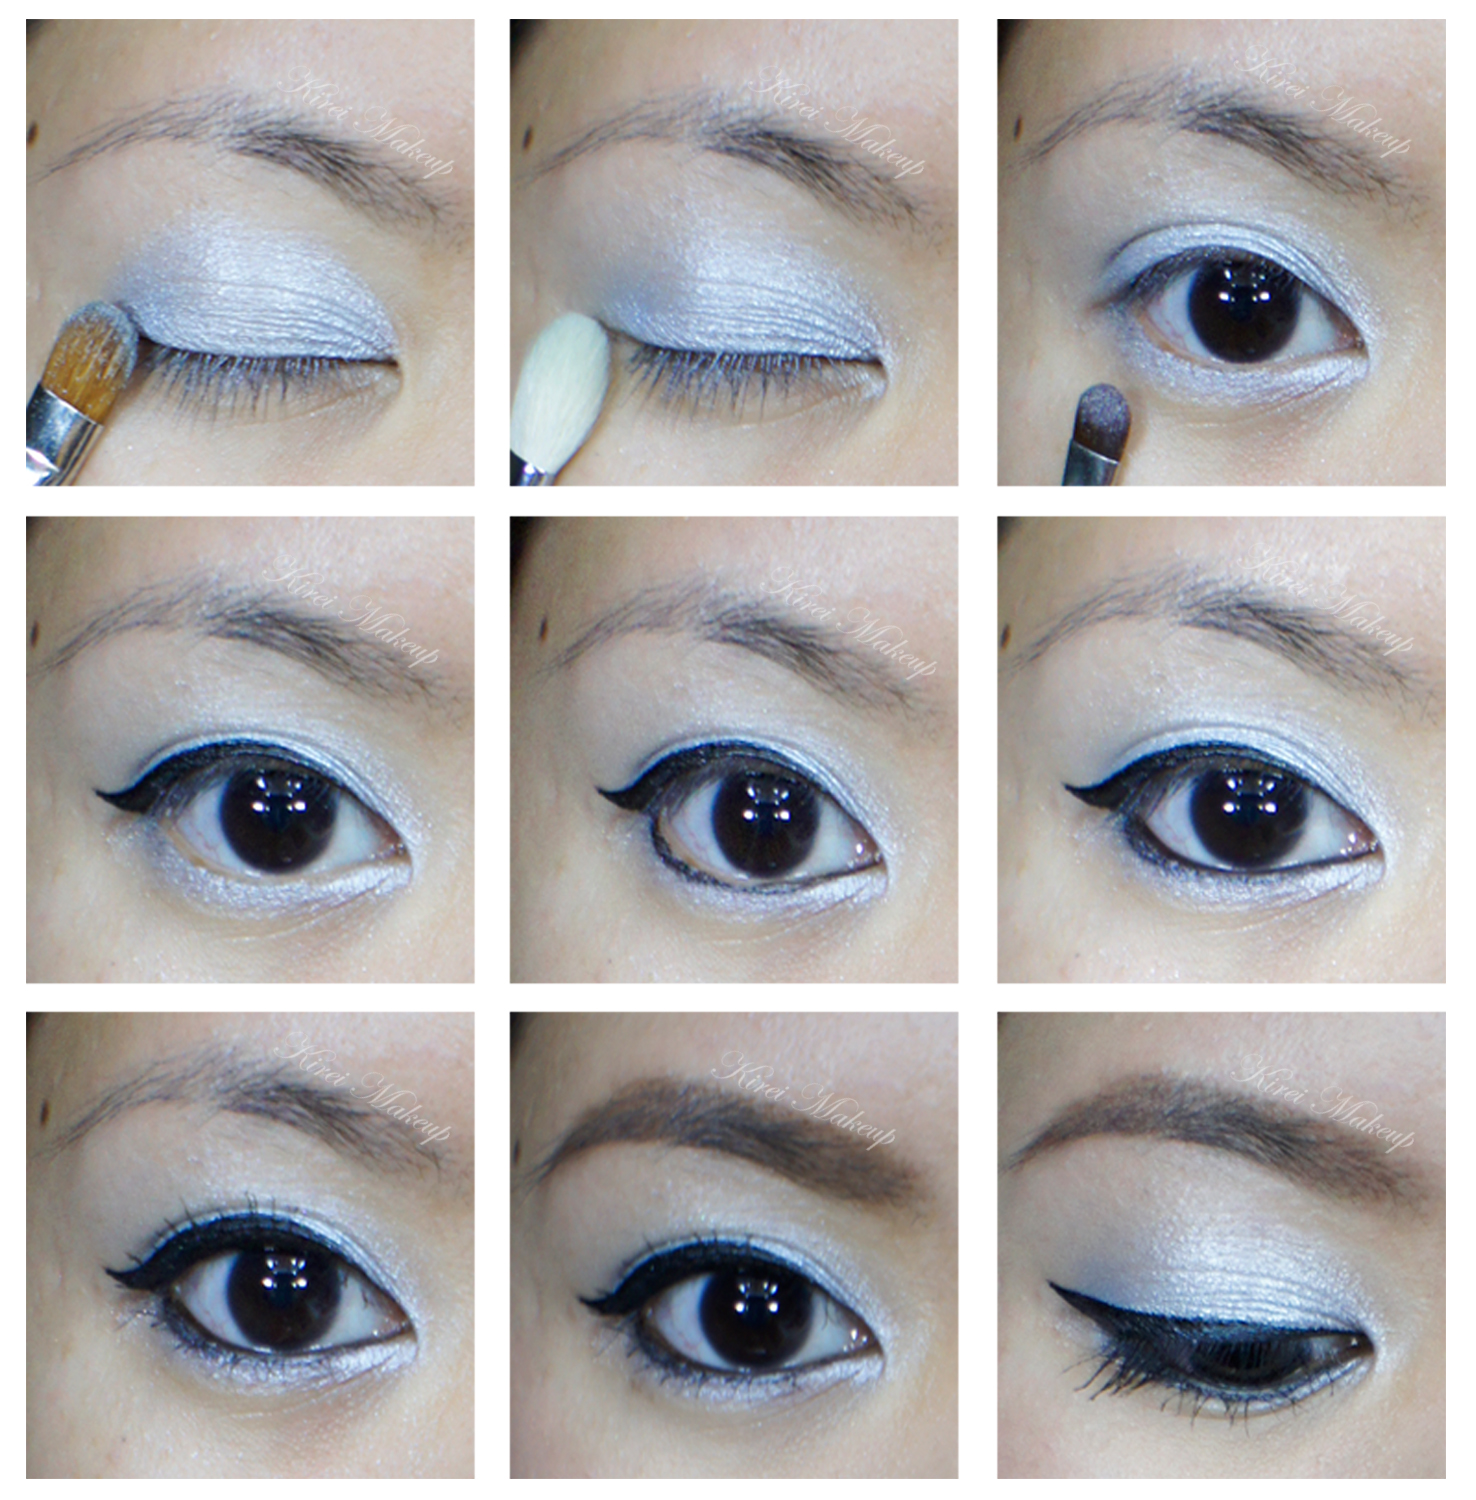
How-to:
1. I applied Tinsel all over the lid using a flat eyeshadow brush.
2. Using a fluffy blending brush, I blended the color from the crease all the way up to the brow bone.
3. Using a small shader brush, I applied Tinsel on the lower lid.
4. I created a winged liner along the upper lashline using Kate Sharp eyeliner.
5. I also lightly lined the lower lashline using the same eyeliner.
6. I lined my waterline using L’oreal Voluminous Smoldering eyeliner.
7. I curled my lashes, and applied Maybelline Express Volume Turbo Boost mascara on both upper and lower lashes.
8. I filled my brows in using Dolly Winked Brow pencil no. 3. (if you notice the difference between the last 2 pictures below on the brow, that’s because I brush the brows after I filled them in using a clean spooly).
9. For the face, I applied Urban Decay Naked foundation using IPKN Auto Wave makeup.
10. Under the eyes, I applied MAC Pro Conceal/Correct palette in Medium.
11. I powdered my face lightly on the T-zone using loose powder.
12. On the cheeks, I applied MAC Dainty blush.
13. On the lips, I applied Chanel Levres Scintillantes in Volupte.
Spring/Summer 2013 RTW Beauty
Hi everyone! I’m back! Just to give a quick update, last week I was in Japan for a short trip. I just returned on Saturday and currently I’m having fever, coughs and stuffy nose. I promise I’ll try to put up a post as soon as I can, but please bear with me the posts might be going up tomorrow onwards. I’ve a makeup haul, product review and tutorials waiting for you! I just need to recuperate first and get better!
Anyhow, with that said, don’t forget to go over to my Instagram account to see pictures from Japan 😀
Now, let’s get going to Spring/Summer 2013 Makeup Trend! Similar theme seems to be popping out throughout the show – bushy thick brows, bare skin and very little to no blush. The look has a retro feel to it, yet it’s kept modern with the downplay of the blushes. Below are a few of my favorites from the Spring 2013 Ready-to-Wear collection.
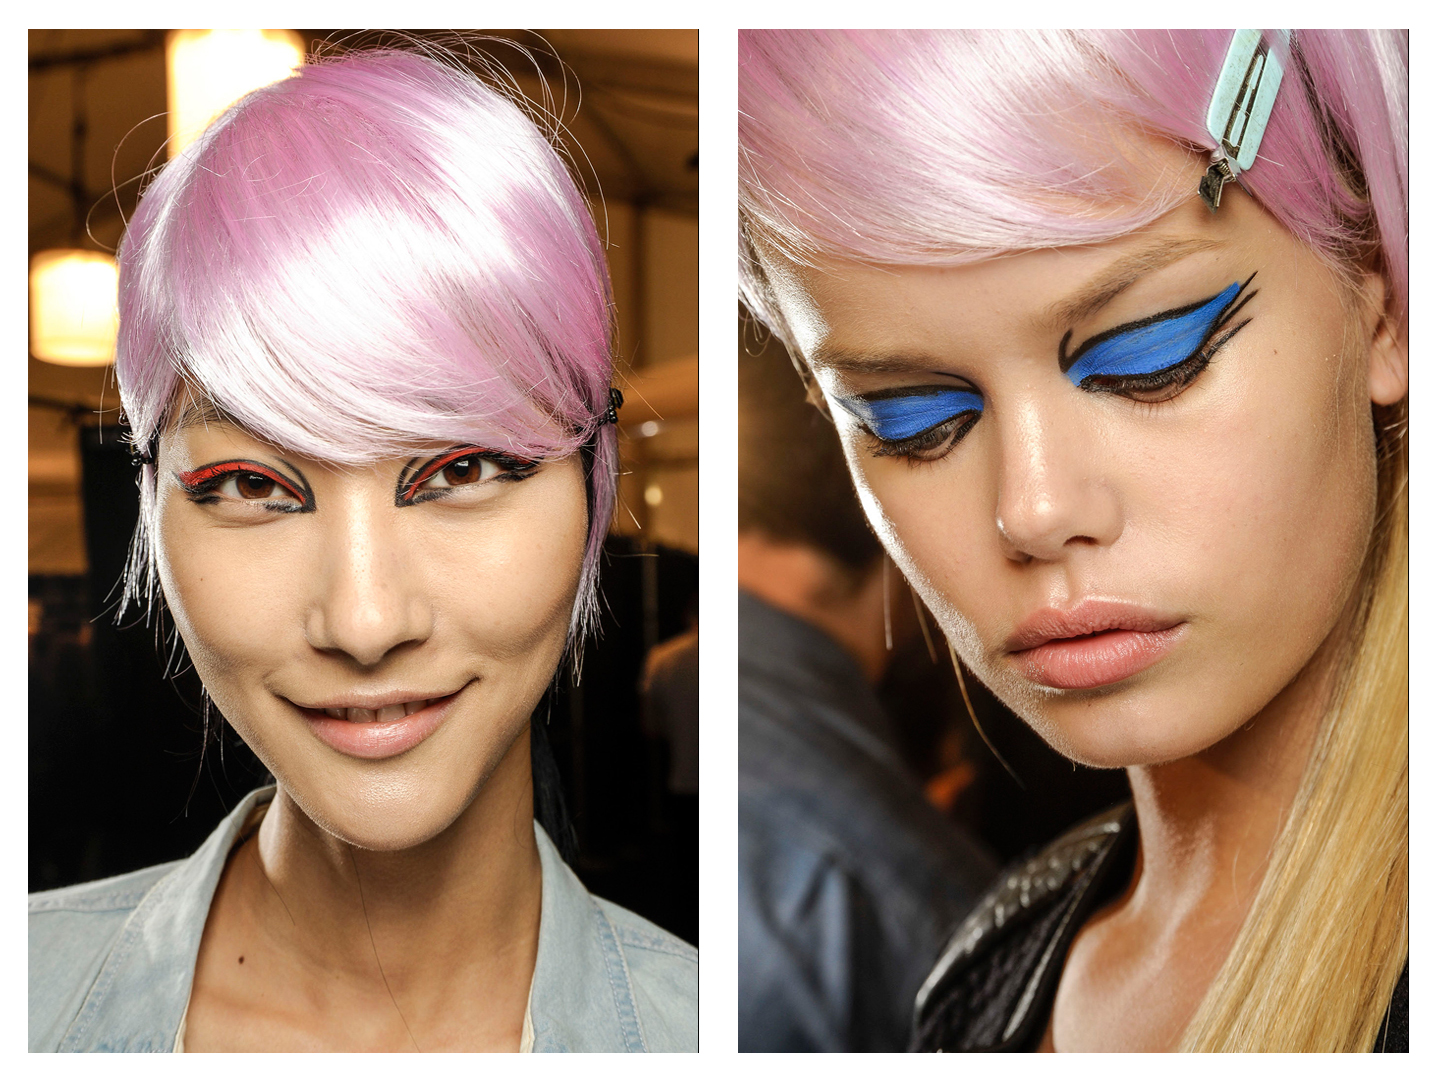
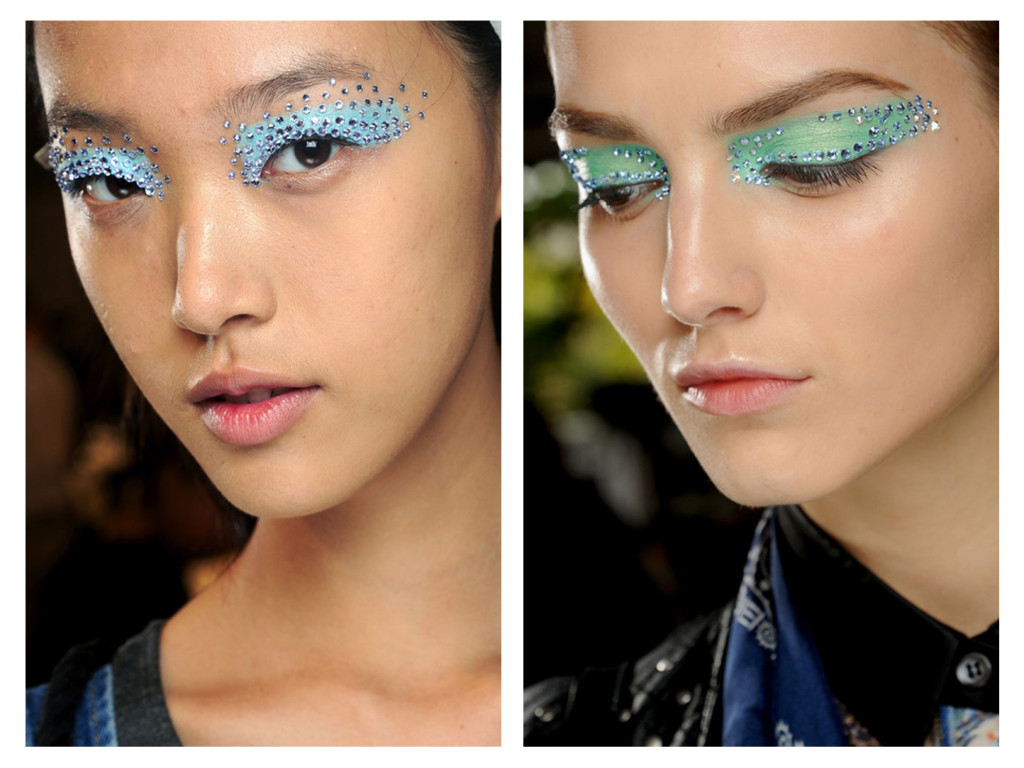
Bright bold colors aren’t going anywhere, and it’s definitely not reserved only to clothings! We’re seeing a punch of cobalt blue, bright pink, seafoam green and mint as seen on Anna Sui, Christian Dior and Jean Paul Gaultier. Bright colors are here to stay! I simply love the use of a bold color with strong liner. Definitely a great look to be paired with muted clothes or if you’d like, wear it with a black headband or even a hat (read: Boy George). Keep in mind that since the eyes are so strong, leave everything else bare. Skin are fresh and dewy with very little blush or contour. Lips are soft and nude in Dior, or if you are bold enough, give red lips a try. Black mascara is a definite must to make your eyes stand out even more.
Christian Dior 2013 Spring RTW 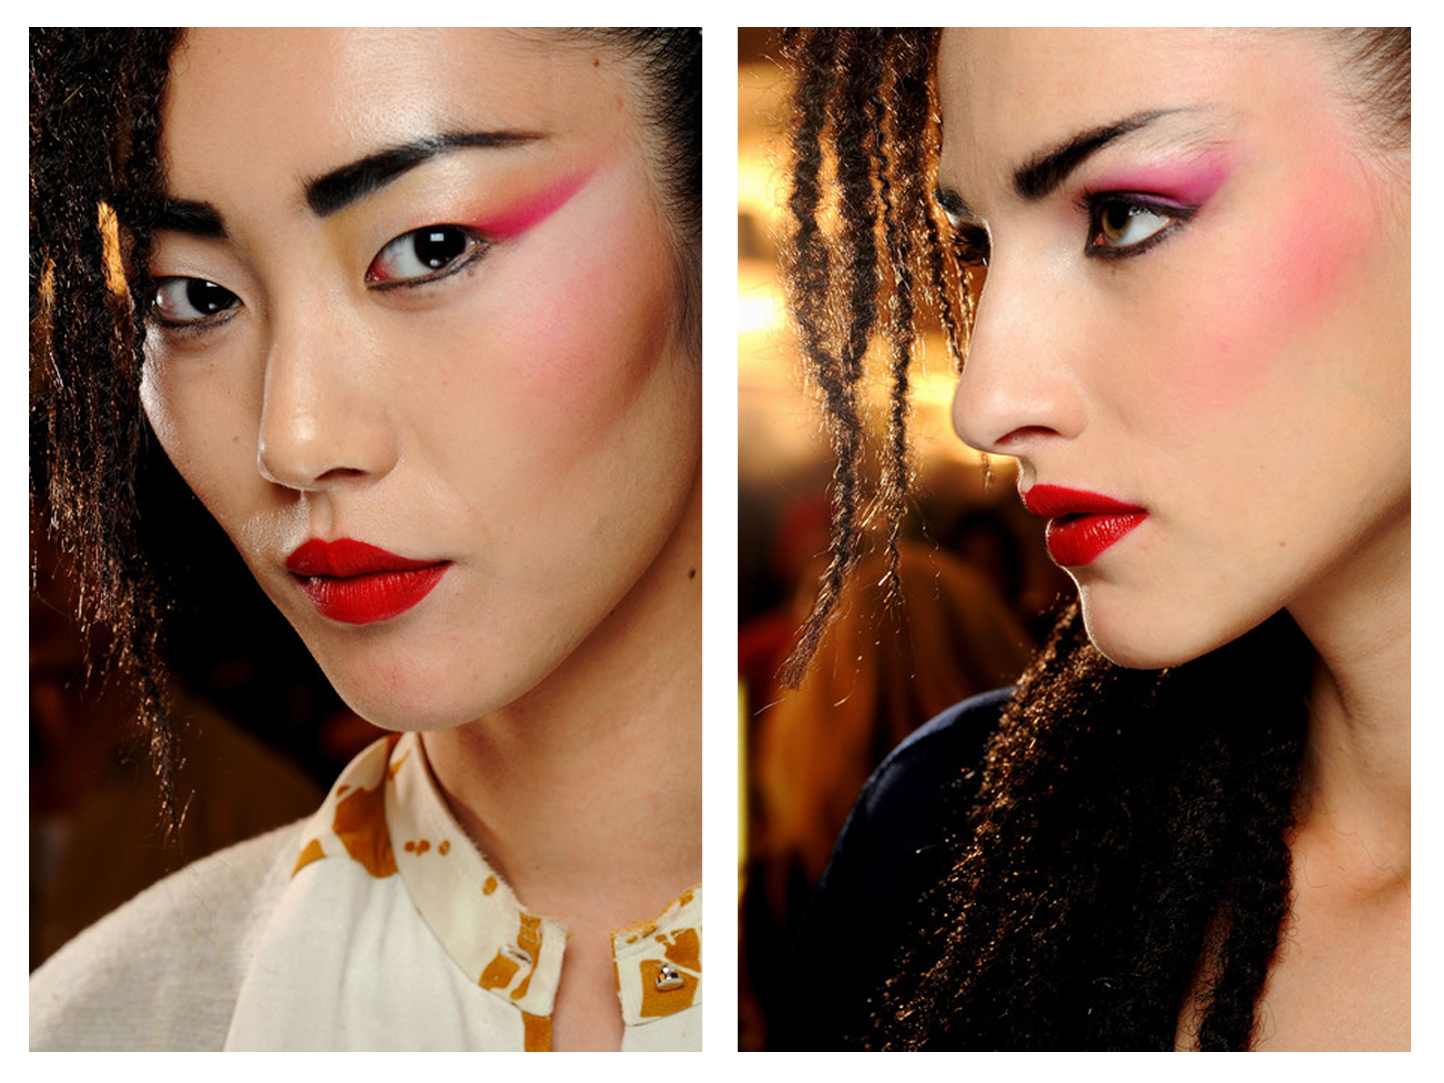
Jean Paul Gaultier 2013 Spring RTW
Of course, if you are afraid to try bright colors, you can definitely give silver eyeshadow a try, as seen on Chanel. Using Chanel Illusion d’Ombre Long-Wear Luminous Eyeshadow, Peter Phillips (creative director for Chanel) layered the cream eyeshadow all over the lid to achieve a high-shine look. The eyes are rimmed with black liner to intensify the look. I recommend this look for everyone! Silver is making a return in a very sophisticated way. Obviously, you don’t have to wear it all the way to the brow bone. Keep it on the lid, buffing the color slightly just over the crease. Paired it with a shiny, peach lips (blot excess gloss) and a nude blush.

If silver isn’t your thing, you can always change it to a more muted color like sandy-gold eyes seen on Derek Lam. Contour on the cheeks using bronzer to give it a healthy glow, while brows are kept thick and bushy for a sporty look. Very simple and effortless. Tres chic!

Of course, if all the above isn’t working for you, there’s always the usual clean bare face and red lips look. These classic looks never fail! In DVF, the girls are tanned and glowy, in 3.1 Phillip Lim eyelashes are clumpy with bare skin all over and lastly Burberry presented an earthy tone natural look with red lips.
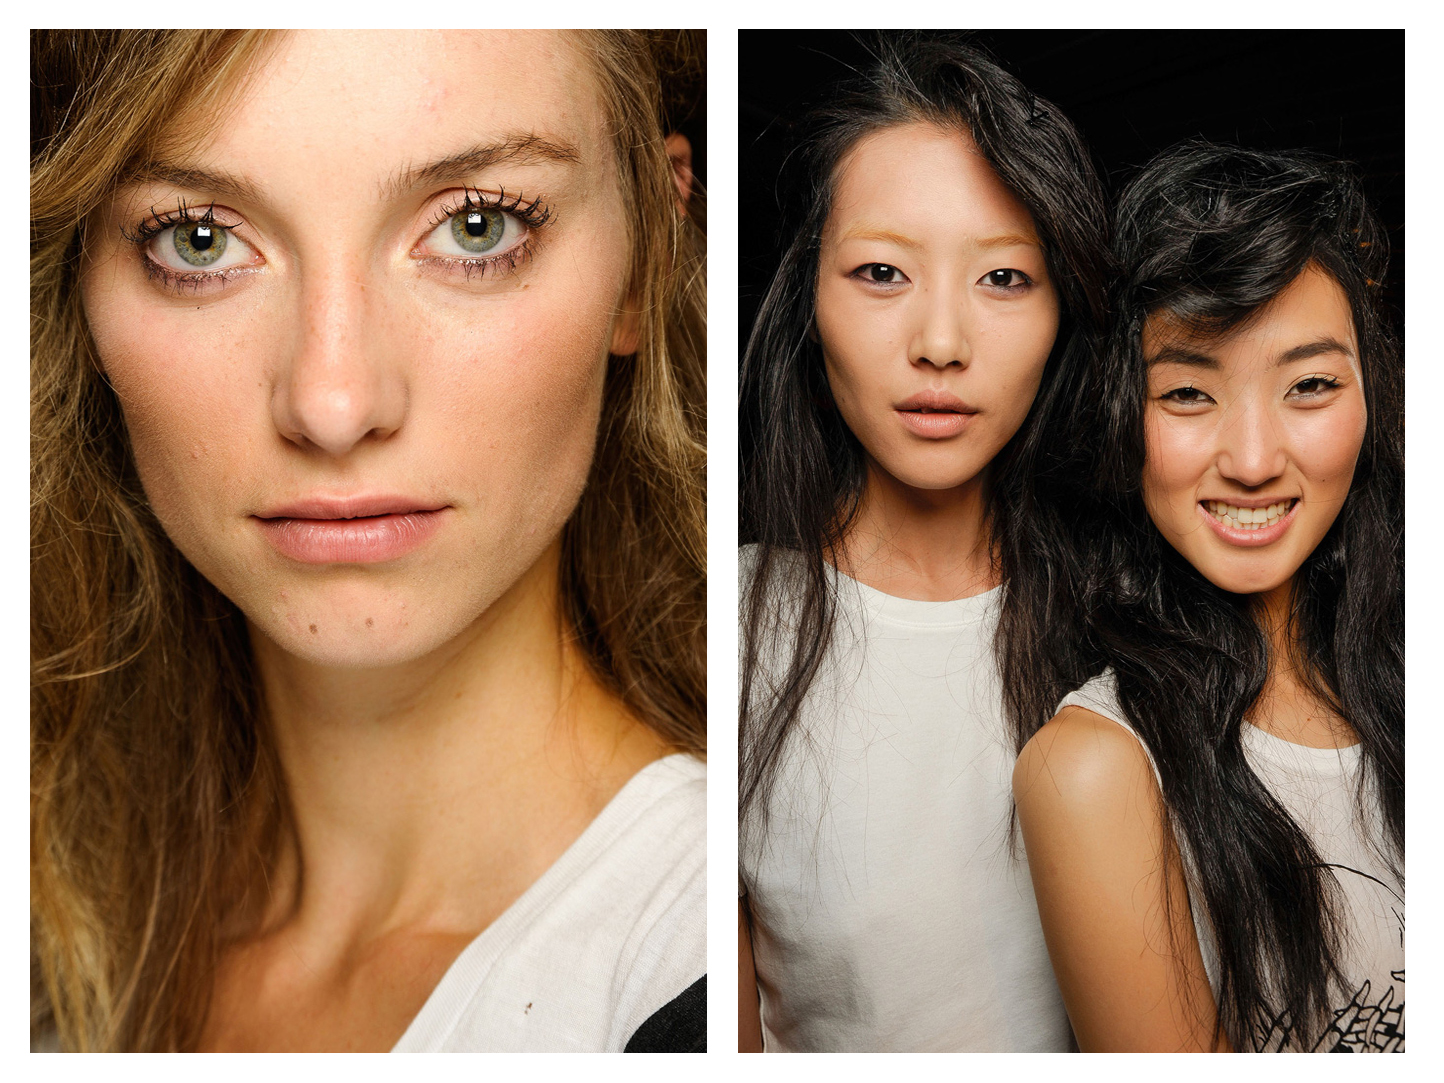
3.1 Phillip Lim 2013 Spring RTW 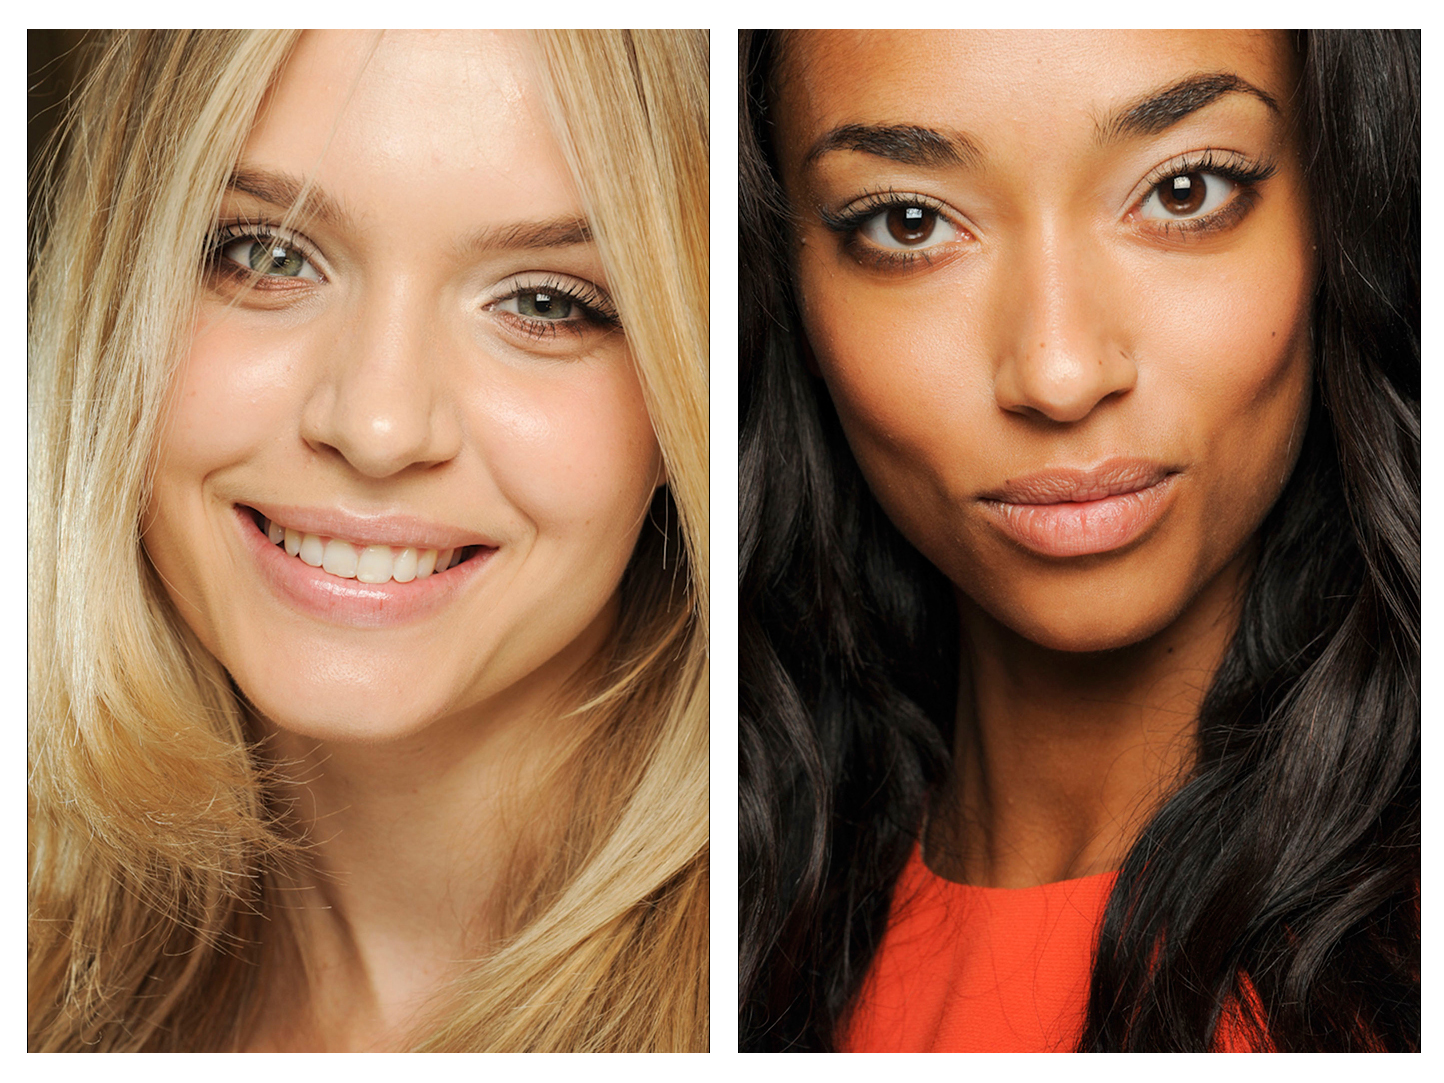
Diane Von Furstensberg 2013 Spring RTW 
Burberry Prorsum 2013 Spring RTW
All images are courtesy of Style.com
Givenchy Bucolic Blossoms
Since I’ve been doing a lot of in-your-face bright colour makeup, I thought it’d be fun to do something bright but softer. I don’t know if you guys know this makeup artist, Lisa Elridge (and a great youtube guru), but I love her..no, I adore her! She’s my inspiration and one of the few REAL makeup artists on youtube. She is amazing! Anyhow, She has done something similar to the tutorial below but on a lighter skin tone, and since I also have the same quad as her (the quad has been sitting at the back of my vanity drawer and hiding) I thought why not re-create the look. I guess for those with darker skin tones, you can try a deeper shades of eyeshadows so it doesn’t look chalky or ashy on your skin tone. I actually quite like how this look turns out, not too bright and still wearable.

How-to:
1. I applied MAC Soft Ochre paint pot all over my lid to prep my eyes with my ring finger.
2. Using a flat eyeshadow brush from Urban Decay, I applied the eyeshadows from the Givenchy Bucolic Blossoms quad: mint green colour on the inner corner of the lid, the pink in the middle and the purple on the outer corner.
3. Using a clean blending brush, I blended the colours towards the crease.
4. I applied the same colour combination on the lower lid using a small angled brush from MAC.
5. To define my eyes a little, I applied the brown from the palette along my upper and lower lash line. I found that the brown isn’t intense enough, and so I applied MAC Brun eyeshadow on top of it.
6. I curled my lashes using Urban Decay eyelash curler and applied Diorshow New Look mascara lightly on upper and lower lashes.
7. I applied MAC Studio fix fluid all over my face using CoverFX foundation brush 160.
8. I applied Benefit Coralista blush on the cheeks and completed the look by applying Tarte Lipsurgence in Enchanted.


Maybelline 24-hour Colour Tattoo
By now, most of you should already know my love for Maybelline 24-hour Colour Tattoo cream gel shadow here and here. Little did you know, I actually bought 2 colours from this collection. I had to do this tutorial. This colour combination is beautiful and so simple! The cream shadows blend so easily together and they are smudge-proof, water-proof and rub-proof. The pigment pay-off is amazing! So, go grab some if you don’t have them yet!

How-to:
1. I applied MAC Face and Body foundation all over my face using Sigma Round Kabuki brush.
2. I concealed my under eyes circles using MAC Select Moisture cover and Sigma Precision Flat brush.
3. I applied Maybelline Edgy Emerald using a flat eyeshadow brush on the inner half of my lid.
4. Next, I applied Maybelline Tenacious Teal using a clean flat eyeshadow brush on the outer half. Using the same brush, I blended whatever is on the brush to the crease.
5. To ensure that there is no harsh line to separate the 2 shadows, I used my ring finger and tapped the center of my lid to make sure everything is blended properly.
6. If you feel that you need more intensity or colour, add more shadow.
7. I lined my waterline using Urban Decay 24-7 Glide on pencil liner in Perversion.
8. I applied Benefit Hervana blush and Chanle lipgloss in 165 to complete the look.
